
“Hold on, did you just say ‘easy dessert’? That’s the magic of these Red Velvet Cake Balls! Picture this: you’re stirring up a rich, velvety batter, folding in sweet cream cheese frosting, and soon you’ll transform it into delightful bites that everyone will adore. These easy-to-make treats are not only a crowd-pleaser, but they also allow you to share your creativity, whether it’s at a celebration or a cozy gathering at home. Plus, with gluten-free variations available, everyone can indulge without worry. Are you ready to take a simple yet mouthwatering adventure in your kitchen?”
Why are Red Velvet Cake Balls a must-try?
Irresistible, these Red Velvet Cake Balls magically combine moist cake and creamy frosting, dipped in rich chocolate—a certain way to win over hearts at any occasion! Versatile, not only can you experiment with flavors like chocolate or vanilla, but gluten-free adaptations mean everyone can join in on the fun. Quick and easy, you’ll whip up these treats in no time, making them perfect for unexpected guests or last-minute celebrations. Delightful bites that are fun to decorate, they add a personal touch to your gatherings. Whether it’s a festive event or just a cozy night in, these cake balls are bound to steal the spotlight, just like our Oreo Balls Decadent or Chocolate Zucchini Cake.
Red Velvet Cake Balls Ingredients
• Delightfully simple ingredients for a scrumptious treat!
For the Cake Balls
- Red velvet cake mix – The base that brings rich flavor and a vibrant color; feel free to substitute with a chocolate or vanilla cake mix for a unique twist.
- Cream cheese frosting – This classic frosting adds both sweetness and moisture; any frosting can work, but cream cheese perfectly complements the red velvet.
For Coating
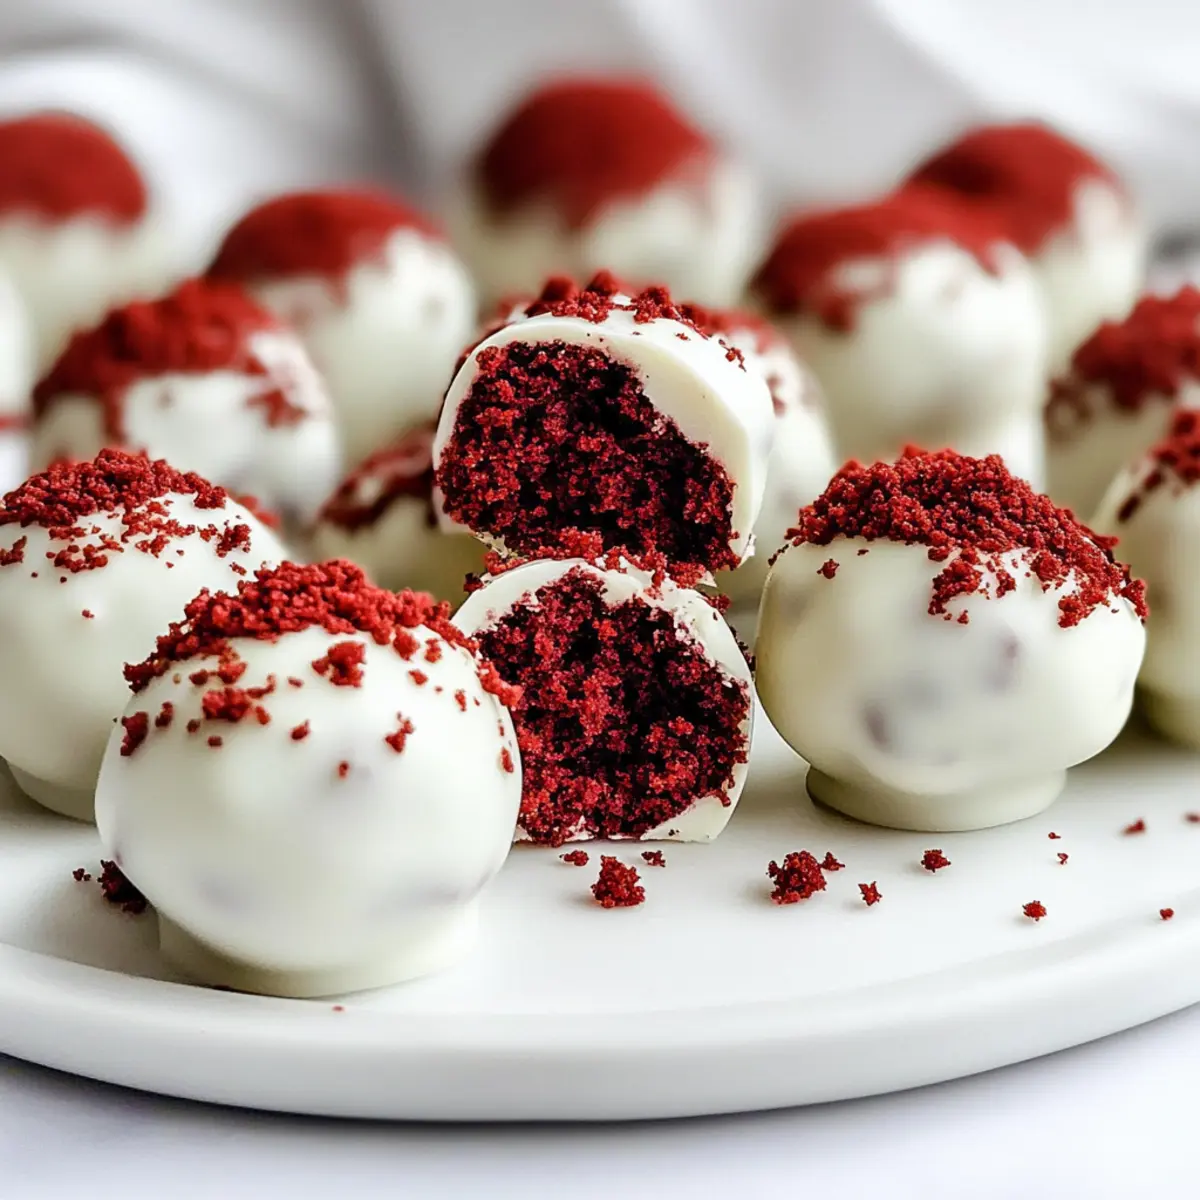
- White candy melts – These provide a smooth and sweet finish to your cake balls; if you prefer, you can use dark or milk chocolate instead.
Optional Toppings
- Reserved red velvet crumbs – Adds a pop of color and a fun texture; save some of your crumbled cake for this garnish!
- Nuts or sprinkles – Perfect for adding a little extra flair; ensure to sprinkle them on immediately after coating while the chocolate is still wet.
These Red Velvet Cake Balls are just waiting for your creative touch! Enjoy your baking adventure!
Step‑by‑Step Instructions for Irresistible Red Velvet Cake Balls
Step 1: Prepare the Cake Mix
Preheat your oven to 350°F (175°C). In a large mixing bowl, combine the red velvet cake mix, water, vegetable oil, and eggs. Whisk until well blended, with a smooth and thick batter resembling a deep crimson color. Make sure there are no lumps, then you'll be ready to bake a cake that will serve as the foundation for your Red Velvet Cake Balls.
Step 2: Bake the Cake
Pour the vibrant batter into a greased 8x8 inch baking dish, spreading it evenly. Bake in your preheated oven for about 20 minutes, or until a toothpick inserted in the center comes out clean. As it bakes, enjoy the wonderful aroma of baking cake filling your kitchen. Once baked, remove the dish from the oven and allow the cake to cool completely on a wire rack.
Step 3: Crumble the Cake
Once the cake has cooled down to room temperature, crumble it into fine pieces in a large mixing bowl. Use your hands or a fork to break it apart, creating a fluffy texture. Reserve about ⅓ cup of crumbs for decoration later. This crumbled cake is essential for forming the rich and delicious base of your Red Velvet Cake Balls.
Step 4: Mix with Frosting
Add the cream cheese frosting to the crumbled cake mixture. Mix well, combining the two until fully incorporated and resembling a dough-like consistency. Cover the bowl with plastic wrap and chill in the freezer for approximately 30 minutes. This step ensures it's easier to shape into delightful balls.
Step 5: Form the Cake Balls
Using a cookie scoop, portion out the mixture and roll it into ping pong-sized balls with your hands. Place each ball on a large baking sheet lined with parchment paper. Try to make them uniform in size for a beautiful presentation. Once you've shaped all the balls, freeze them again until solid, which should take about 1 hour.
Step 6: Melt the Candy Coating
While the cake balls chill, melt the white candy melts. You can do this in the microwave by heating in short intervals, stirring in between, until smooth. Alternatively, use a double boiler. This melted candy coating will provide a sweet and glossy layer for your Red Velvet Cake Balls, enhancing their visual appeal.
Step 7: Coat the Cake Balls
Remove the chilled cake balls from the freezer. Using a fork, dip each cake ball into the melted chocolate, ensuring they're fully coated. Allow any excess chocolate to drip off back into the bowl. Then, place each coated cake ball back onto your lined baking sheet and sprinkle with the reserved red velvet crumbs for that festive touch.
Step 8: Let Set and Serve
Finally, let the chocolate coating set at room temperature. This should take about 20-30 minutes. Once set, your Irresistible Red Velvet Cake Balls are ready to be enjoyed! They make for the perfect party treat or sweet indulgence to share with friends and family.

How to Store and Freeze Red Velvet Cake Balls
Fridge: Store your Red Velvet Cake Balls in an airtight container for up to a week. This keeps them fresh and ready to indulge at any moment!
Freezer: For longer storage, freeze the cake balls in a single layer on a baking sheet, then transfer to a freezer-safe container. They can last for up to three months.
Thawing: When ready to enjoy, simply thaw the cake balls in the refrigerator overnight. This ensures they are deliciously soft and perfect for sharing!
Reheating: If you prefer them warm, microwave a cake ball for 10-15 seconds—just enough to soften the chocolate without melting it completely!
Make Ahead Options
These Red Velvet Cake Balls are fantastic for meal prep, allowing you to enjoy sweet treats whenever cravings strike! You can prepare the cake mix and bake the cake up to 24 hours in advance; simply let it cool completely before crumbling. Additionally, once you mix the crumbled cake with cream cheese frosting and form the balls, you can freeze them for up to 3 months. To maintain their delicious quality, keep them in an airtight container in the freezer. When you're ready to enjoy, dip the frozen cake balls in melted candy melts and let them set at room temperature; they’ll taste just as fresh and delightful as when they were made!
Red Velvet Cake Balls Variations & Substitutions
Feel free to unleash your creativity with these Red Velvet Cake Balls, transforming them into something truly extraordinary!
- Gluten-Free: Substitute the red velvet cake mix with a gluten-free cake mix, so everyone can indulge delightfully!
- Chocolate Lovers: Use chocolate cake mix instead of red velvet for a rich, chocolaty twist that pleases every chocolate lover around.
- Vanilla Dream: Swap in a vanilla cake mix for a lighter, more delicate flavor that pairs beautifully with cream cheese frosting.
- Nutty Crunch: For added texture, fold in chopped nuts like walnuts or pecans into the cake mixture for a delightful crunch in every bite.
- Fruity Surprise: Incorporate some crushed pineapple or raspberry puree into the frosting for an unexpected fruity hint that brightens up the flavors.
- Festive Sprinkles: Decorate with themed sprinkles for holidays or birthdays, adding a splash of color and fun to your cake balls.
- Dairy-Free: Substitute cream cheese frosting with a dairy-free alternative, ensuring everyone at the table can enjoy these sweet bites!
- Spicy Kick: Mix in a pinch of cinnamon or cayenne pepper to the cake mixture for a warm, spicy surprise that elevates the flavor profile.
These ideas can make your next gathering shine even brighter. If you're also looking for something equally delightful, check out these Red Velvet Strawberry delights or our comforting Roasted Red Pepper Soup. Enjoy your sweet adventures!
What to Serve with Irresistible Red Velvet Cake Balls
These delightful treats are perfect for sharing, and pairing them with the right accompaniments can elevate your dessert experience.
- Creamy Vanilla Ice Cream: A scoop of vanilla ice cream adds a cool, creamy contrast to the rich flavors of the cake balls.
- Fresh Berries Medley: Bright, tart berries like strawberries and raspberries brighten the palate and provide a refreshing counterbalance.
- Chocolate Ganache Drizzle: A silky ganache enhances the chocolate coating, adding an extra layer of indulgence that chocolate lovers will adore.
- Sparkling Lemonade: This light and zesty drink cuts through the sweetness, making your dessert feel refreshing and lively.
- Coffee or Espresso: The deep, robust flavors of coffee complement the sweetness of the cake balls—perfect for an afternoon treat.
- Mini Cheesecakes: These rich bites offer a creamy texture and contrast, bringing a different flavor profile while maintaining the party vibes.
- Homemade Whipped Cream: A dollop of fresh whipped cream enhances the richness, making each bite even more decadent and delightful.
- Gluten-Free Cookies: Pairing with gluten-free options allows everyone to indulge while enjoying a variety of textures and flavors.
- Chocolate Milkshake: The creaminess of a chocolate milkshake pairs beautifully with the cake balls, creating a nostalgic and fun dessert combo.
Expert Tips for Red Velvet Cake Balls
-
Chill for Easy Shaping: Make sure the cake mixture is completely cold; it makes rolling into balls much easier and prevents them from falling apart.
-
Avoid Overmixing: When combining the crumbled cake with the cream cheese frosting, mix just until incorporated to keep the texture light and fluffy.
-
Perfect Coating: If your candy melts are getting too thick, heat them again in short bursts. This prevents clumps and ensures a smooth finish for your Red Velvet Cake Balls.
-
Use Parchment Paper: Line your baking sheet with parchment paper. It helps prevent sticking and ensures easy cleanup after making these delicious treats!
-
Decorate Wisely: Add toppings like nuts or sprinkles immediately after coating each cake ball to ensure they adhere well. Don't wait too long!

Red Velvet Cake Balls Recipe FAQs
What cake mix should I use?
You want to use red velvet cake mix for that iconic flavor and color. If you’re up for an experiment, chocolate or vanilla cake mixes also work beautifully as alternatives for a different taste.
How should I store the Red Velvet Cake Balls?
To keep your delightful treats fresh, store them in an airtight container in the refrigerator for up to a week. This way, they're always ready for a sweet craving or surprise guest!
Can I freeze Red Velvet Cake Balls?
Absolutely! To freeze, place the cake balls in a single layer on a baking sheet until solid, then transfer them to a freezer-safe container. They can be kept for up to 3 months. When you’re ready to enjoy them, just thaw in the fridge overnight.
What if my candy melts are too thick for coating?
If the candy melts start to thicken, simply reheat them in the microwave in short 15-20 second intervals, stirring between bursts until they’re nice and smooth. This will give you that perfect coating consistency!
Are there any dietary considerations for these cake balls?
Absolutely! You can opt for gluten-free cake mix to cater to dietary restrictions while ensuring everyone can enjoy a piece. Also, if you have guests with allergies, be mindful of the frosting and chocolate used; there are many allergy-friendly brands available that may work for your needs.

Delicious Red Velvet Cake Balls to Brighten Your Day
Ingredients
Equipment
Method
- Preheat your oven to 350°F (175°C). In a large mixing bowl, combine the red velvet cake mix, water, vegetable oil, and eggs. Whisk until well blended.
- Pour the batter into a greased 8x8 inch baking dish and bake for about 20 minutes.
- Once baked, remove the dish from the oven and allow the cake to cool completely on a wire rack.
- Crumble the cooled cake into fine pieces in a large mixing bowl, reserving about ⅓ cup for decoration.
- Mix the cream cheese frosting into the crumbled cake mixture until fully incorporated and resembling a dough-like consistency. Cover and chill in the freezer for approximately 30 minutes.
- Using a cookie scoop, portion out the mixture and roll it into ping pong-sized balls. Place each ball on a lined baking sheet and freeze for about 1 hour.
- Melt the white candy melts in the microwave, stirring in between, until smooth.
- Dip each chilled cake ball into the melted chocolate, allowing excess to drip off, and sprinkle with reserved crumbs immediately after coating.
- Let the chocolate coating set at room temperature for about 20-30 minutes before serving.


Leave a Reply