
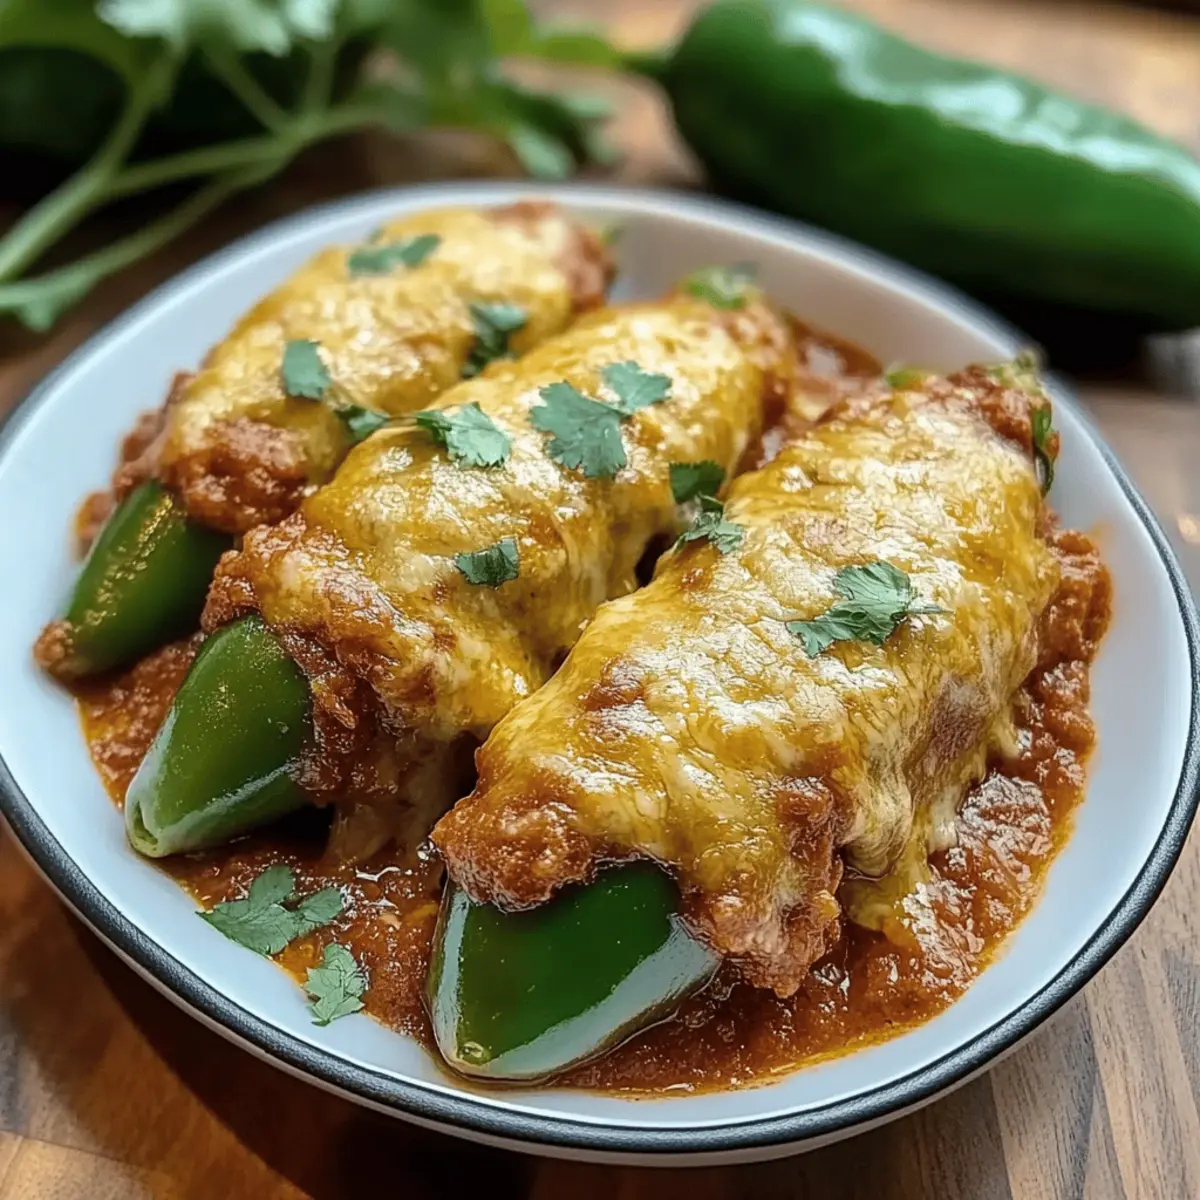
There's a certain thrill that comes with the sizzle of crispy Cheesy Hatch Chile Rellenos hitting hot oil, releasing a fragrance that beckons you to the kitchen. These are not just any stuffed peppers; they’re comfort food at its absolute finest, where smoky roasted chiles cradle gooey, melted cheese in a crispy embrace. What I love most about this recipe is its versatility—it’s perfect for a cozy dinner or an impressive dish to share with friends, allowing for customizable heat levels to suit any palate. You can even adapt it to be vegetarian-friendly, ensuring everyone at the table can dig in. Trust me, once you take that first bite of crunchy goodness paired with hearty sauce, you’ll want to keep this recipe on rotation. Ready to explore how to make these delightful chiles that will surely impress? Let’s dive in!

Why are Hatch Chile Rellenos amazing?
Comforting Crunch: The crispy outer layer paired with the creamy cheese filling is a flavor experience you won't forget.
Customizable Heat: Adjust the spice to match your taste buds—add jalapeños for a kick or keep it mild for a family-friendly version.
Vegetarian-Friendly: Enjoy this dish without meat by simply focusing on the delightful flavors of the chiles and cheese.
Perfect for Sharing: Impress your guests with this visually stunning dish that’s perfect for gatherings—think warm tortillas and Cheesy Garlic Chicken on the side!
Quick & Easy: Ready to savor in no time, these chiles are a fantastic way to elevate a weeknight dinner!
Cheesy Hatch Chile Rellenos Ingredients
For the Chiles
- Hatch Green Chiles – The star of the show! Opt for firm chiles; poblano peppers can work in a pinch.
- Oaxaca Cheese – A melty, gooey must-have; try Monterey Jack as a substitute for a similar taste.
For the Batter
- Eggs (6, separated) – Use room temperature egg whites for a fluffy batter, while yolks enrich the flavor.
- All-Purpose Flour (⅔ cup) – Helps the batter stick to the chiles; swap for gluten-free flour if needed.
- Salt (1 tsp) and Garlic Powder (1 tsp) – Elevate the batter's flavor; feel free to adjust spices to your liking for these Cheesy Hatch Chile Rellenos.
For Frying
- Vegetable Oil – Heat it to 350°F for the perfect crunchy exterior; fry in small batches for optimum results.
For the Sauce
- Tomatoes (5 medium) – The base of your fresh sauce; consider roasting them for added flavor.
- White Onion (1 small) – Adds a subtle sweetness to the sauce.
- Garlic Cloves (5) – Essential for that rich depth of flavor.
- Chopped Cilantro (2 tbsp) – Brightens the sauce, though it can be omitted if herbs aren’t your thing.
- Salt (1 teaspoon for sauce) – Adjust this to enhance flavor depending on your taste preferences.
- Jalapeños (¼ cup sliced, optional) – Add some heat; reduce or leave out for those who prefer it milder.
Step‑by‑Step Instructions for Cheesy Hatch Chile Rellenos
Step 1: Roast Chiles
Start by preheating your broiler to high. Arrange the hatch green chiles on a baking sheet and broil them for about 10–20 minutes, turning occasionally, until their skins are blistered and charred. This roasting process gives the chiles a smoky flavor. Once done, place the chiles in a plastic bag to steam for 10 minutes, which will make peeling easier.
Step 2: Prep Chiles
Once the chiles have cooled down, carefully peel off the charred skins. Slice each chile open lengthwise and remove the seeds, being gentle not to tear the flesh. Now, stuff each chile generously with Oaxaca cheese, making sure they are filled but not overstuffed to avoid bursting during frying. Secure the openings with toothpicks to keep the cheese inside.
Step 3: Make Batter
In a large mixing bowl, separate the egg whites from the yolks. Using a hand mixer, beat the egg whites until stiff peaks form—this provides the lightness needed for the batter. Gradually fold in the egg yolks, being careful to maintain the volume, creating a light and fluffy batter that is perfect for coating your Cheesy Hatch Chile Rellenos.
Step 4: Prepare Coating
In a separate bowl, combine the all-purpose flour, salt, and garlic powder. This mixture will create a dry coating that helps the batter adhere to the chiles. Dredge each stuffed chile in the flour mixture until evenly coated, shaking off any excess flour before dipping them into the prepared egg batter.
Step 5: Fry Chiles
Heat vegetable oil in a deep skillet or frying pan to 350°F. When the oil is hot, carefully add the coated chiles in small batches. Fry them for 2–3 minutes on each side, or until they achieve a golden-brown color and crispy texture. Be sure not to overcrowd the pan to maintain consistent oil temperature for the best results.
Step 6: Make Sauce
While the chiles are frying, prepare the sauce. In a blender, combine the tomatoes, chopped white onion, garlic cloves, cilantro, and salt. Blend until smooth, then pour the mixture into a saucepan and heat over medium until it comes to a gentle simmer, around 5–7 minutes. This fresh sauce will complement your Cheesy Hatch Chile Rellenos beautifully.
Step 7: Serve
Once the chiles are fried to golden perfection, remove them from the oil and drain on paper towels. Serve the hot, crunchy Cheesy Hatch Chile Rellenos on a platter with the fresh tomato sauce on the side. This vibrant presentation will make for a delightful meal that friends and family will love!

Cheesy Hatch Chile Rellenos Variations
Feel free to explore these delightful variations and make this recipe perfectly yours!
-
Milder Peppers: Substitute Hatch chiles with poblano or bell peppers for a sweeter, milder flavor. These alternatives will still provide a satisfying roasting experience.
-
Cheese Swap: Use Monterey Jack or Fontina cheese for a twist on the classic Oaxaca flavor. Both options melt beautifully and add their unique touch to each bite.
-
Gluten-Free Batter: Replace all-purpose flour with a gluten-free flour blend. The batter will still be light and crispy, ensuring everyone can enjoy these delicious chiles.
-
Vegan Option: Substitute eggs with aquafaba (chickpea brine) and replace cheese with a dairy-free alternative. Your plant-based friends will appreciate this creative twist!
-
Extra Spice: Add diced jalapeños into the cheese filling or in the tomato sauce for an extra kick of heat. You can adjust the amount according to your spice tolerance.
-
Herb-Infused Sauce: Elevate your sauce by mixing in fresh herbs like basil or oregano. This will bring a burst of freshness that pairs splendidly with the chiles, enhancing every bite.
-
Roasted Sauce: For deeper flavor, roast the tomatoes and onions before blending them into a sauce. This simple step adds an irresistible smokiness that complements the chiles perfectly.
-
Serve with Salsa: Pair your Cheesy Hatch Chile Rellenos with a side of fresh salsa or creamy guacamole for added texture and flavor. Enjoy with Mexican rice and Cheesy Beef Potato for a complete meal!
Expert Tips for Cheesy Hatch Chile Rellenos
-
Roasting Technique: Ensure chiles are fully charred for easy peeling. If they're not roasted well, skins will stick, making it hard to handle.
-
Stuffing Carefully: Don’t overstuff the chiles; it might cause them to burst during frying. Aim for a pleasant balance of cheese without excess.
-
Frying Temperature: Maintain the oil at a consistent 350°F. Too hot will burn them, while too cool will make them soggy. Fry in small batches for best results.
-
Batter Consistency: When folding in egg yolks, be gentle to preserve the airiness from the whipped egg whites—this is essential for the perfect texture in your Cheesy Hatch Chile Rellenos.
-
Sauce Upgrade: For an extra flavor boost, roast the tomatoes and onions before blending, adding depth and smokiness to your sauce.
Make Ahead Options
These Cheesy Hatch Chile Rellenos are fantastic for meal prep! You can roast and stuff the chiles up to 24 hours in advance; simply keep them in the refrigerator in an airtight container to maintain their freshness. The batter can also be prepared ahead by mixing the egg whites and yolks, though it's best to whip the egg whites right before frying for optimum fluffiness. When you're ready to serve, heat the oil and coat your stuffed chiles in flour and batter—fry them until golden brown for that signature crunch. Trust me, you'll love how this make-ahead strategy saves time on busy weeknights without sacrificing flavor!
Storage Tips for Cheesy Hatch Chile Rellenos
-
Refrigerate: Store leftover Cheesy Hatch Chile Rellenos in an airtight container for up to 3 days. Place a paper towel inside to absorb moisture and keep them fresh.
-
Freeze: Assemble the chiles but do not cook them; freeze individually on a baking sheet before transferring to a freezer bag. They can be stored for up to 2 months. Fry from frozen, adding a few extra minutes to cooking time.
-
Reheat: When ready to enjoy, for the best crispy texture, reheat in a 350°F oven for 10-15 minutes. Avoid using a microwave to maintain that delightful crunch!
What to Serve with Crispy Cheesy Hatch Chile Rellenos
There's nothing quite like creating an inviting dining experience, where every bite is paired with the perfect accompaniment.
-
Warm Flour Tortillas: Soft and pliable, these tortillas are perfect for scooping up every last bit of the cheesy goodness and sauce.
-
Mexican Rice: Fluffy, seasoned rice adds a comforting base, perfectly balancing the spicy and creamy elements of the chiles.
-
Refried Beans: Creamy and rich, refried beans provide a nutritious side that complements the crunchy texture of the chiles. It’s a match made in heaven!
-
Fresh Avocado Salad: Tossed with lime dressing, ripe avocado brings freshness and creaminess, lightening your plate beautifully.
-
Sour Cream: A dollop on top or on the side cuts through the richness of the chiles, adding a cool contrast to every bite.
-
Pico de Gallo: This fresh salsa adds zing and crunch, with its diced tomatoes, onions, and cilantro elevating the overall flavor profile.
-
Margaritas: Pair with a classic lime margarita for a festive touch that complements the zesty flavors of the dish. Cheers to a delightful meal!

Cheesy Hatch Chile Rellenos Recipe FAQs
What kind of chiles should I use for this recipe?
Absolutely! For the best flavor and texture, look for large, firm Hatch green chiles, usually around 4-5 inches long. If you can’t find them, poblano peppers are a great substitute as they have a similar shape and taste, though they tend to be milder.
How should I store leftovers?
Leftover Cheesy Hatch Chile Rellenos can be stored in an airtight container in the refrigerator for up to 3 days. I recommend placing a paper towel inside the container to absorb any moisture, helping to keep your chiles fresh and tasty.
Can I freeze Cheesy Hatch Chile Rellenos?
Absolutely! To freeze, assemble the chiles but do not fry them. Lay the stuffed chiles on a baking sheet in a single layer and freeze them for about 2 hours. Once frozen, transfer the chiles into a freezer bag and they can be stored for up to 2 months. When you're ready to enjoy them, fry directly from the freezer, adding a couple of extra minutes to the cooking time.
What should I do if my batter isn’t fluffy enough?
If your batter isn't fluffy, it’s likely that the egg whites weren't whipped to stiff peaks. Double-check that your mixing bowl and beaters are clean and completely grease-free, as any grease can prevent the whites from whipping properly. For an extra boost, you can add a pinch of cream of tartar before whipping. Always fold in the yolks gently to retain volume.
Are there any dietary considerations to keep in mind?
Yes! If you or your guests have dietary restrictions, this dish is already vegetarian-friendly. If you're concerned about gluten, you can easily substitute the all-purpose flour with a gluten-free version. Additionally, always be cautious with ingredients like jalapeños, which can be too spicy for some; tailor the heat level according to your crowd's preferences.
Cheesy Hatch Chile Rellenos: A Crunchy Comfort Food Treat
Ingredients
Equipment
Method
- Preheat your broiler to high. Arrange chiles on a baking sheet and broil for 10-20 minutes until blistered and charred.
- Place chiles in a plastic bag to steam for 10 minutes to make peeling easier.
- Once cooled, peel off charred skins and slice each chile open to remove seeds, stuffing each with Oaxaca cheese.
- In a bowl, separate egg whites and yolks. Beat egg whites until stiff peaks form and fold in yolks.
- Combine flour, salt, and garlic powder in another bowl. Dredge stuffed chiles in flour before dipping in batter.
- Heat vegetable oil to 350°F. Fry coated chiles in small batches for 2-3 minutes until golden-brown.
- Prepare the sauce by blending tomatoes, onion, garlic, cilantro, and salt. Heat until simmering.
- Remove fried chiles and drain on paper towels. Serve with fresh tomato sauce on the side.


Leave a Reply