
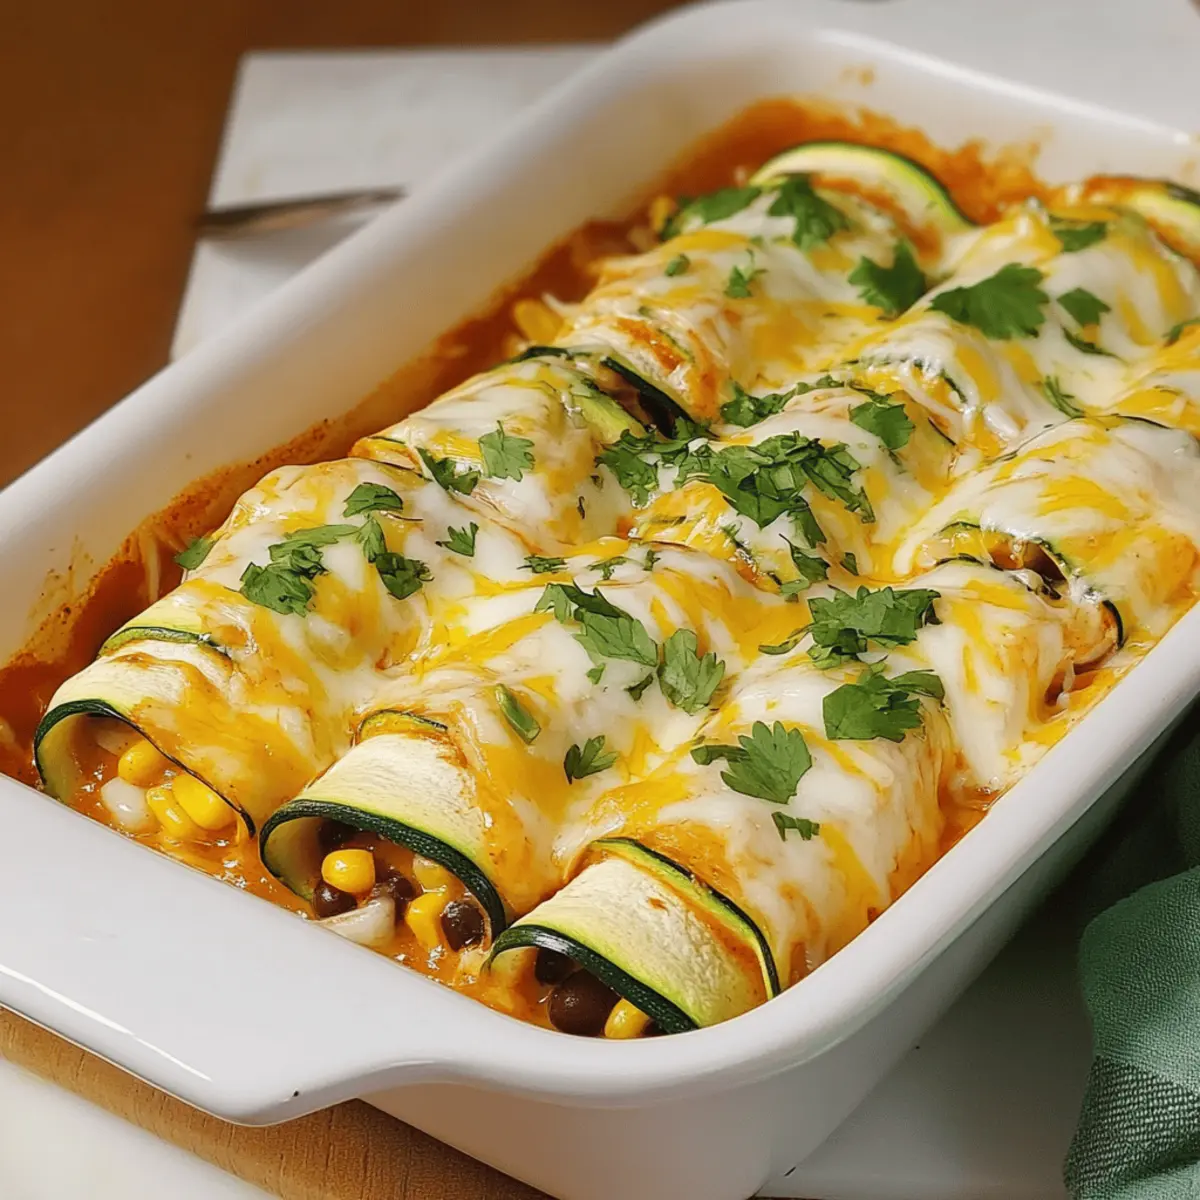
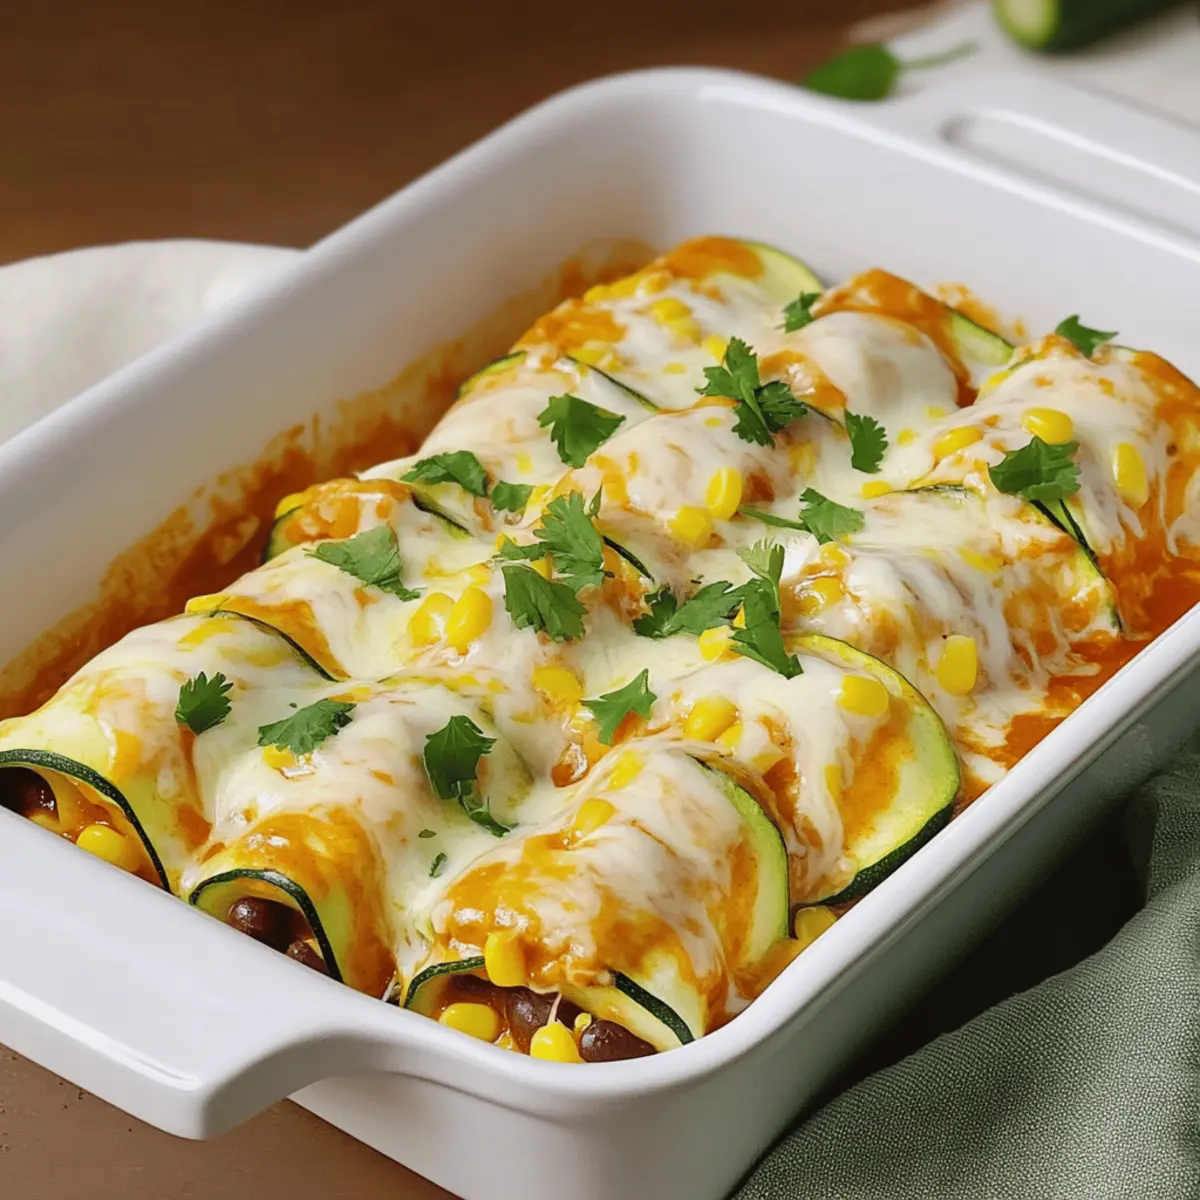
Have you ever stared at a pile of zucchini, wondering how to transform it into a delicious meal? Well, let me introduce you to a delightful solution: Zucchini Enchiladas! This healthy recipe takes the classic Mexican comfort food you love and swaps out the heavy tortillas for tender zucchini, creating a fabulous low-carb, gluten-free alternative that is as satisfying as it is nutritious. Not only are these enchiladas quick to prepare, but they also pack in protein and fiber, making them perfect for family dinners or a quick weeknight feast. With customizable ingredients, you can easily adjust this dish to fit your taste. Are you ready to whip up some culinary magic in your kitchen? Let’s dive in!

Why Love Zucchini Enchiladas?
Healthier Indulgence: These Zucchini Enchiladas offer a guilt-free twist on your favorite Mexican dish, slashing carbs without sacrificing flavor.
Quick & Easy: Meal prep is a breeze with a simple assembly process that gets dinner on the table fast.
Customizable: Tailor the flavors to suit your mood—substitute black beans with turkey or add vibrant veggies like bell peppers or spinach.
Crowd-Pleasing: This hearty dish is sure to impress family and friends, blending comfort food vibes with healthy eating.
Leftover Friendly: Make-ahead options let you prep ahead of time, ensuring you have a delicious meal ready to go. Enjoy with a side of Guacamole for a complete experience!
Zucchini Enchiladas Ingredients
For the Filling
- Black Beans – Rich in protein and fiber, they create a hearty filling that satisfies hunger.
- Corn – Adds a burst of sweetness and texture; feel free to use canned or frozen for convenience.
- Cumin – Infuses the filling with warm, earthy tones; taco seasoning works well as a quick substitute.
- Chili Powder – The key to a pop of flavor; choose mild or spicy according to your spice preference.
- Garlic Powder – Elevates the taste; fresh minced garlic can be swapped in, with a ½ teaspoon of powder equating to 1 clove fresh.
- Salt and Pepper – Essential for seasoning; adjust according to your taste, especially if using pre-seasoned ingredients.
- Shredded Cheese – Provides creaminess; a Mexican blend or cheddar gives the best results, but feel free to explore other options.
For the Zucchini Base
- Zucchini – Thinly sliced to serve as your low-carb tortillas; medium-sized and firm zucchini is ideal for this dish.
For Finishing Touches
- Enchilada Sauce – Ties everything together; ensure it's gluten-free if needed, with either homemade or store-bought options available.
- Cilantro – Adds a refreshing garnish; it's optional if cilantro isn't your favorite.
Step‑by‑Step Instructions for Zucchini Enchiladas
Step 1: Preheat the Oven
Begin by preheating your oven to 375°F (190°C). This temperature ensures even cooking and helps to achieve a bubbly and golden cheese topping on your Zucchini Enchiladas. While the oven heats, gather your ingredients and prepare your workspace for a smooth cooking process.
Step 2: Prepare the Filling
In a large mixing bowl, combine your black beans, corn, cumin, chili powder, garlic powder, salt, and pepper. Mix these ingredients thoroughly until well blended, creating a flavorful filling bursting with protein and fiber. Don’t forget to reserve half of your shredded cheese to sprinkle on top later!
Step 3: Slice the Zucchini
Using a sharp knife, slice the zucchini lengthwise into thin strips, about ¼ inch thick, resembling tortillas. A mandoline slicer can help achieve even slices if you have one. This step is crucial for creating the low-carb base of your enchiladas; aim for uniform thickness to ensure even cooking.
Step 4: Assemble the Enchiladas
Take a zucchini strip, place about two tablespoons of the prepared filling at one end, and roll it up tightly. Continue this process with the remaining strips, placing each rolled enchilada seam-side down in a greased baking dish. This assembly will create delightful Zucchini Enchiladas ready for the oven.
Step 5: Add Sauce and Cheese
Once all the zucchini rolls are in the baking dish, pour enchilada sauce evenly over the top. Make sure the sauce covers all the rolls to keep them moist while baking. Lastly, sprinkle the remaining shredded cheese over the sauce for that irresistible cheesy layer that will melt beautifully.
Step 6: Bake to Perfection
Place your assembled Zucchini Enchiladas in the preheated oven and bake for 30 minutes. Look for the cheese to become bubbly and golden brown as it cooks. This step ensures that the enchiladas are heated through, and the flavors meld beautifully.
Step 7: Garnish and Serve
Once baked, remove the dish from the oven and let it cool slightly before serving. For a fresh touch, garnish your Zucchini Enchiladas with chopped cilantro. This final step adds a burst of color and brightness to your dish, enhancing the overall experience.
What to Serve with Zucchini Enchiladas?
A delightful meal deserves a few thoughtful accompaniments to elevate it further!
- Creamy Guacamole: This classic dip brings a cool, creamy texture, perfectly balancing the warmth of the enchiladas.
- Mexican Rice: Fluffy rice flavored with spices complements the savory enchiladas, adding a hearty side to your plate.
- Fresh Tomato Salsa: The zesty freshness of salsa cuts through the richness of the cheese, providing a refreshing contrast.
- Refried Beans: Rich and creamy, refried beans add a comforting touch and pack in more protein, enhancing the meal's heartiness.
- Crisp Green Salad: A light salad topped with citrus dressing offers a bright crunch, giving a refreshing counterpoint to the warm enchiladas.
To round out the meal, consider serving a margarita or iced tea to keep things festive and cool on the side!
Make Ahead Options
These Zucchini Enchiladas are perfect for busy home cooks looking to save time during hectic weeknights! You can assemble the entire dish and refrigerate it for up to 24 hours before baking. Just prepare the filling and fill the zucchini strips, placing them seam-side down in your baking dish. To maintain quality and prevent excess water, be sure to salt the zucchini and pat it dry before assembly. When you're ready to serve, pour the enchilada sauce over the top, sprinkle with cheese, and bake at 375°F (190°C) for 30 minutes. This way, you’ll enjoy a delicious, stress-free meal that tastes just as fabulous as when made fresh!
How to Store and Freeze Zucchini Enchiladas
Fridge: Store leftover Zucchini Enchiladas in an airtight container for up to 3 days. Reheat in the oven at 350°F (175°C) until heated through, about 15-20 minutes.
Freezer: To freeze, wrap individual enchiladas tightly in plastic wrap and then place them in a freezer-safe bag. They can be frozen for up to 3 months.
Reheating: For best results, thaw in the fridge overnight before reheating. Bake in the oven at 375°F (190°C) until bubbly and warm, about 25-30 minutes.
Make-Ahead: Assemble your enchiladas up to a day in advance, cover them with plastic wrap, and store in the fridge until you’re ready to bake.
Expert Tips for Zucchini Enchiladas
-
Slice Thinly: Ensure zucchini strips are about ¼ inch thick for even cooking and a delightful tortilla-like texture in your Zucchini Enchiladas.
-
Salt to Remove Moisture: Salt the zucchini slices and let them sit for 10 minutes, then pat dry to prevent excess water from pooling while baking.
-
Mix Up the Fillings: Don't hesitate to swap out black beans for lentils or ground turkey to customize the filling, adding your favorite protein for a unique taste.
-
Watch the Baking Time: Keep an eye on your enchiladas in the oven; every oven cooks differently. They’re done when cheese turns bubbly and golden, around 30 minutes.
-
Serve Hot: For the best experience, serve your Zucchini Enchiladas immediately after baking. They’re at their peak in flavor, texture, and comfort!
Zucchini Enchiladas: Add Your Twist!
Feel free to get creative with these delicious Zucchini Enchiladas and make them your own!
- Protein Swap: Replace black beans with lentils or ground turkey for a hearty, protein-packed filling. Feel free to mix things up based on what you have on hand!
- Extra Vegetables: Add nutrient-rich veggies like diced bell peppers or fresh spinach to the filling for added color and flavor. It’s an easy way to sneak in more greens!
- Cheese Variations: Experiment with different cheeses such as queso fresco or Monterey Jack to create unique flavor profiles that suit your taste. Each cheese brings a different character to the dish!
- Spicy Kick: For a heartier kick, fold in diced jalapeños or increase the chili powder for a dish that packs more heat. Your taste buds will thank you!
- Herb Infusion: Enhance flavor by adding fresh herbs like chopped cilantro or parsley to the filling before rolling the enchiladas. The freshness elevates the entire dish!
- Zucchini Tots: If you're in the mood for a snack, try making some Zucchini Tots Veggie on the side for a fun twist!
- Sauce Options: Switch up enchilada sauce with green sauce or a homemade spicy salsa for different taste notes, creating layers of flavor with each bite.
- Preparation Ease: Assemble your Zucchini Enchiladas ahead of time and store them in the fridge before baking, making weeknight dinners a breeze!
With these variations, you’re sure to delight everyone around the table!
Zucchini Enchiladas Recipe FAQs
How do I choose the best zucchini for my enchiladas?
Absolutely! Look for medium-sized, firm zucchini with a vibrant green color and no dark spots. These are indications of freshness and will hold up well when sliced into strips for your Zucchini Enchiladas.
How should I store leftover Zucchini Enchiladas?
After enjoying your meal, you can store leftover Zucchini Enchiladas in an airtight container in the fridge for up to 3 days. When you're ready to indulge again, simply reheat them in the oven at 350°F (175°C) for about 15-20 minutes until warmed through.
Can I freeze Zucchini Enchiladas? If so, how?
Absolutely! Freezing is a fantastic option. To freeze your Zucchini Enchiladas, start by wrapping individual enchiladas tightly in plastic wrap, ensuring no air is trapped. Then, place them in a freezer-safe bag. They can be frozen for up to 3 months. When you're ready to enjoy them, thaw in the fridge overnight before reheating, and bake at 375°F (190°C) for about 25-30 minutes.
What should I do if my zucchini releases too much water during baking?
Very! To avoid excess moisture, I recommend salting your sliced zucchini and letting it sit for 10 minutes before patting them dry. This process draws out any excess water, helping your enchiladas stay nicely intact while baking.
Are there any dietary considerations I should be aware of for Zucchini Enchiladas?
Definitely! These enchiladas are naturally gluten-free and low in carbs, making them suitable for various dietary needs. However, if you're accommodating allergies, check that your enchilada sauce and cheese are free from gluten and dairy as necessary. You can also swap in dairy-free cheese options and use fresh veggies to create a personalized, allergy-friendly dish.
Can I customize the fillings in my Zucchini Enchiladas?
Yes, the more the merrier! You can easily swap black beans for lentils, ground turkey, or even add in extra veggies like bell peppers or spinach for an added nutritional boost. Don’t hesitate to make it your own and adjust the flavors to your preference!

Zucchini Enchiladas: Low-Carb Comfort Food Everyone Craves
Ingredients
Equipment
Method
- Preheat the oven to 375°F (190°C).
- In a large mixing bowl, combine black beans, corn, cumin, chili powder, garlic powder, salt, and pepper.
- Slice the zucchini lengthwise into thin strips, about ¼ inch thick.
- Assemble the enchiladas by rolling the filling in zucchini strips and placing them seam-side down in a greased baking dish.
- Pour enchilada sauce evenly over the top and sprinkle remaining cheese.
- Bake for 30 minutes until cheese is bubbly and golden brown.
- Garnish with chopped cilantro before serving.


Leave a Reply