
As I sat down with a warm cookie in hand, my taste buds delighted in the simple yet satisfying flavors of these 4-Ingredient Gluten-Free Chocolate Oat Cookies. Crafted for those of us who crave a sweet treat without the guilt, this recipe comes together quickly and easily, with minimal mess in the kitchen. Perfect for a cozy afternoon snack or a healthy dessert alternative, these cookies combine nutritious oats and rich chocolate to create a chewy, indulgent bite. Plus, they adapt beautifully to fit various dietary needs—whether you're gluten-free, seeking a healthy dessert, or just want something delicious to enjoy, this recipe is a real winner. Curious about how to whip up this delightful treat? Let’s dive in!

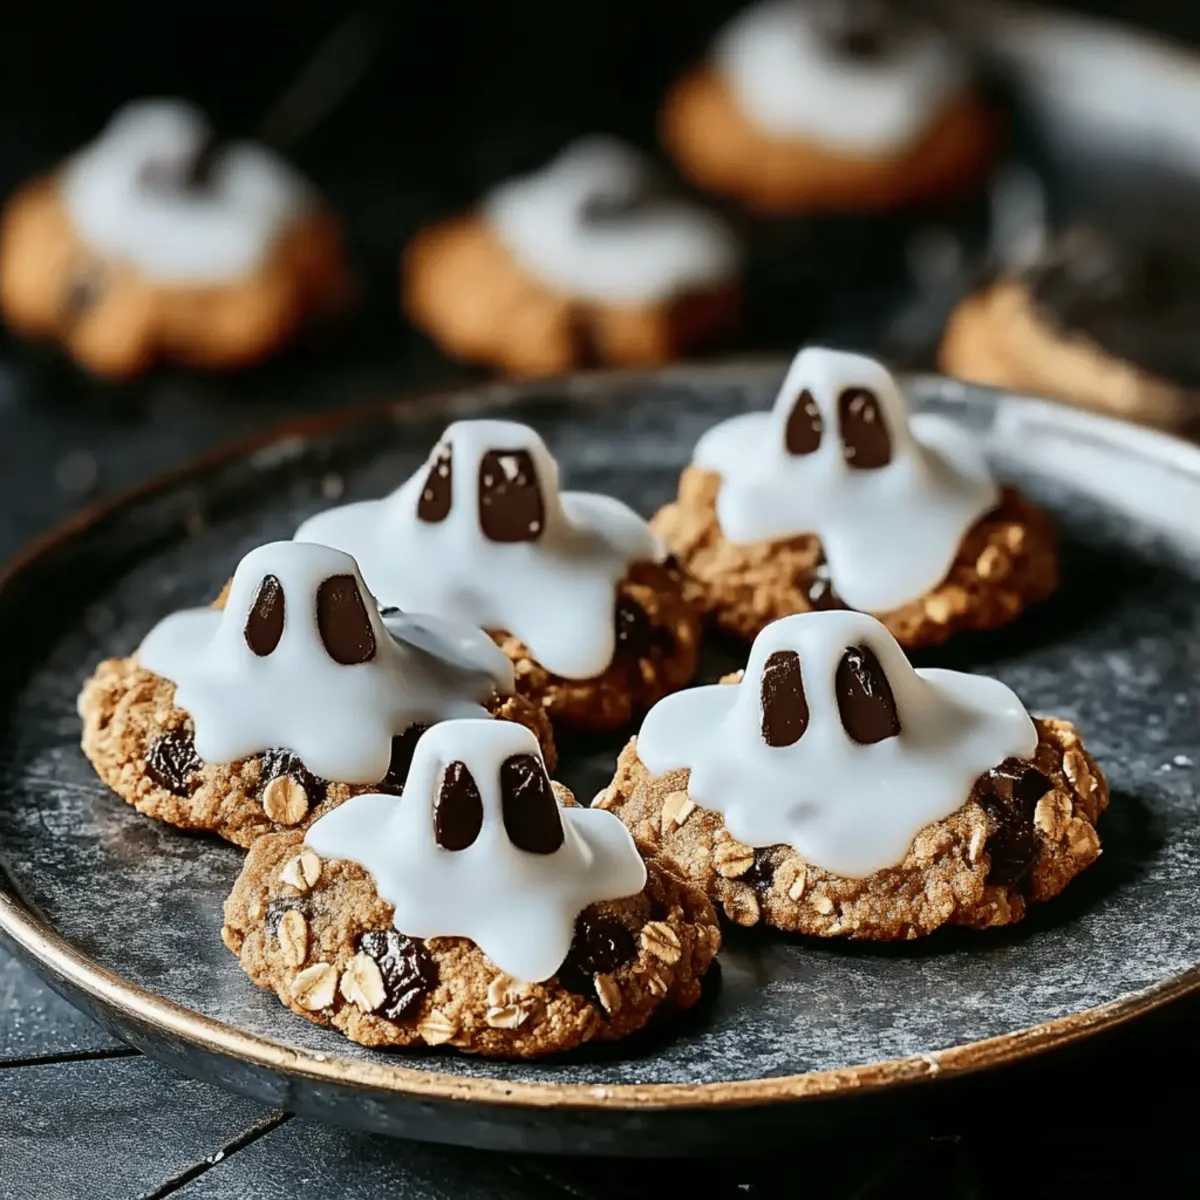
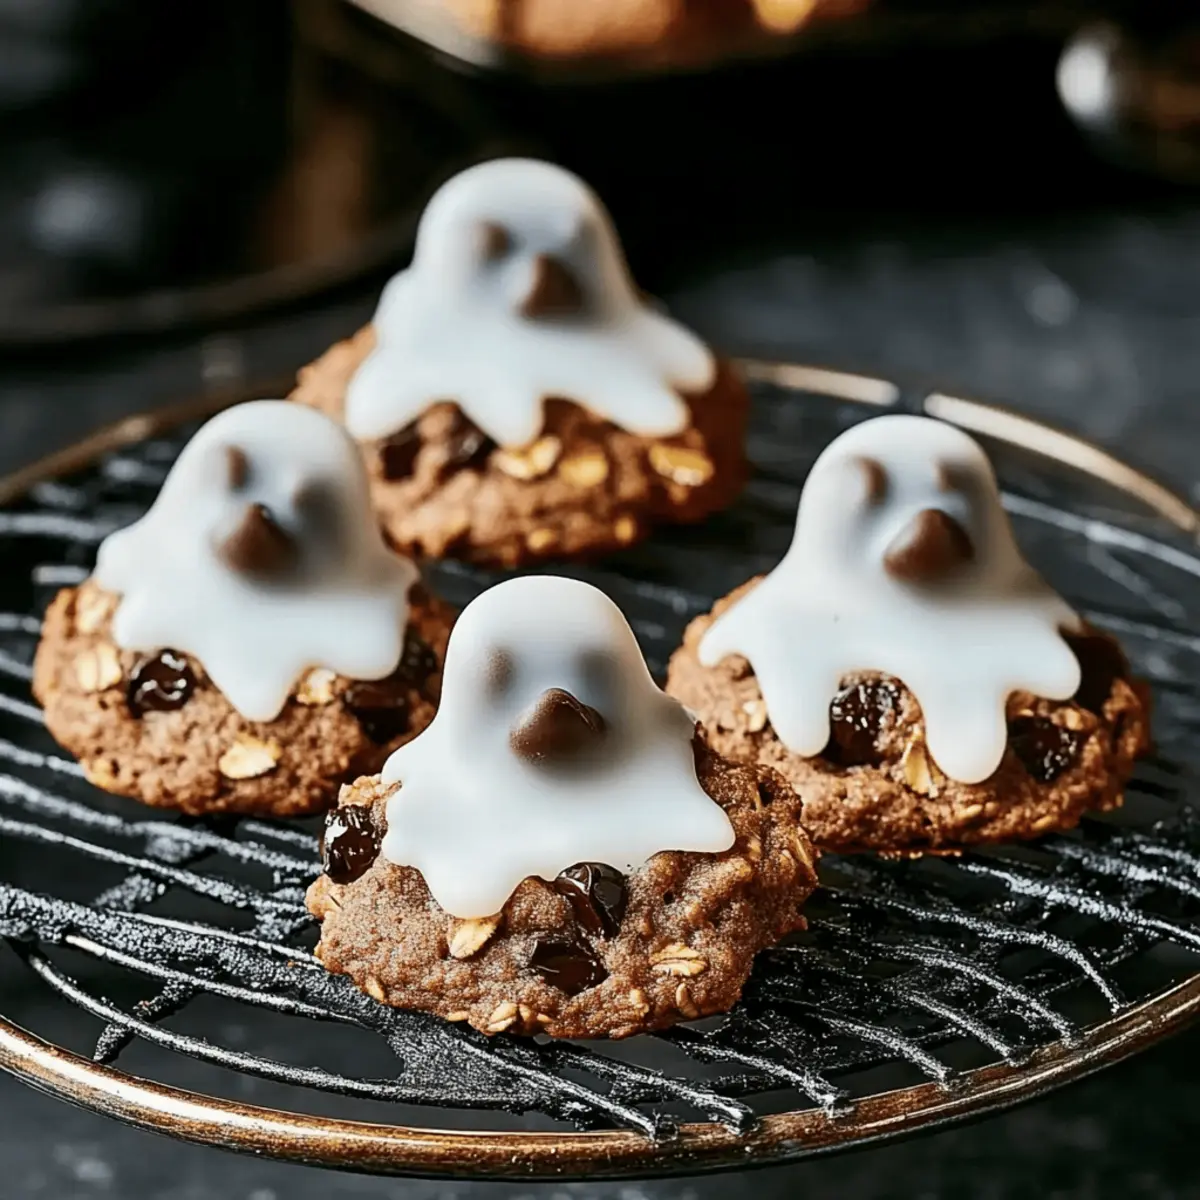
Why Are Ghost Cookies So Appealing?
Simplicity at Its Best: With just four ingredients, these cookies come together in no time, perfect for busy bakers.
Chewy, Decadent Texture: Enjoy a delightful combination of oat chewiness and chocolatey goodness that satisfies any craving.
Versatile and Adaptable: Easily swap ingredients to cater to your dietary preferences—whether it’s gluten-free or nut-free.
Healthy Indulgence: Pack in the nutrition without sacrificing flavor, making these cookies a guilt-free treat for everyone.
Perfect for Any Occasion: Whether it's a cozy night in or a fun gathering, these cookies will surely impress friends and family! For more delicious variations, check out my Oatmeal Cookies Chewy or Pineapple Cookies Tropical.
Ghost Cookies Ingredients
For the Base
- Oats – Provide the chewy texture that makes these ghost cookies so satisfying; ensure you use gluten-free oats for an allergy-friendly treat.
- Nut Butter (e.g., almond or peanut) – Acts as the perfect binding agent and adds a creamy richness; substitute with sunflower seed butter for a nut-free option.
- Maple Syrup (or honey) – Infuses sweetness and moisture, making each bite irresistible; agave syrup works well for a vegan alternative.
- Chocolate Chips – Deliver indulgent chocolate flavor and melty goodness; try using dark chocolate chips for a dairy-free twist.
For Toppings
- Shredded Coconut – Adds a fun, chewy texture and a hint of tropical flavor; it's particularly festive for decorating your ghost cookies.
- Edible Eyes – Make your ghost cookies come to life with fun edible eyes, perfect for a spooky treat presentation!
With these easy-to-find ingredients, you’ll be well on your way to baking delightful ghost cookies that will steal the show!
Step‑by‑Step Instructions for Ghost Cookies
Step 1: Mix Dry Ingredients
In a large mixing bowl, combine 1 cup of gluten-free oats and 1 cup of chocolate chips. Stir these ingredients together until evenly distributed, ensuring the oats and chocolate chips are well mixed. This creates a solid base for your ghost cookies, bringing together the chewy texture of oats with the rich, melting chocolate.
Step 2: Combine Wet Ingredients
In a separate bowl, measure out ½ cup of your chosen nut butter and ¼ cup of maple syrup (or honey). Mix these ingredients until smooth and well-blended, which should take about 2 minutes. This creamy mixture will act as a binding agent, infusing your ghost cookies with moisture and flavor.
Step 3: Combine Mixtures
Carefully fold the wet mixture into the dry oat and chocolate chip combination using a spatula. Continue mixing gently until everything is thoroughly combined and no dry patches remain. This step ensures that each cookie will have the perfect chewy texture, so take your time to create a uniform dough.
Step 4: Shape Cookies
Preheat your oven to 350°F (175°C) and line a baking sheet with parchment paper. Scoop about 2 tablespoons of the cookie dough for each ghost cookie, then shape them into round mounds on the prepared baking sheet. Leave sufficient space between each cookie as they will spread slightly during baking, adding to their delightful appearance.
Step 5: Bake
Place the baking sheet in your preheated oven and bake for 10-12 minutes. Keep an eye on your ghost cookies; they should be golden brown around the edges but slightly soft in the center. This visual cue is crucial for achieving that perfect chewy texture that we all love!
Step 6: Cool and Decorate
Once baked, remove the cookies from the oven and let them cool on the baking sheet for about 5 minutes. This allows them to set slightly before transferring to a wire rack. Once fully cooled, feel free to decorate with edible eyes and shredded coconut to transform these delicious ghost cookies into festive treats!

Variations & Substitutions for Ghost Cookies
Feel free to unleash your creativity and customize these delightful cookies with these fun ideas!
-
Nut-Free: Substitute nut butter with sunflower seed butter to accommodate nut allergies while retaining creaminess.
-
Sweetener Swap: Use agave syrup instead of maple syrup for a vegan-friendly option without compromising on sweetness.
-
Extra Chewy: Fold in ½ cup of shredded coconut for added texture and a tropical twist. The strands will provide a chewy surprise with every bite!
-
Cocoa Boost: Replace a portion of oats with cocoa powder to intensify the chocolate flavor. This adds a rich, chocolatey depth to your cookie.
-
Chili Kick: Increase the excitement by sprinkling in some cayenne pepper mixed with the dry ingredients. Just a pinch offers a warm, unexpected kick that pairs wonderfully with chocolate!
-
Fruit Flavor: Toss in ¼ cup of dried fruits like cranberries or raisins for a pop of sweetness. They’ll complement the chocolate chips beautifully!
-
Healthy Additions: Mix in a handful of chia seeds or flaxseeds for an extra boost of nutrition. These tiny seeds pack a punch of fiber and omega-3s.
-
Flavor Experiment: Add a teaspoon of vanilla extract or a pinch of cinnamon to deepen the flavor profile—each adds a cozy touch that elevates the cookie experience.
For even more cookie inspiration, explore my Pineapple Cookies Tropical or try out the delightful White Chocolate Cookies. Enjoy baking!
Expert Tips for Ghost Cookies
-
Choose Right Oats: Use certified gluten-free oats to ensure your ghost cookies are safe for those with gluten sensitivities.
-
Room Temperature Nut Butter: Let your nut butter sit at room temperature for easier mixing, preventing clumps in your cookie dough.
-
Watch the Bake Time: Avoid overbaking your cookies; they should remain soft in the center to ensure the perfect chewy bite.
-
Mix Well: Thoroughly combine wet and dry ingredients to avoid dry patches, which can result in uneven texture in your ghost cookies.
-
Decorate After Cooling: Allow the cookies to cool completely before decorating with edible eyes and shredded coconut to make them look spooktacular!
What to Serve with 4-Ingredient Gluten-Free Chocolate Oat Cookies
Treat yourself to a joyous baking experience, where these delicious cookies become the centerpiece of your dessert spread.
-
Creamy Almond Milk: This nutty beverage compliments the cookie's rich chocolate and oat flavors, creating a comforting pairing perfect for any time of day.
-
Fruity Yogurt Parfait: Layer your favorite fruits and yogurt; the freshness brightens the richness of the cookies while adding delightful textures.
-
Sliced Strawberries: Their natural sweetness and juiciness enhance the chocolate while providing a bright pop of color, making each bite refreshing.
-
Coconut Whipped Cream: Light and fluffy, this dreamy topping adds a tropical twist that enhances the cookie's chewy goodness without overpowering it.
-
Dark Roast Coffee: A warm cup balances the sweet flavors; the rich coffee tones elevate the chocolate, making this the perfect afternoon pick-me-up.
-
Chilled Herbal Tea: An aromatic tea brings a refreshing contrast to the cookies; consider a peppermint or chamomile blend for a soothing touch.
-
Mini Chocolate Trifle: Layer cookie chunks with whipped cream and fruit; this indulgent dessert packs a luxurious punch while showcasing your cookie creation.
-
Vanilla Ice Cream: For an indulgent treat, scoop some creamy vanilla on top; the contrast of warm cookies and cold ice cream creates a mouthwatering experience that delights the senses.
-
Smoothie Bowl: Top a chilled smoothie with cookie crumbles for a fun, nutritious twist; the fruitiness provides freshness, while the cookies add a satisfying crunch.
How to Store and Freeze Ghost Cookies
Room Temperature: Store your ghost cookies in an airtight container at room temperature for up to 1 week, ensuring they remain soft and chewy.
Fridge: For longer freshness, you can keep these cookies in the fridge for up to 2 weeks, but make sure they are in a sealed container to prevent drying out.
Freezer: Freeze your ghost cookies for up to 3 months by placing them in a single layer on a baking sheet first, then transferring to a zip-top freezer bag, separating layers with parchment paper.
Reheating: To enjoy warm, simply pop them in the microwave for 10-15 seconds, bringing back their deliciously gooey chocolate center and chewy texture for a delightful treat!
Make Ahead Options
These delightful Ghost Cookies are absolutely perfect for meal prep, allowing you to enjoy homemade treats with minimal fuss during busy days. You can mix the dry ingredients (oats and chocolate chips) and store them in an airtight container up to 3 days in advance, preventing any moisture from ruining the texture. The wet ingredients (nut butter and maple syrup) can also be combined and kept in the refrigerator for up to 24 hours. When you’re ready to bake, simply combine both mixtures, shape the cookies, and bake as directed—this way, you'll have freshly baked Ghost Cookies that are just as delicious with no extra time commitment!
Ghost Cookies Recipe FAQs
How do I choose the right oats for my ghost cookies?
Absolutely! For gluten-free ghost cookies, it's crucial to use certified gluten-free oats. Regular oats may come into contact with gluten during processing, so look for brands that specifically label their oats as gluten-free to ensure they're safe for anyone with sensitivities.
What’s the best way to store my ghost cookies?
I recommend storing your ghost cookies in an airtight container at room temperature for up to 1 week. This keeps them soft and chewy! If you want them to last longer, you can refrigerate them for up to 2 weeks in a sealed container.
Can I freeze my ghost cookies?
Yes, you can freeze your ghost cookies for up to 3 months! Start by placing them in a single layer on a baking sheet to freeze them individually. Once frozen solid, transfer them to a zip-top freezer bag. Be sure to separate layers with parchment paper to avoid sticking!
What should I do if my ghost cookies turn out dry?
To prevent dryness, ensure that your nut butter is at room temperature for easier mixing, and don’t overbake! When baking, look for golden brown edges while the centers remain slightly soft—this ensures that delightful chewy texture we all love.
Are ghost cookies suitable for people with nut allergies?
Very! For a nut-free version of these ghost cookies, simply substitute the nut butter with sunflower seed butter. Check that any additional ingredients, like chocolate chips or decorations, are also nut-free to ensure that your treat is safe for everyone.
Can I add other ingredients to my ghost cookies?
Of course! Feel free to get creative by adding extras like shredded coconut or chopped nuts for additional texture and flavor. For a fun twist, you might even incorporate a pinch of cinnamon or a splash of vanilla extract to enhance their taste!
Delightfully Chewy Ghost Cookies for a Spooky Treat!
Ingredients
Equipment
Method
- In a large mixing bowl, combine 1 cup of gluten-free oats and 1 cup of chocolate chips. Stir these ingredients together until evenly distributed.
- In a separate bowl, measure out ½ cup of your chosen nut butter and ¼ cup of maple syrup. Mix these until smooth.
- Carefully fold the wet mixture into the dry oat and chocolate chip combination using a spatula until well combined.
- Preheat your oven to 350°F (175°C) and line a baking sheet with parchment paper. Scoop about 2 tablespoons of dough for each cookie and shape them into mounds.
- Place the baking sheet in the oven and bake for 10-12 minutes, until golden brown around the edges but soft in the center.
- Let them cool on the baking sheet for about 5 minutes before transferring to a wire rack. Decorate with edible eyes and shredded coconut.


Leave a Reply