
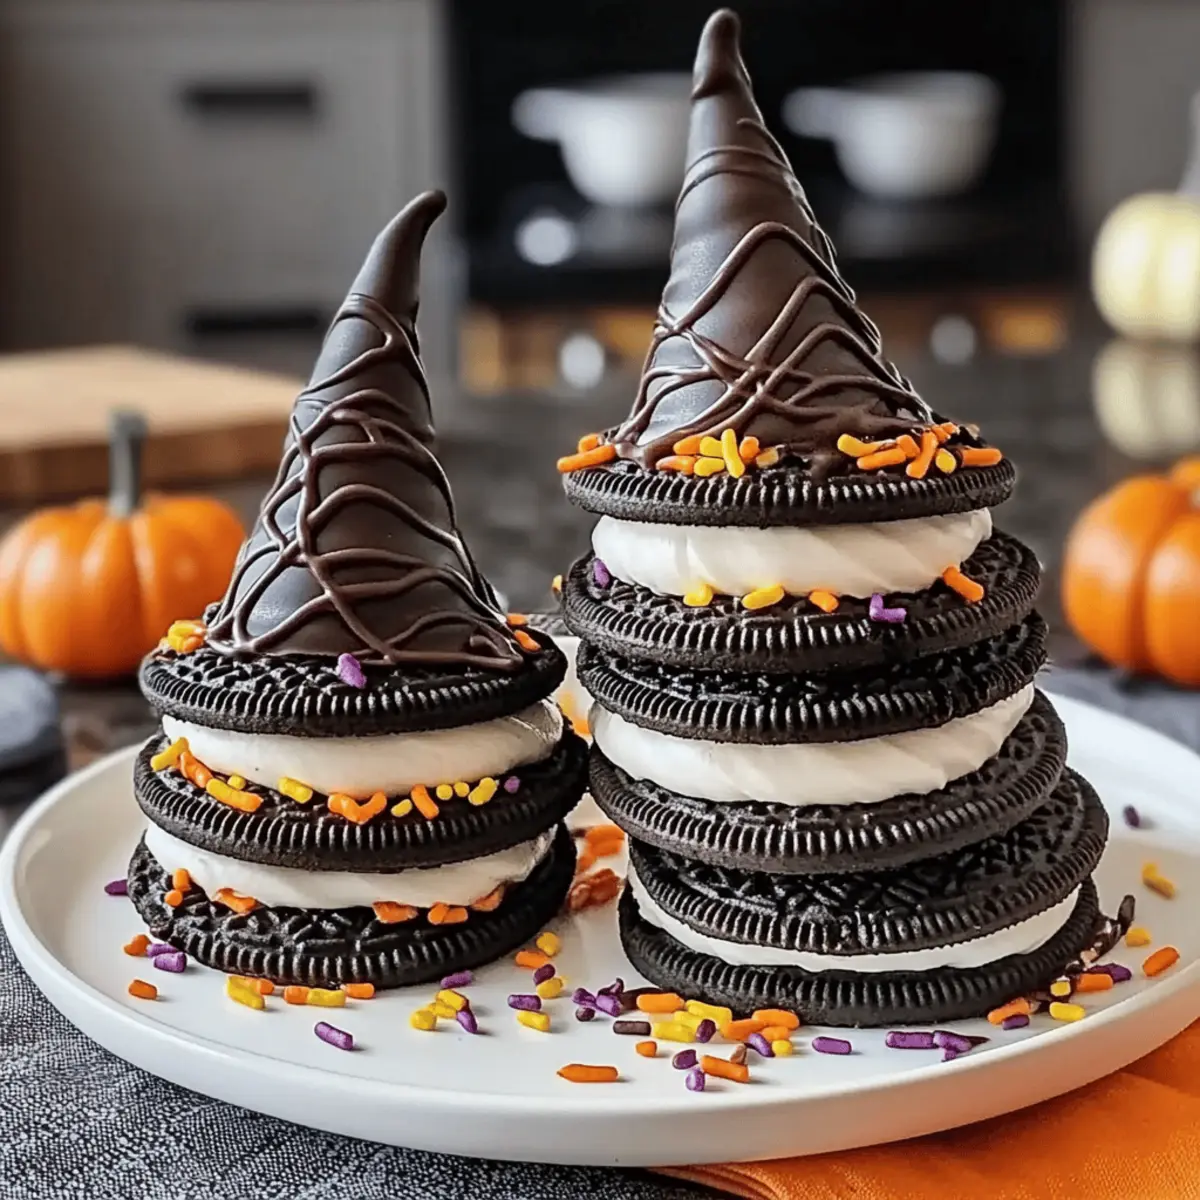
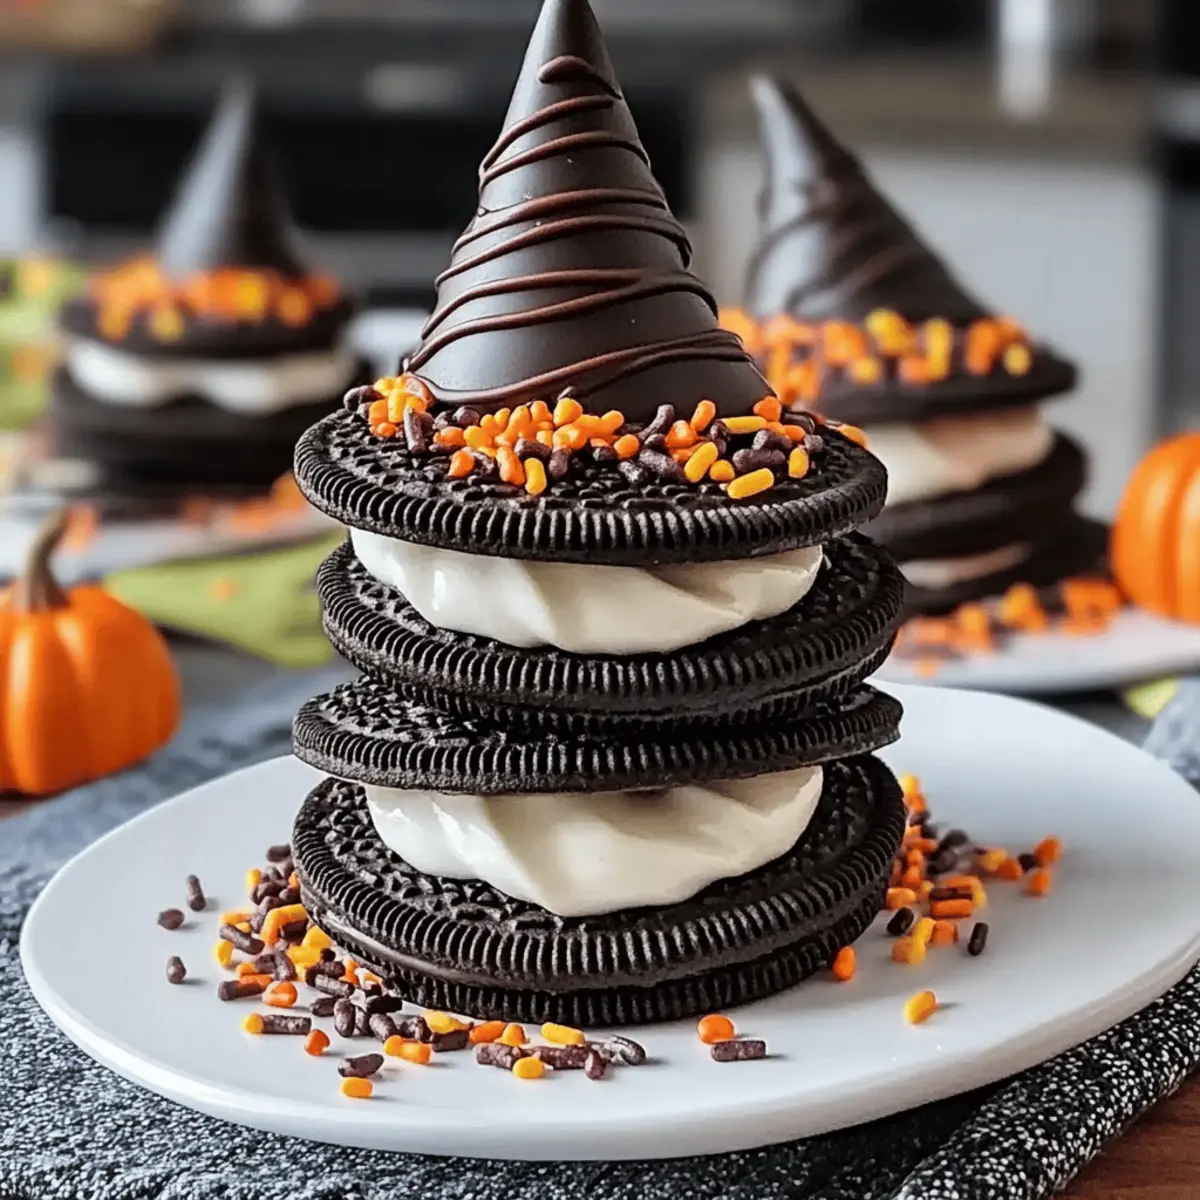
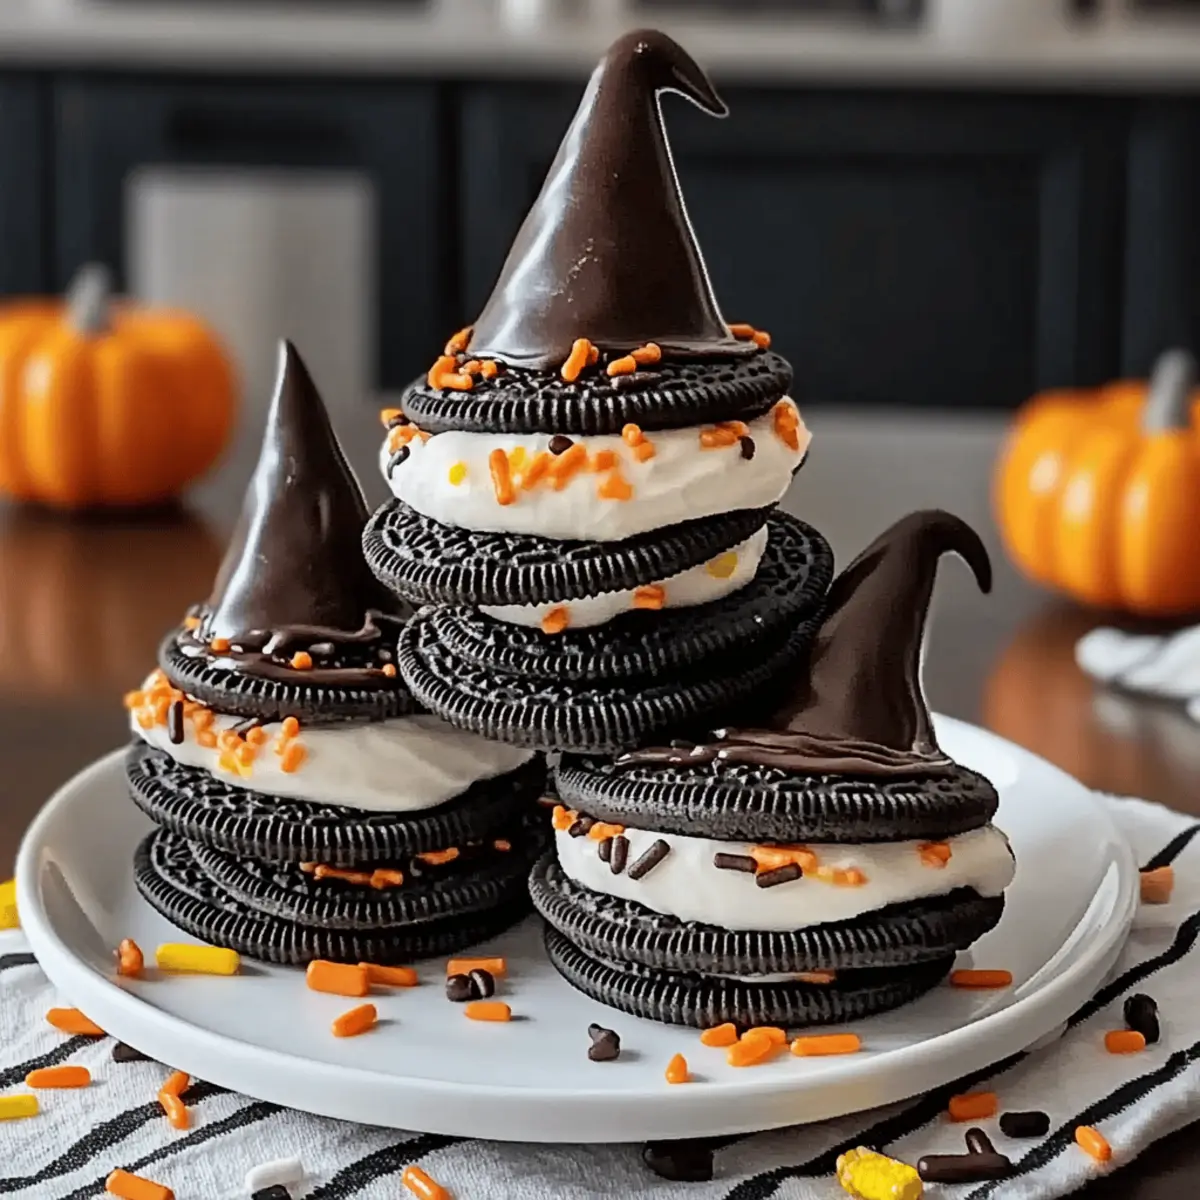
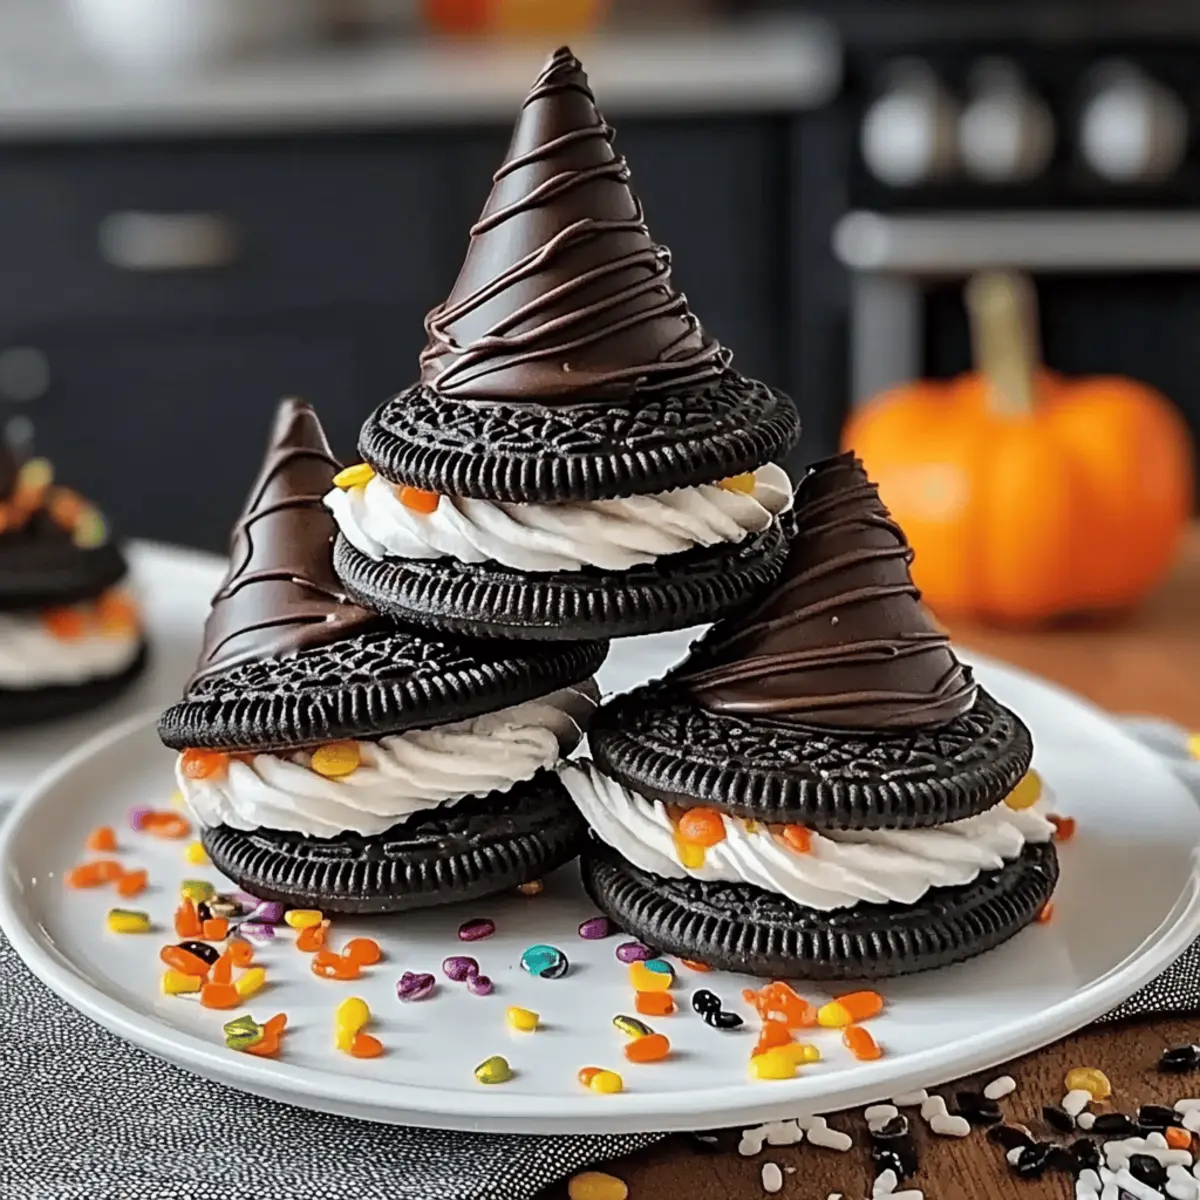
The aroma of melting chocolate and crushed Oreos brings back memories of my childhood Halloween parties, filled with laughter and sweet treats. This year, I’m excited to share my recipe for Tasty Oreo Witch Hat Cookies, the perfect Halloween treats that are as delightful to make as they are to eat! These cookies marry the crunchy texture of Oreo cookies with a fluffy cream filling and a chocolate cap that transforms them into whimsical little witch hats. Not only are they remarkably easy to whip up, but they also allow for creative customization to match any Halloween theme you can dream up. Whether for a festive gathering or a cozy family night, these cookies are sure to enchant both kids and adults alike. Ready to summon some sweetness and fun into your kitchen? Let’s get baking!
Why Are Oreo Witch Hat Cookies So Special?
Whimsical: These cookies not only taste great but also look enchanting, resembling adorable witch hats that will captivate your guests.
Customizable: With various toppings and fillings, you can easily tailor them to your preferences—consider using Pineapple Cookies Tropical for a fruity twist!
Easy to Make: Even novice bakers will find this recipe approachable, ensuring a fun-filled baking experience.
Perfect for Gatherings: Serve them at Halloween parties, and watch everyone delight in the charming presentation as they enjoy a uniquely delicious treat.
Time-Saving: With a preparation time under 30 minutes, you can whip these up quickly, leaving you more time to enjoy the festivities!
Crowd-Pleasing: Their irresistible combination of crunchy and creamy textures, paired with sweet chocolate, guarantees that these will be a hit among friends and family!
Oreo Witch Hat Cookies Ingredients
• These simple ingredients will bring your adorable witch hat cookies to life!
For the Cookies
- Oreo Cookies – The main flavor base; feel free to use flavored Oreos for a unique twist.
- Butter (softened) – Provides a creamy filling; ensure it’s at room temperature for easy blending.
For the Filling
- Powdered Sugar – Sweetens the cream and adds a fluffy texture; can substitute granulated sugar if necessary.
For the Decorations
- Chocolate Kisses – Creates the iconic hat shape; use regular or dark chocolate for variation.
- White Chocolate Chips – Perfect for drizzling on top, adding sweetness; colored melting chocolates can be used for fun colors.
- Colorful Sprinkles – Brighten up your cookies with Halloween flair; swap for themed candy or edible glitter for extra pizzazz.
These Oreo Witch Hat Cookies are not only delicious but also your canvas for creativity, making every batch as special as your imagination allows!
Step‑by‑Step Instructions for Oreo Witch Hat Cookies
Step 1: Preheat the Oven
Begin by preheating your oven to 350°F (175°C), a perfect temperature to ensure your cookies bake evenly. While the oven warms up, gather your ingredients and equipment: a mixing bowl, a spatula, and your Oreo cookies. This step sets the stage for your delightful Oreo Witch Hat Cookies!
Step 2: Prepare the Oreo Cookies
Carefully twist apart the Oreo cookies, separating them into halves. For this recipe, you’ll only need one half from each cookie, preferably the side with the creamy filling. Set aside the cream-less halves and stack your filled halves on a plate, ready for the upcoming delicious fillings and toppings.
Step 3: Make the Cream Filling
In a medium mixing bowl, combine softened butter and powdered sugar. Using a hand mixer, beat the mixture on medium speed until it becomes light, fluffy, and well-combined, which should take about 3-5 minutes. If you’d like, add a few drops of food coloring for a festive touch to your Oreo Witch Hat Cookies!
Step 4: Assemble the Cookies
Spread a generous dollop of your fluffy cream filling onto the creamy side of the filled Oreo half. Then, place another half on top, aligning the edges carefully to create a sandwich. Press down gently to ensure they stick together well, forming the main structure of your adorable Oreo Witch Hat Cookies.
Step 5: Melt the Chocolate Kisses
Now it's time to create the witch hats! Take your chocolate kisses and place them in a microwave-safe bowl. Heat them in the microwave in 30-second intervals, stirring in between until fully melted, which should take about 1-2 minutes total. Once melted, it’s time to bring your cookies to life!
Step 6: Top the Cookies with Kisses
Using a small amount of melted chocolate, attach a chocolate kiss on top of each assembled Oreo cookie. This will mimic the shape of a witch's hat. Allow the kisses to rest on the cookies for a few minutes, using a spoon to adjust their placement if needed for a perfect witch hat look.
Step 7: Drizzle with White Chocolate
Melt the white chocolate chips in another bowl, again using the microwave in 30-second intervals until smooth. With a fork or a piping bag, drizzle the melted chocolate over the cookies, creating a whimsical design on top. Work quickly, as the white chocolate should still be warm for the next step!
Step 8: Add the Finishing Touches
While the white chocolate is still wet, sprinkle colorful candy sprinkles over the top of each cookie to add that fun Halloween flair. The vibrant colors will enhance the appearance of your Oreo Witch Hat Cookies, making them delightful luxury treats for your spooky gatherings.
Step 9: Cool and Serve
Allow the completed cookies to cool on a wire rack for about 15 minutes. This cooling step ensures that the melted chocolates set properly. Once they are cool to the touch, your Oreo Witch Hat Cookies are ready to enchant friends and family at your Halloween celebrations!
Expert Tips for Oreo Witch Hat Cookies
- Fluffy Filling: Mix the cream filling until light and fluffy for that perfect texture. It's essential for achieving a delightful taste in your Oreo Witch Hat Cookies.
- Swift Decorating: Work quickly when drizzling white chocolate and sprinkling toppings. This ensures they stick before the chocolate sets, resulting in a lovely presentation.
- Cooling Time: Allow cookies to cool completely on a wire rack to ensure the chocolate firms up nicely, making them easier to handle and serve later.
- Storage Solution: Keep leftover cookies in an airtight container at room temperature. This prevents them from getting stale, maintaining the crunchy and creamy bliss!
- Creative Variations: Don't hesitate to customize! Try flavored Oreos or swap out sprinkles for themed candy; these changes can create a new twist on your spooky dessert.
What to Serve with Tasty Oreo Witch Hat Cookies
Nothing pairs better with these enchanting cookies than treats and sips that complement their whimsical charm and delightful flavors.
-
Pumpkin Spice Lattes: The warm spices enhance the rich chocolate, making your Halloween gathering cozy and festive.
-
Spooky Punch: This fun beverage, with its fruity flavors and playful color, adds a refreshing touch to your sweet treats, delighting both kids and adults.
-
Chewy Caramel Apples: The chewy texture and the sweet-tart apples create a wonderful contrast to the crunchy Oreo Witch Hat Cookies.
Feel free to mix and match! Each pairing is sure to evoke smiles and create lasting memories during your spooky celebrations.
-
Ghostly Marshmallow Treats: These light, airy goodies mirror the creaminess of the cookies while also delivering a fun visual element.
-
Fang-tastic Chocolate Cupcakes: Rich chocolate cake topped with creamy frosting echoes the flavors of your cookies, making for an indulgent dessert option.
-
Witch’s Brew Hot Chocolate: Topped with whipped cream and colorful sprinkles, this warm drink adds a festive flair to your Halloween dessert table.
Make Ahead Options
These Oreo Witch Hat Cookies are perfect for busy home cooks looking to save time without sacrificing flavor! You can prepare the cookie filling and assemble the cookies up to 24 hours in advance by simply storing them in an airtight container at room temperature. To maintain their delightful crunch and texture, keep the chocolate kisses and sprinkles separate until you're ready to serve. When it’s time to enjoy, melt the chocolate kisses and attach them to the cookies, drizzle with white chocolate, and finish with sprinkles. This way, your Oreo Witch Hat Cookies will be just as charming and scrumptious as if they were freshly made!
How to Store and Freeze Oreo Witch Hat Cookies
Room Temperature: Store cookies in an airtight container at room temperature for up to 5 days to keep them fresh and maintain their delightful crunch.
Fridge: If you prefer chilled cookies, you can keep them in the refrigerator. Just ensure they're in an airtight container, and let them come to room temperature before serving for the best flavor and texture.
Freezer: Freeze Oreo Witch Hat Cookies for up to 2 months. Place them in a single layer in an airtight container separated by parchment paper to prevent sticking.
Reheating: To enjoy them warm, briefly microwave the cookies on a low setting for about 10-15 seconds, allowing the chocolate to melt slightly but not become too soft.
Oreo Witch Hat Cookies Variations
Get ready to unleash your creativity and add a personal touch to these delightful cookies!
-
Flavored Oreos: Swap standard Oreos for pumpkin spice or Halloween-themed flavors to boost seasonal richness.
-
Fun Chocolate Additions: Instead of chocolate kisses, try using caramel-filled chocolates for a gooey surprise inside your witch hats.
-
Different Melting Chocolates: Experiment with colored melting chocolates to create an eye-catching array of spooky hats, perfect for Halloween parties.
-
Fruity Sprinkles: Replace colorful sprinkles with edible glitter or themed candy to switch up the visual appeal and add that festive flair.
-
Cream Cheese Filling: For a richer taste, mix in some cream cheese to the filling, creating a deliciously tangy contrast to the sweetness.
-
Gummy Worms: Instead of sprinkles, top your cookies with gummy worms for a fun, creepy touch that kids will love!
-
Heat Factor: Add a pinch of cayenne powder to the cream filling for a surprising spicy twist that will intrigue adventurous eaters.
-
Themed Decorations: Create Halloween scenes by adding tiny gummy eyeballs or using the cookies to mimic a spooky graveyard scene, pairing with Oreo Balls Decadent for a cookie platter that’s sure to impress.
These variations make each batch of Pineapple Cookies New unique, ensuring that each cookie is a delightful experience filled with surprises! Enjoy the festive spirit as you experiment with these ideas.
Oreo Witch Hat Cookies Recipe FAQs
How do I choose ripe ingredients for my Oreo Witch Hat Cookies?
Absolutely! When it comes to baking, ensure your butter is softened and at room temperature, making it easier to blend with the powdered sugar. This will create that light, fluffy filling we all love. If using chocolate kisses, opt for the plumpest ones without any visible blemishes to make your witch hats stand tall and delightful!
How should I store my Oreo Witch Hat Cookies for freshness?
To keep your cookies fresh and scrumptious, store them in an airtight container at room temperature for up to 5 days. If you choose to refrigerate them, just be sure to let them sit at room temperature before serving for the best flavor and texture. I often find that they taste even better after a day!
Can I freeze Oreo Witch Hat Cookies for later enjoyment?
Yes, you can! To freeze your Oreo Witch Hat Cookies, place them in a single layer in an airtight container, separated by parchment paper to prevent sticking. These treats can be frozen for up to 2 months. When you’re ready to indulge, simply let them thaw in the refrigerator overnight or at room temperature for a couple of hours.
What if my cream filling isn’t fluffy enough?
If your filling isn’t achieving that light, fluffy texture, double-check that your butter is softened enough and give it an extra minute of mixing. Whipping your butter and powdered sugar for 3-5 minutes on medium speed will trap air into the mix, resulting in the ideal filling consistency. Don’t give up! The right mixing technique makes all the difference.
Are there any dietary considerations for Oreo Witch Hat Cookies?
Great question! These cookies contain common allergens like dairy and gluten due to the butter and Oreo cookies. If you're making these for someone with allergies, consider using gluten-free Oreos and dairy-free alternatives for the butter and chocolate. They can still enjoy the fun and festivity of these delightful treats!
Oreo Witch Hat Cookies
Ingredients
Equipment
Method
- Preheat your oven to 350°F (175°C).
- Carefully twist apart the Oreo cookies, separating into halves, using only the filled halves.
- In a medium mixing bowl, combine softened butter and powdered sugar, then beat on medium speed until light and fluffy (3-5 minutes).
- Spread a generous dollop of cream filling onto the creamy side of an Oreo half, and top it with another half to form a sandwich.
- Melt the chocolate kisses in a microwave-safe bowl in 30-second intervals, stirring until fully melted (1-2 minutes total).
- Using melted chocolate, attach a chocolate kiss on top of each assembled cookie, mimicking the shape of a witch's hat.
- Melt white chocolate chips in a bowl, then drizzle over the cookies in a whimsical design.
- While the white chocolate is wet, sprinkle colorful candy sprinkles over each cookie.
- Allow completed cookies to cool on a wire rack for about 15 minutes before serving.


Leave a Reply