
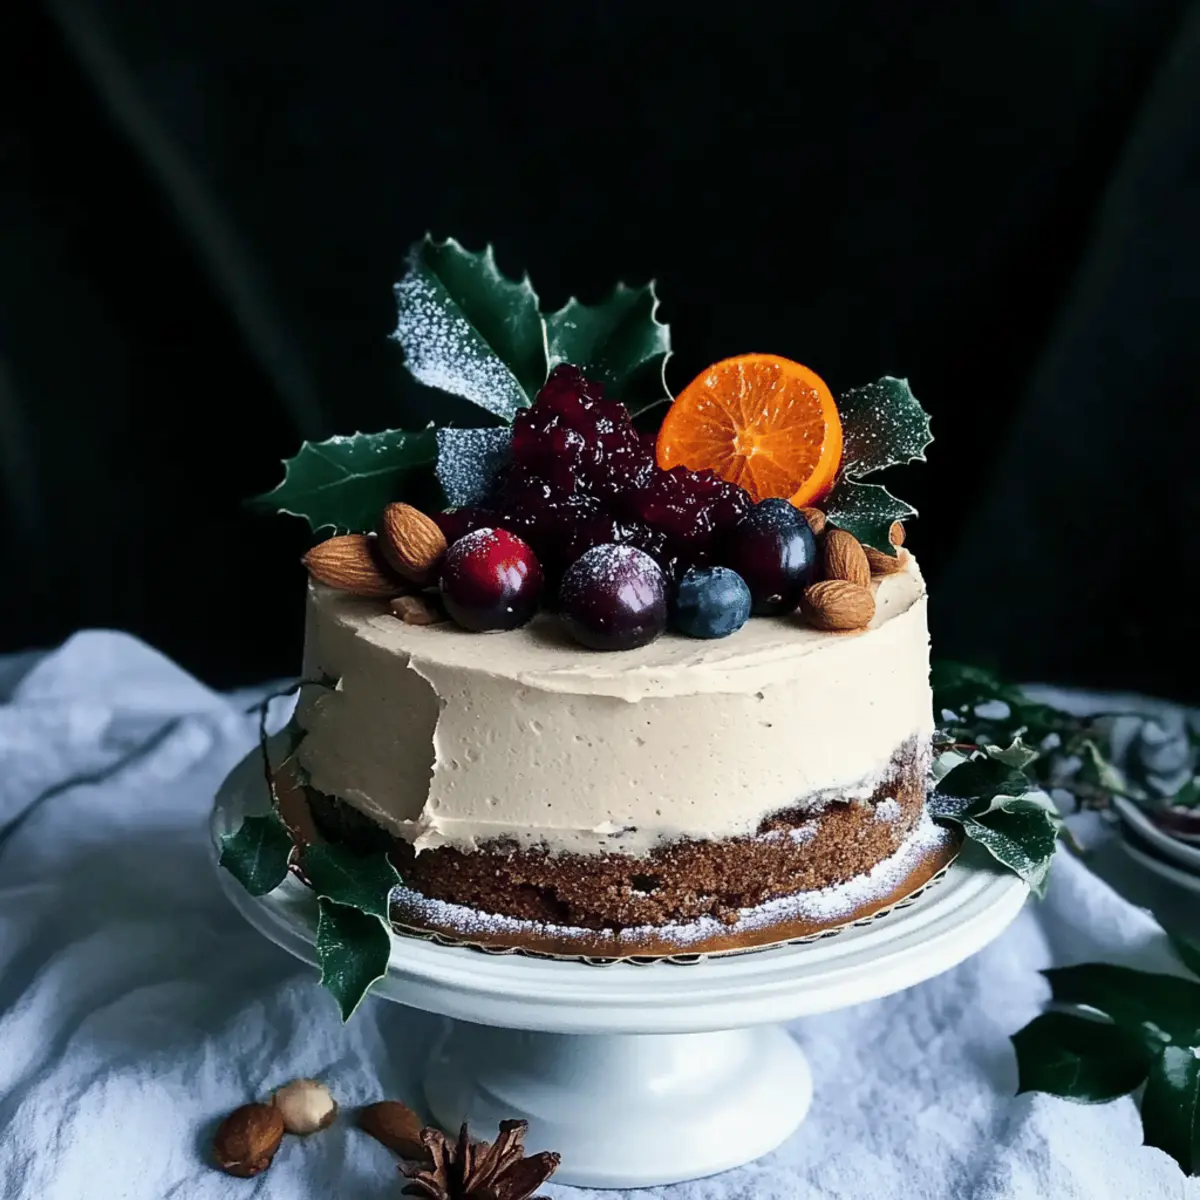
As I sifted through a vibrant array of spices, the irresistible scent of ginger and cinnamon wafted through my kitchen, instantly transporting me to cozy holiday gatherings. At that moment, I decided to bake a Moist Vegan Gingerbread Layer Cake, a delightful treat that perfectly embodies the spirit of the season. This gluten-free and plant-based masterpiece not only boasts a wonderfully fluffy texture but also features a unique twist with homemade cranberry chia jam nestled between the layers. Imagine sharing this festive dessert with loved ones—each slice is a warm reminder of home-cooked joy, while being kind to everyone’s dietary preferences. Plus, it’s quick to whip up, making it a hassle-free option for any gathering. Are you ready to dive into a scrumptious baking adventure?
Why is this cake a festive must-have?
Moist, this vegan gingerbread layer cake is the perfect seasonal treat that everyone can enjoy! Rich flavors of ginger and cinnamon come together in each delicious slice, making it a comforting delight for any gathering. Health-conscious eaters will appreciate its gluten-free and plant-based ingredients. Versatile enough for different dietary needs, consider trying it with macadamia frosting for a unique twist! Quick preparation ensures you won’t be stuck in the kitchen for hours, giving you more time to share joy with family and friends. Don't miss out on pairing it with fresh seasonal fruits or even a scoop of vegan ice cream for an extra special touch!
Gingerbread Layer Cake Ingredients
For the Cake
- Teff Flour – Provides structure and a nutty flavor; substitute with buckwheat if preferred.
- Ginger – Infuses the cake with warm, spicy notes; feel free to increase for more kick.
- Cinnamon – Adds depth to the flavor profile; adjust to taste for a personal touch.
- Coconut Oil – Ensures a tender crumb; you can use another neutral oil if desired.
- Apple Sauce – Keeps the cake moist; mashed banana is a great alternative for natural sweetness.
- Baking Powder – Essential for the cake's rise; ensure it's fresh for best results.
For the Filling
- Cranberry Chia Jam – Provides a tangy contrast that brightens each bite; prepare ahead for optimal flavor.
For the Frosting
- Cashew Frosting – Smooth and creamy, perfect for topping; can be substituted with macadamia nuts for a different taste.
With these delightful components, you’re on your way to creating a Gingerbread Layer Cake that will impress both guests and loved ones alike!
Step‑by‑Step Instructions for Moist Vegan Gingerbread Layer Cake with Cranberry Chia Jam
Step 1: Prepare the Filling
Begin by making the cranberry chia jam the night before. In a saucepan over medium heat, combine fresh cranberries and chia seeds with a splash of water. Stir frequently for about 10 minutes until the cranberries soften and the mixture thickens. Let it cool fully before transferring to the fridge to allow the flavors to meld beautifully.
Step 2: Make the Frosting
While the jam sets, prepare the cashew frosting. In a blender or food processor, blend soaked cashews, coconut oil, and a splash of vanilla until smooth and creamy. If you prefer a sweeter frosting, add a touch of maple syrup. Once blended, store the frosting in the fridge until you're ready to assemble the Gingerbread Layer Cake.
Step 3: Preheat the Oven
Before you start mixing your cake batter, preheat your oven to 350°F (175°C). Grease and flour two 8-inch round cake pans to ensure an easy release after baking. Take a moment to ensure the pans are evenly coated; this visual cue will help your cakes to slide out beautifully when you're ready to serve.
Step 4: Mix the Dry Ingredients
In a large mixing bowl, combine teff flour, ground ginger, ground cinnamon, and baking powder. Whisk these dry ingredients together until well combined; this will help distribute the leavening evenly throughout your Gingerbread Layer Cake, ensuring a uniform rise. Set this bowl aside while you mix the wet ingredients to maintain focus.
Step 5: Combine the Wet Ingredients
In a separate bowl, mix together the wet ingredients: apple sauce, melted coconut oil, and a touch of maple syrup if desired. Whip them together until you achieve a smooth consistency, which should take about 2–3 minutes. This step will not only provide moisture but also a lovely balance to the spices in your cake layers.
Step 6: Combine Mixtures
Gradually add the dry mixture to the wet ingredients, stirring gently until just combined. Be careful not to overmix, as this can lead to a dense cake. You should see a thick batter forming, filled with flecks of spice. This moment means you're getting closer to baking your Gingerbread Layer Cake!
Step 7: Bake the Cakes
Pour the batter evenly into the prepared cake pans, smoothing the tops with a spatula for an even bake. Place the pans in the preheated oven and bake for 25–30 minutes, or until a toothpick inserted into the center comes out clean. Look for a golden-brown top and a slight spring when pressed gently, indicating they’re done.
Step 8: Cool the Cakes
Once baked, remove the cakes from the oven and allow them to cool in the pans for about 10 minutes. Then, carefully transfer them to a wire rack to cool completely. This step is crucial, as assembling while warm can cause the frosting to melt and ruin the presentation of your Gingerbread Layer Cake.
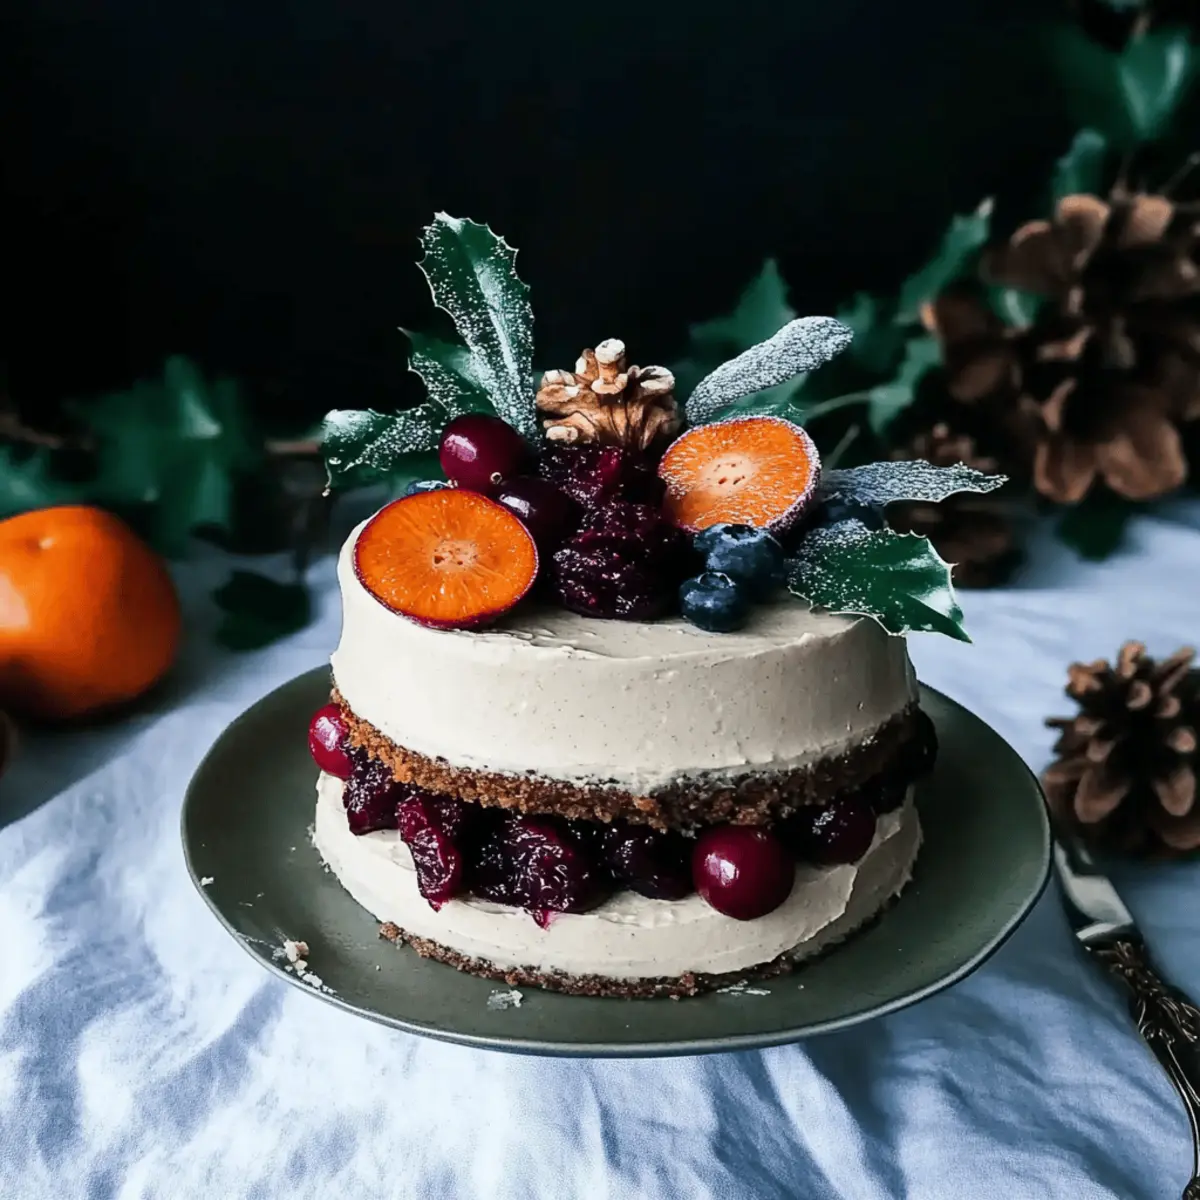
Step 9: Assemble the Layers
After the cakes have cooled, place one layer on a serving plate and spread a generous layer of cranberry chia jam on top. Gently place the second cake layer on top of the jam. Repeat this process if you've made additional layers, ensuring you create a harmonious combination of flavors throughout your Gingerbread Layer Cake.
Step 10: Frost the Cake
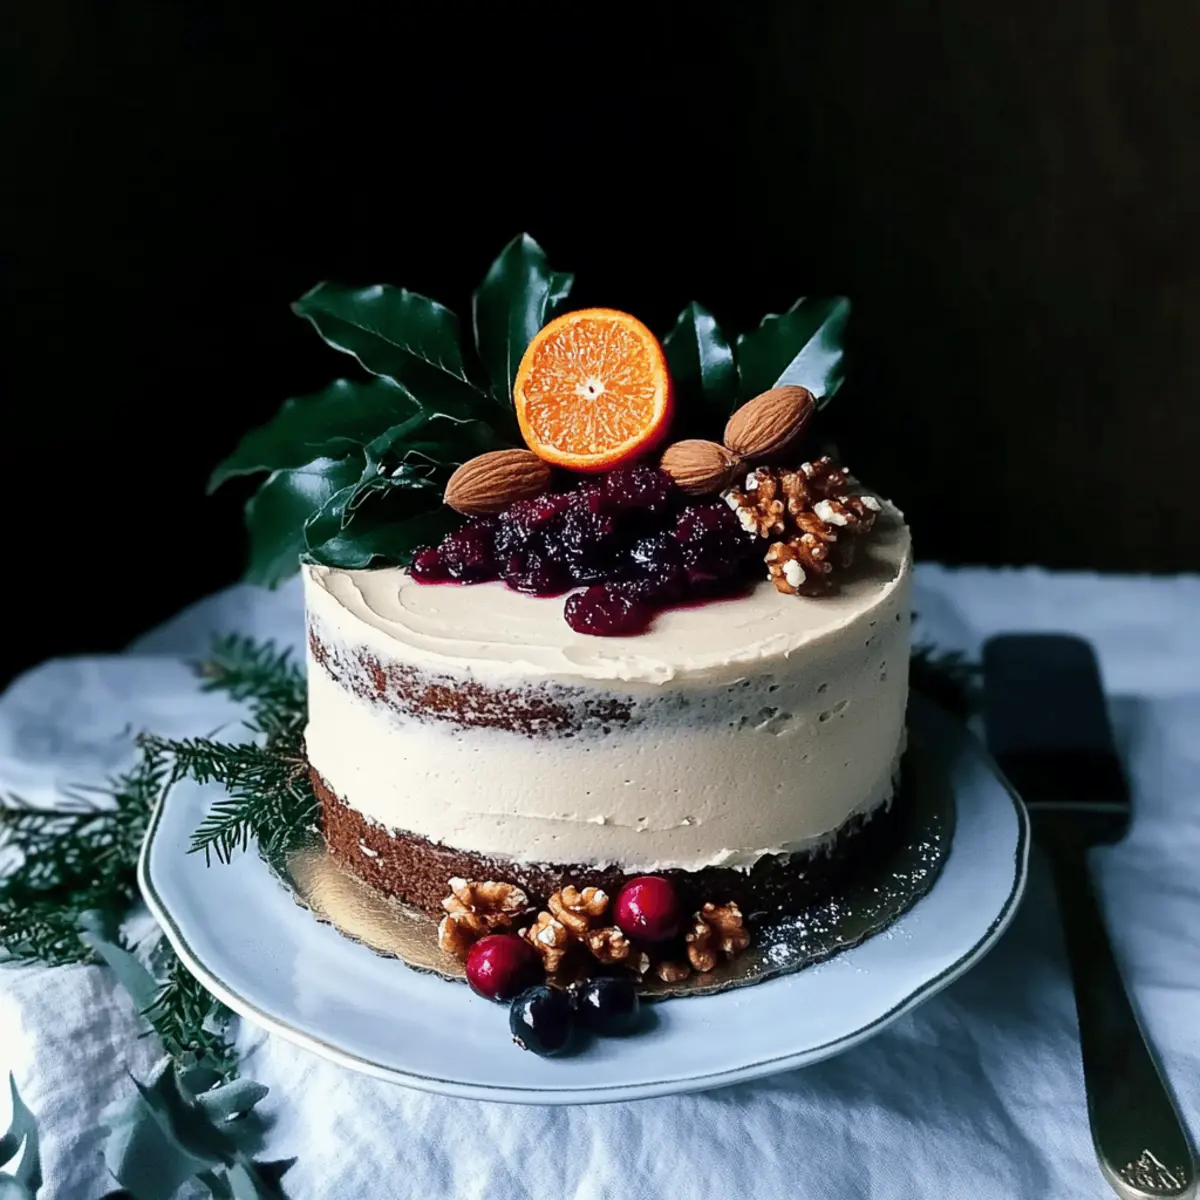
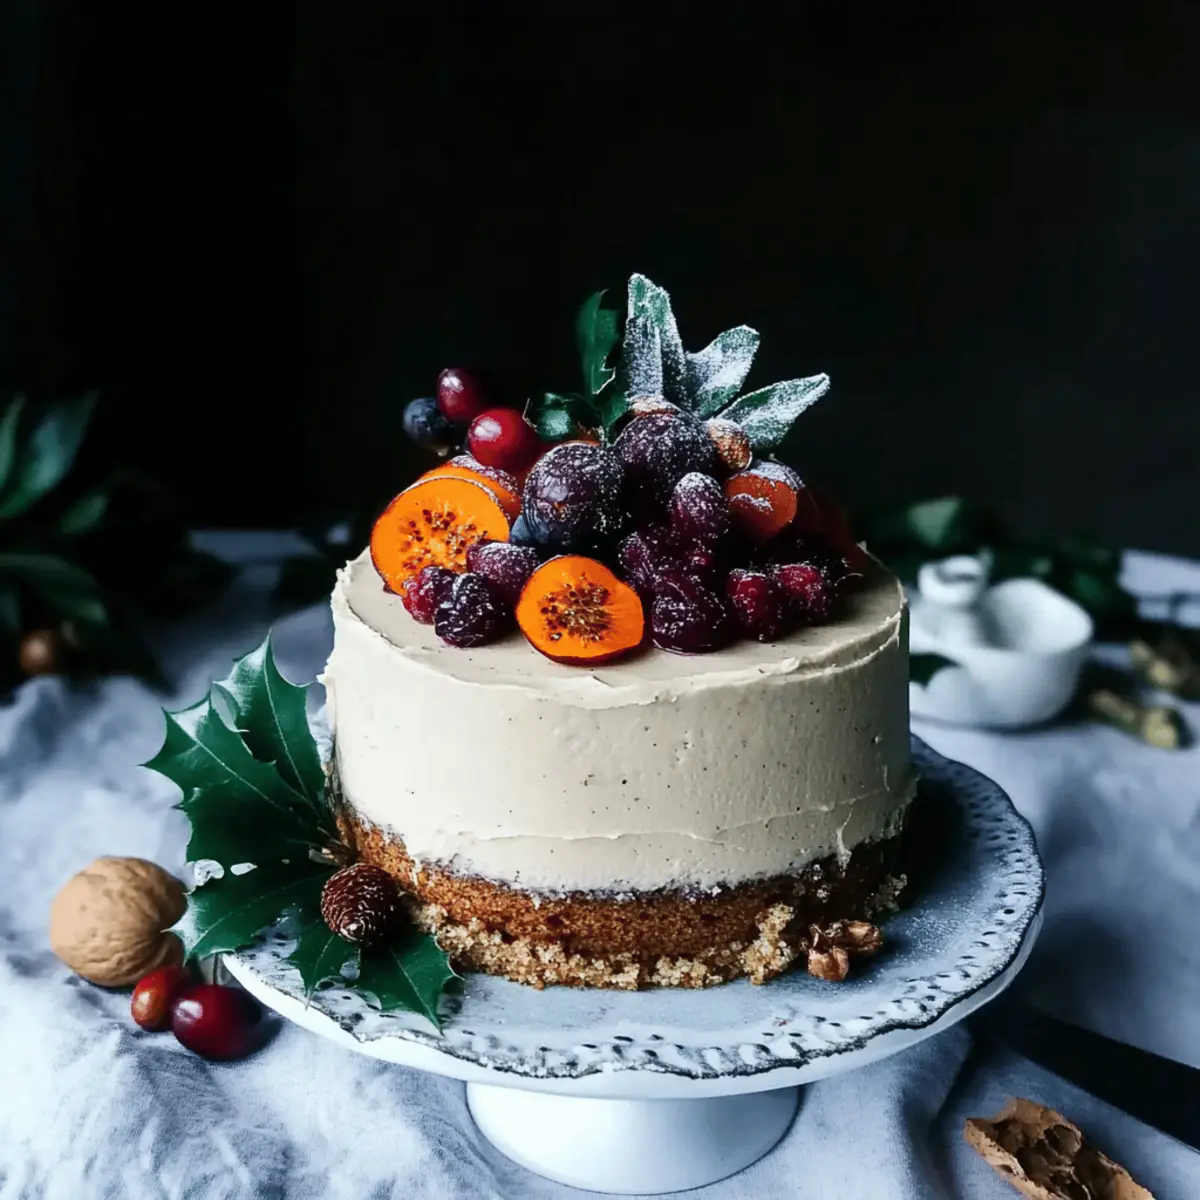
With your layers stacked, generously frost the top and sides of the cake with the creamy cashew frosting. Use a spatula to create smooth edges or textured patterns as desired. This frosted masterpiece not only enhances the flavors but also adds delightful visual appeal to your festive creation.
Step 11: Decorate and Serve
Feel free to add decorative touches to your finished cake, such as a sprinkle of cinnamon or fresh cranberries on top. Slice into this beautiful Gingerbread Layer Cake and serve it to your loved ones. A bright moment of sharing joy and warmth will surely come from every delightful slice!
What to Serve with Moist Vegan Gingerbread Layer Cake?
Indulge in the flavors of the season with this delightful dessert, perfect for festive gatherings and cozy evenings.
- Creamy Vegan Ice Cream: Adds a smooth and sweet contrast that melts beautifully with each slice of the gingerbread cake.
- Warm Cinnamon Apples: Their tender sweetness pairs wonderfully with the spiced highlights of the cake, creating a comforting experience.
- Homemade Hot Chocolate: A rich, velvety drink that complements the ginger and cinnamon flavors, making every bite feel like a warm hug.
For an extra touch, consider serving your gingerbread layer cake alongside a spiced chai latte. The aromatic spices create a harmonious blend with each mouthful.
- Fresh Cranberries: Scatter some on top for a tart burst that brightens the sweet layers, adding a lovely pop of color.
- Chopped Nuts: Offering crunch and nutty flavor, nuts like walnuts or pecans can enhance the texture and richness of the cake.
- Coconut Whipped Cream: This light, fluffy topping adds a tropical twist and contrasts beautifully with the cake's warm spices.
Expert Tips for Gingerbread Layer Cake
- Fresh Ingredients: Ensure your baking powder is fresh; expired leavening agents can lead to dense layers, ruining your Gingerbread Layer Cake.
- Cool Completely: Allow cakes to cool fully before frosting to prevent melting, ensuring a beautifully assembled cake.
- Layer Wisely: For balanced flavors, spread the cranberry chia jam evenly between layers; it’s the perfect tangy complement.
- Texture Check: If your cake is heavy, check the ingredient measurements and potential oven temperature issues; accurate baking leads to lightness.
- Substitution Tips: Don't hesitate to replace teff flour with buckwheat if needed, ensuring you still enjoy delicious results.
Make Ahead Options
These Moist Vegan Gingerbread Layer Cakes are perfect for busy cooks wanting to save time without sacrificing flavor! To prep in advance, make the cranberry chia jam and cashew frosting up to 24 hours ahead; this allows the flavors to meld beautifully. Store the jam in an airtight container in the refrigerator and keep the frosting chilled as well. You can also bake the gingerbread layers up to 3 days ahead; simply wrap them well in plastic wrap and refrigerate to maintain their moisture and fluffiness. When you're ready to serve, assemble the layers with jam in between, frost the sides, and enjoy a delicious festive dessert that brings warmth and cheer to any gathering!
Gingerbread Layer Cake Variations
Feel free to experiment and personalize your gingerbread layer cake for a delightful twist that suits your taste buds!
-
Gluten-Free: Use buckwheat flour instead of teff to maintain a gluten-free cake that’s equally delicious.
-
Nut-Free Frosting: Replace cashews with silken tofu blended until smooth for a creamy, nut-free alternative.
-
Citrusy Burst: Add orange zest to the cake batter for a refreshing citrusy surprise that harmonizes beautifully with the spices.
-
Fruit-Filled Layers: Incorporate diced apples or pears between cake layers for an extra layer of moisture and sweetness.
-
Spicy Kick: Increase the ginger in the batter for a spicier flavor that will keep spice lovers on their toes.
-
Chocolate Lovers: Drizzle melted dark chocolate over the frosting for a decadent, rich twist—who can resist chocolate?
-
Chai Spice: Switch to chai spice blend instead of ginger and cinnamon for a cozy, aromatic flavor change.
-
Caramel Drizzle: Top with a homemade vegan caramel sauce for a richer, indulgent dessert experience that elevates sweetness.
With these creative ideas, you can make this gingerbread layer cake uniquely yours, just like my family loves to do during the festive season. For even more cake inspiration, try our Copycat Birthday Cake or the delightful Orange Breakfast Cake.
How to Store and Freeze Gingerbread Layer Cake
Fridge: Keep your gingerbread layer cake covered in the fridge for up to 5 days to maintain its moisture and freshness.
Freezer: For longer storage, wrap individual slices tightly in plastic wrap and then place them in an airtight container. The cake can be frozen for up to 3 months.
Reheating: To enjoy your cake warm, gently thaw in the fridge overnight, then warm slices in the microwave for about 10-15 seconds before serving.
Wrapping: To prevent freezer burn, make sure to use high-quality wrapping materials for both the cake and any leftover frosting.
Gingerbread Layer Cake Recipe FAQs
What type of flour should I use for this cake?
I recommend using teff flour for its nutty flavor and structure, but if you can’t find it, buckwheat flour is a fantastic gluten-free alternative that works just as well!
How should I store the leftover gingerbread layer cake?
Store any leftovers covered in the fridge for up to 5 days. Keeping it covered helps retain moisture, ensuring each slice is as delicious as the first. It’s a great way to enjoy the flavors for a bit longer!
Can I freeze gingerbread layer cake, and how?
Absolutely! Wrap the cake tightly in plastic wrap and then in aluminum foil before placing it in the freezer. This method will help it stay fresh for up to 3 months. When you're ready to enjoy it, just thaw it overnight in the fridge. For a warm treat, microwave individual slices for about 15-20 seconds.
What if my cake turns out dense?
If your gingerbread layer cake seems dense, it might be due to stale baking powder or not enough aeration during mixing. Double-check that your baking powder is fresh, and ensure you’re not overmixing the batter after combining wet and dry ingredients. Gentle folding is key to keeping your cake light and fluffy!
Are there any dietary considerations for this gingerbread layer cake?
Yes! This recipe is both vegan and gluten-free, making it suitable for various dietary needs. Just be sure to check all ingredients to ensure they meet your specific dietary requirements, especially regarding cross-contamination with gluten. It's a thoughtful treat for family and friends, no matter their restrictions!
How do I know when the gingerbread layer cake is done baking?
A toothpick inserted into the center of the cake should come out clean or with just a few moist crumbs. The tops should be slightly domed and a rich golden-brown color, making for a perfect baked treat!
Irresistibly Moist Gingerbread Layer Cake You’ll Love
Ingredients
Equipment
Method
- Make the cranberry chia jam and cashew frosting a day ahead for optimal flavor infusion.
- In a saucepan, combine cranberries with chia seeds over medium heat for about 10 minutes until thickened.
- Soak raw cashews in water for at least four hours, then blend with coconut oil and maple syrup until smooth.
- Preheat oven to 350°F (175°C) and prepare two round cake pans.
- Whisk together teff flour, baking powder, ginger, and cinnamon in a bowl.
- Mix coconut oil, apple sauce, and other wet ingredients in a separate bowl.
- Gradually combine the dry and wet mixtures until no dry flour is visible.
- Pour batter into prepared pans and bake for 25-30 minutes.
- Let the cakes cool in the pans for 10 minutes, then invert onto a wire rack to cool completely.
- Place one cake layer on a serving plate and spread cranberry chia jam on top.
- Add the second layer and repeat the jam process.
- Spread cashew frosting generously over the top and sides of the cake.
- Decorate as desired with seasonal fruits or nuts.


Leave a Reply