
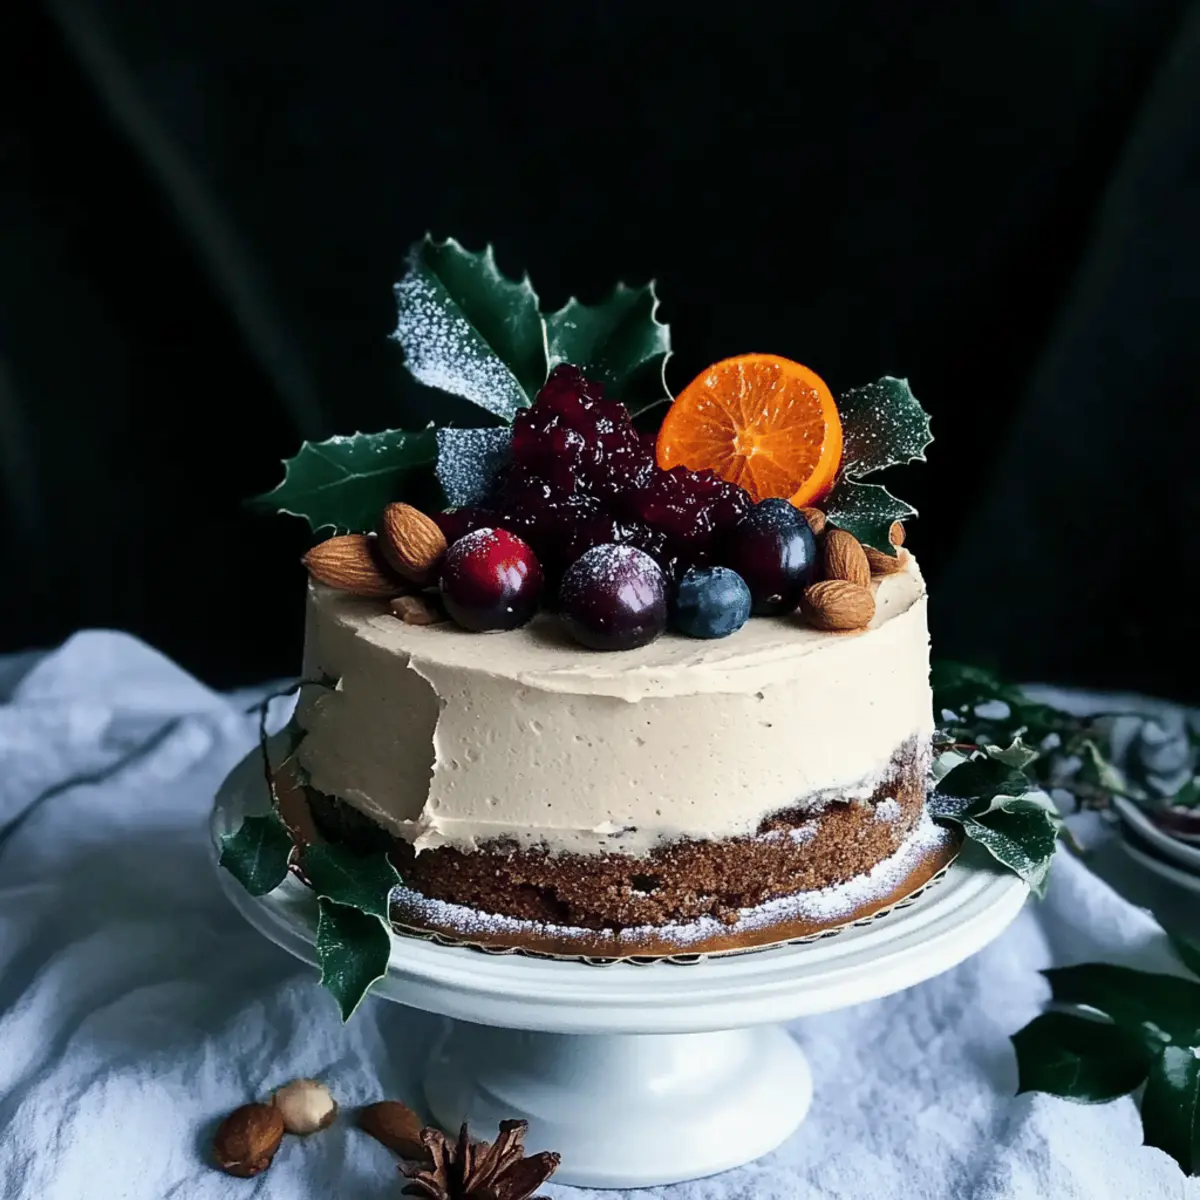
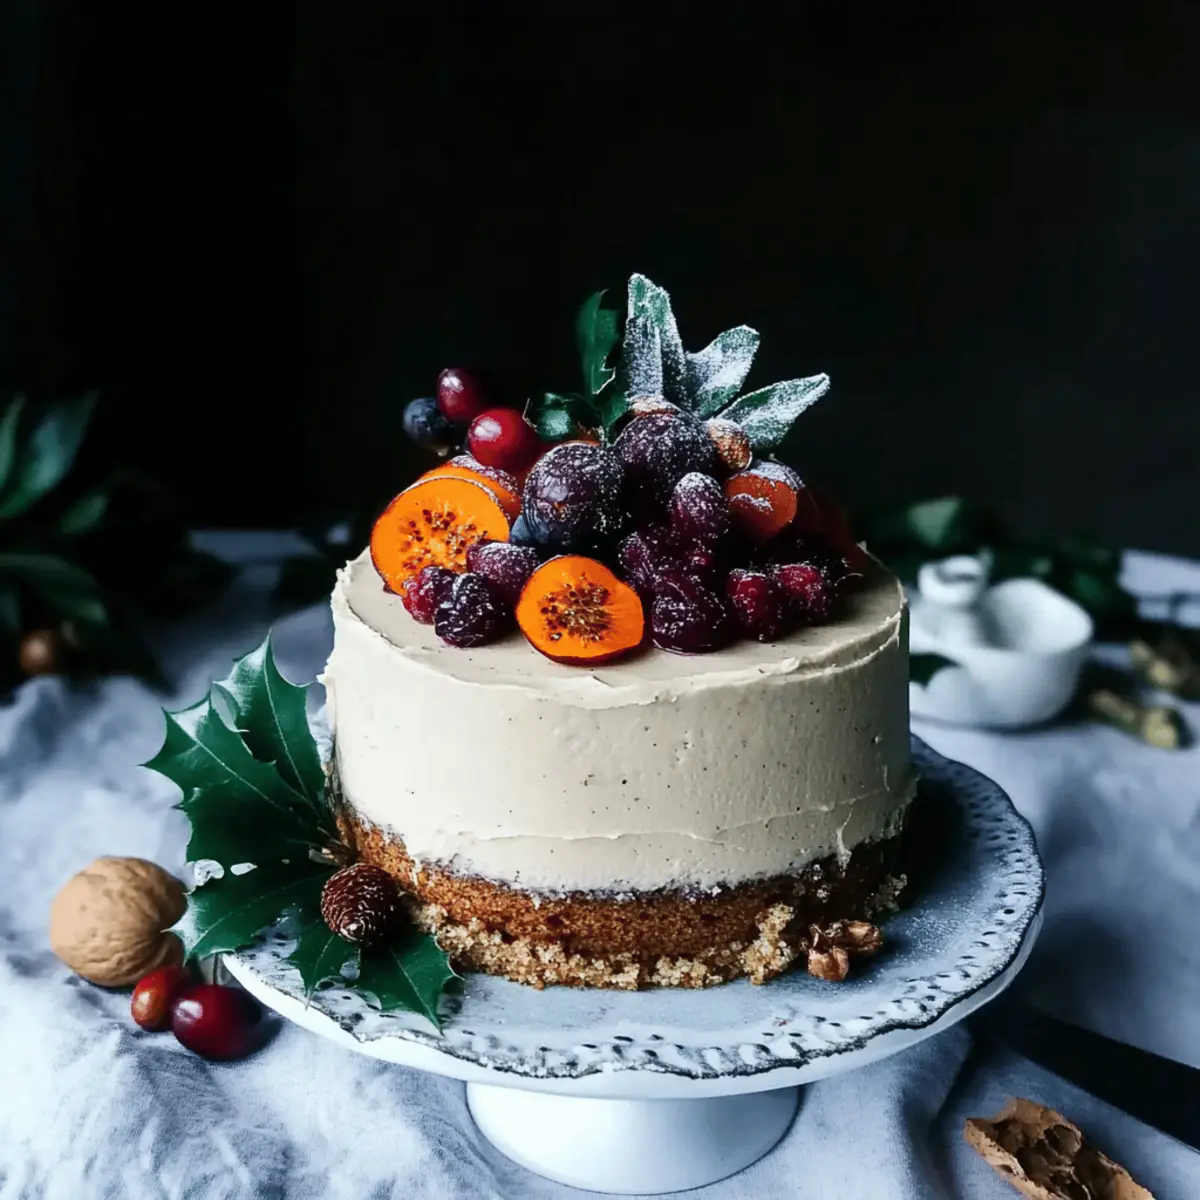
As the leaves turn and a crispness fills the air, the scent of freshly baked gingerbread takes me back to my favorite holiday memories. This Vegan Gingerbread Layer Cake is not just a dessert; it’s a celebration of the season, impeccably moist and infused with warming spices. With each decadent layer, you'll discover a delightful surprise of tangy cranberry chia jam, perfectly balancing the cake's sweetness. Not only is this luscious treat gluten-free and plant-based, but it also requires minimal prep time, making it a fantastic option for festive gatherings or cozy nights in. Ready to impress your loved ones with a cake that promises to be the highlight of any table? Let’s dive into the details!
Why is this cake a holiday must-try?
Wholesome Ingredients: Made with gluten-free teff flour and rich plant-based ingredients, this cake embraces health without sacrificing flavor.
Layered Delight: Each layer is a surprise, filled with tangy cranberry chia jam that cuts through the cake's sweetness beautifully.
Festive Appeal: Perfect for holiday gatherings, this cake shines on any dessert table and is bound to impress guests and family alike.
Easy Prep: The straightforward steps make baking this stunning cake a breeze, freeing up time for other holiday activities.
Versatile Variations: Try swapping in buckwheat or experimenting with different frostings to customize this cake to your taste—there’s something for everyone!
Celebrate the season with a deliciously moist treat that captures the spirit of the holidays—just like this Chocolate Zucchini Cake that’s made for cheerful gatherings!
Gingerbread Layer Cake Ingredients
For the Cake
- Teff Flour – Provides structure and a nutty flavor; substitute with buckwheat if you prefer a different taste.
- Ginger – Adds warmth and a spicy kick; adjust to your preferences for that perfect zing.
- Cinnamon – Brings a depth of flavor that enhances the ginger; use freshly ground for the best aroma.
- Coconut Oil – Helps create a tender crumb; a mild oil can work as a substitute if needed.
- Apple Sauce – Keeps the cake moist and adds natural sweetness; mashed banana works as a great alternative.
- Baking Powder – Ensures the cake rises beautifully; check the freshness for optimal results.
For the Filling
- Cranberry Chia Jam – Provides a burst of tartness to contrast the cake’s sweetness; prepare it ahead for deeper flavors.
For the Frosting
- Cashew Butter – Offers a creamy texture; blend with more coconut oil for smooth consistency.
- Maple Syrup – Adds a subtle sweetness to the frosting; honey can be swapped for a non-vegan alternative.
This Gingerbread Layer Cake is not just another dessert; it's a delightful celebration of the season that will warm the hearts of all who share it!
Step‑by‑Step Instructions for Gingerbread Layer Cake
Step 1: Prepare the Jam and Frosting
Start by preparing the cranberry chia jam and cashew frosting, ideally the night before. This allows the flavors to meld beautifully. For the jam, combine fresh or frozen cranberries with chia seeds and a sweetener of choice—let it set in the fridge and thicken. For the frosting, blend cashew butter with coconut oil and maple syrup until smooth and creamy.
Step 2: Preheat and Grease
Preheat your oven to 350°F (175°C) while you grease two 8-inch round cake pans with coconut oil to prevent sticking. Consider lining the bottoms with parchment paper for extra assurance. This preparation sets the stage for baking your moist Gingerbread Layer Cake to perfection.
Step 3: Mix Dry Ingredients
In a large bowl, whisk together teff flour, ginger, cinnamon, and baking powder until evenly combined. This step creates the fragrant base for your gingerbread layers. Pay attention to ensure no lumps remain for a smooth batter. The warm aroma of spices will fill your kitchen as you prepare for the next stage.
Step 4: Blend Wet Ingredients
In another bowl, combine the wet ingredients, including apple sauce and melted coconut oil. Mix thoroughly until you see a uniform consistency. This mixture will bring moisture and flavor to your Gingerbread Layer Cake. Take a moment to savor the sweet, inviting scent of your wet ingredients.
Step 5: Combine Wet and Dry Ingredients
Gradually pour the wet mixture into the bowl with the dry ingredients. Stir gently but thoroughly until everything is just combined. Be careful not to overmix, as this will affect the cake's texture. You’ll know it’s ready when the batter is smooth and slightly thick, yet pourable.
Step 6: Bake the Cakes
Divide the batter evenly between the prepared cake pans and smooth the tops with a spatula. Bake in the preheated oven for 25-30 minutes, or until a toothpick inserted in the center comes out clean. Your Gingerbread Layer Cake will rise beautifully and smell divine, filling your home with festive cheer.
Step 7: Cool the Cakes
Once baked, remove the cakes from the oven and let them cool in the pans for about 10 minutes. Then carefully transfer them to wire racks to cool completely. Cooling is crucial to achieving the perfect frosting consistency on your Gingerbread Layer Cake without melting it during assembly.
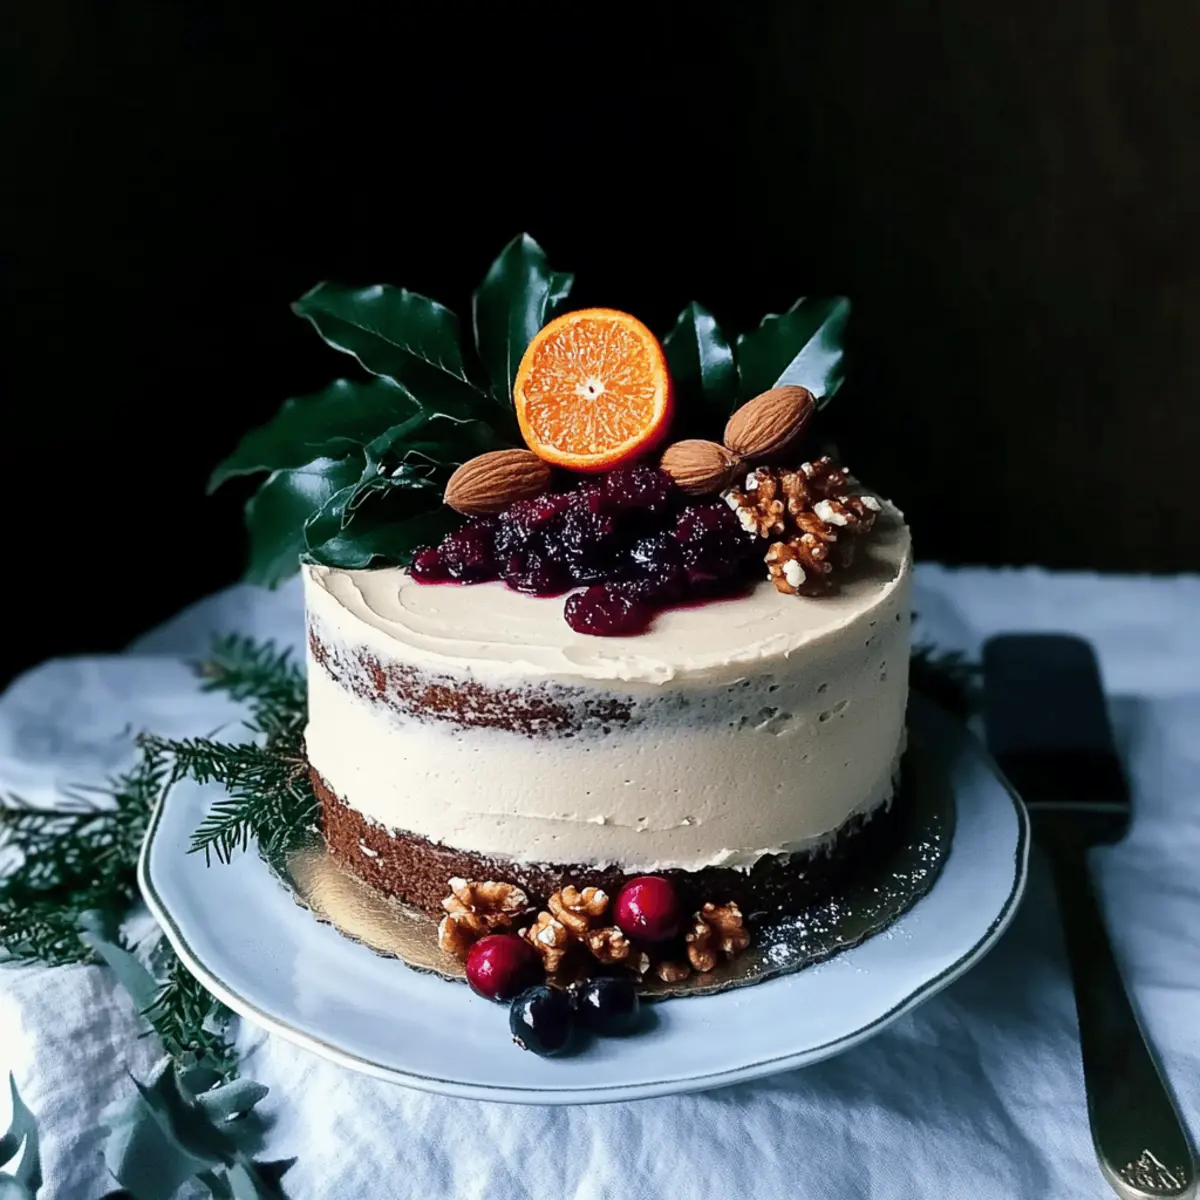
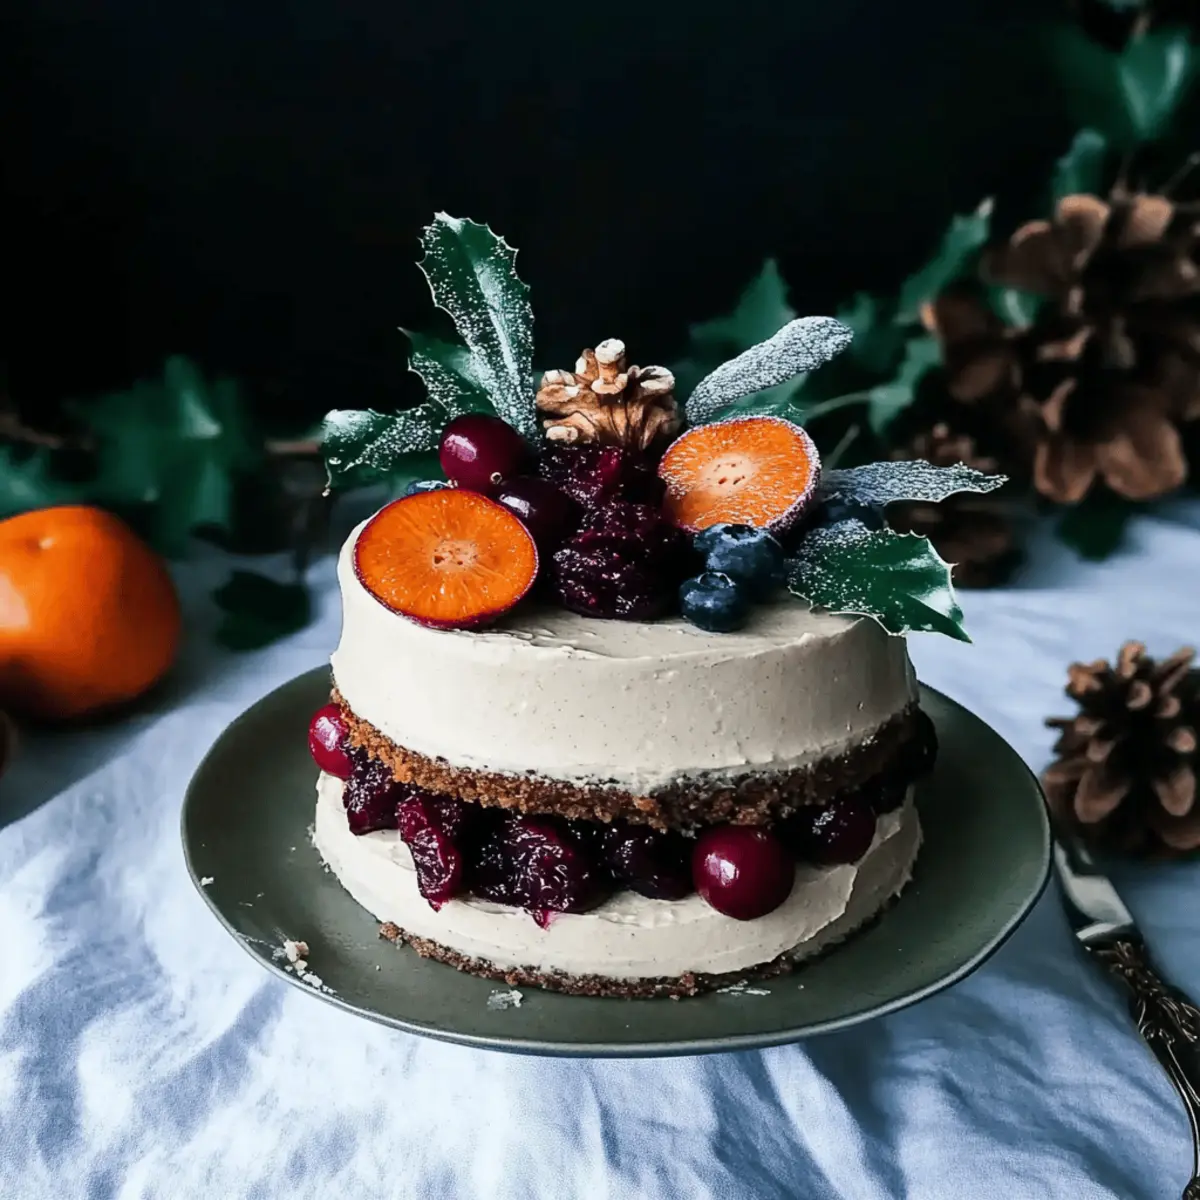
Step 8: Assemble the Cake
To assemble, place one layer of cake on a serving plate. Spread a generous layer of the cranberry chia jam on top, followed by the second cake layer. Repeat this layering process if you’re making a multi-tiered cake, finishing with the top layer. The vibrant jam will provide a lovely pop of color.
Step 9: Frost the Cake
Once assembled, use the cashew frosting to cover the top and sides of the Gingerbread Layer Cake. Spread it evenly with a spatula, creating a smooth, luxurious finish. Take your time to make it visually appealing, as this stunning cake is sure to be a centerpiece at any gathering.
Step 10: Serve and Celebrate
Slice your beautiful Gingerbread Layer Cake and serve it with any remaining cranberry chia jam on the side for drizzling. This delightful dessert pairs wonderfully with a warm cup of spice tea or coffee, making it a perfect treat for festive celebrations or cozy family nights alike.
What to Serve with Gingerbread Layer Cake
As you gather around with loved ones, consider these delightful pairings that elevate your festive baking experience.
-
Spiced Chai Latte: The warm, fragrant notes of cinnamon and ginger in spiced chai perfectly complement the cake's rich flavors. It's like a cozy hug in a cup!
-
Cranberry Orange Salad: A fresh and zesty salad featuring tart cranberries and a citrusy dressing brightens the table and balances the cake's sweetness beautifully.
-
Vegan Vanilla Ice Cream: Creamy and smooth, a scoop of vegan vanilla ice cream adds a comforting coolness, creating a lovely contrast with the warm spices of the cake.
-
Maple-Glazed Pecans: Crunchy and sweet, these pecans bring a festive flair and nutty depth that pairs wonderfully with the cake's tender texture.
-
Holiday Fruit Platter: A colorful array of seasonal fruits like oranges, pears, and pomegranates not only looks beautiful but also provides a refreshing contrast to the dense layers.
-
Warm Ginger Tea: Emphasizing the ginger's natural warmth, a cup of ginger tea enhances the cozy experience of enjoying your gingerbread layer cake on chilly evenings.
-
Chocolate Ganache: Drizzle rich chocolate ganache over slices of cake for a decadent touch that adds depth and a touch of indulgence to your dessert.
These pairing ideas aim to create a full experience that captures the spirit of the season while celebrating your delicious gingerbread layer cake!
Gingerbread Layer Cake Variations
Feel free to get creative with this recipe and make it your own with these delightful twists!
- Dairy-Free Frosting: Swap cashew frosting with coconut whipped cream for a light and airy alternative.
- Different Flour: Use buckwheat instead of teff flour for a unique flavor profile while remaining gluten-free.
- Nutty Addition: Toss in chopped walnuts or pecans for a delightful crunch and extra richness throughout the cake.
- Fruit Variations: Swap cranberry jam for homemade raspberry or blueberry chia jam to add a different fruity punch.
- Spice Adjustments: Add a pinch of nutmeg or allspice for a warm, aromatic twist that surprises the palate.
- Chocolate Drizzle: Elevate your frosting with a rich chocolate ganache drizzle over the top for a decadent finish.
- Heat Boost: Mix in a dash of cayenne pepper for a warm kick that complements the ginger’s spiciness beautifully.
These variations make your Gingerbread Layer Cake versatile enough to accommodate everyone’s taste. If you're in the mood for more holiday treats, check out this cozy Chocolate Cupcake Decadent that'll surely make spirits bright!
Expert Tips for Gingerbread Layer Cake
-
Fresh Ingredients: Always use fresh baking powder to ensure your Gingerbread Layer Cake rises properly. Stale leavening agents can lead to dense results.
-
Cool Completely: Allow your cakes to cool completely before frosting. This prevents melting, ensuring that your frosting holds its beautiful shape.
-
Adjust Spice Levels: Feel free to adjust the amount of ginger and cinnamon according to your taste. A little extra spice can elevate the flavor profile beautifully.
-
Check Flour Substitutes: If using buckwheat instead of teff flour, check for weight equivalency, as this can change the cake's texture.
-
Layering with Jam: Apply the cranberry chia jam carefully between layers; too much jam can cause slipping. A thin layer is usually perfect for balance.
How to Store and Freeze Gingerbread Layer Cake
Fridge: Keep any leftover gingerbread layer cake covered in the fridge for up to 5 days. This helps maintain its moisture and fresh flavors.
Freezer: For longer storage, wrap the cake tightly in plastic wrap and then in aluminum foil before placing it in the freezer. It can last for up to 3 months.
Thawing: To enjoy your frozen gingerbread layer cake, transfer it to the fridge and let it thaw overnight. This allows the texture to return to its delightful softness.
Reheating: If you prefer your cake warm, slice a piece and microwave it for about 10-15 seconds, just until warmed through but not hot. Enjoy that comforting spice!
Make Ahead Options
These delicious Gingerbread Layer Cakes are perfect for meal prep enthusiasts! You can prepare the cranberry chia jam and cashew frosting up to 3 days in advance to allow the flavors to deepen. Simply store the jam in an airtight container in the refrigerator and blend the frosting for a smooth consistency, refrigerating until ready to use. Additionally, the cake layers can be baked ahead and kept frozen for up to 1 month—just wrap them tightly in plastic wrap and aluminum foil to maintain freshness. When you’re ready to serve, thaw the cake layers in the fridge overnight and assemble with the jam and frosting for restaurant-quality results with minimal effort!
Gingerbread Layer Cake Recipe FAQs
What type of flour is best for this gingerbread layer cake?
I love using teff flour for its unique nutty flavor and excellent structure! However, if you can’t find it or prefer something else, buckwheat flour is a fantastic gluten-free substitute. Just make sure to measure accurately for the best results.
How should I store the gingerbread layer cake?
Keep any leftovers covered in the fridge for up to 5 days to maintain their moisture and flavor. I usually wrap the slices in parchment paper and place them in an airtight container to keep them fresh.
Can I freeze the gingerbread layer cake?
Absolutely! To freeze, wrap the cake tightly in plastic wrap and then in aluminum foil to prevent freezer burn. It can last for up to 3 months. When you're ready to enjoy it, simply thaw it in the fridge overnight before serving.
What can I do if my gingerbread layer cake turned out dense?
If your cake is denser than expected, check if your baking powder is fresh—old leavening agents can affect the rise. Additionally, ensure you’re measuring your ingredients correctly, especially the flour. Overmixing can also lead to a dense texture, so try mixing just until combined next time!
Is this cake safe for people with allergies?
This gingerbread layer cake is vegan and gluten-free, making it suitable for those avoiding animal products and gluten. If you're concerned about specific allergies, be sure to check the labels on ingredients like coconut oil and cashew butter. Always be cautious with cross-contamination if you’re serving someone with a nut allergy.
Can I make any substitutions in the baba recipe for dietary needs?
Absolutely! You can substitute apple sauce with mashed banana for an alternative sweetness or use a different nut butter for the frosting, like almond butter. These swaps can slightly change the flavor profile, but they will still yield a delicious cake!
Delicious Vegan Gingerbread Layer Cake for Festive Cheers
Ingredients
Equipment
Method
- Prepare the cranberry chia jam and cashew frosting the night before to allow flavors to meld beautifully.
- Preheat the oven to 350°F (175°C) and grease two 8-inch round cake pans with coconut oil.
- In a large bowl, whisk together teff flour, ginger, cinnamon, and baking powder until combined.
- In another bowl, mix together the wet ingredients: apple sauce and melted coconut oil until uniform.
- Gradually combine the wet mixture into the dry ingredients, stirring gently until just combined.
- Divide the batter between the prepared pans and bake for 25-30 minutes, until a toothpick comes out clean.
- Cool the cakes in the pans for about 10 minutes, then transfer to wire racks to cool completely.
- Assemble the cake by placing one layer on a serving plate, spread cranberry chia jam on top, and add the second layer.
- Frost the top and sides with the cashew frosting, smoothing it out with a spatula.
- Slice and serve your Gingerbread Layer Cake with additional cranberry chia jam if desired.


Leave a Reply