
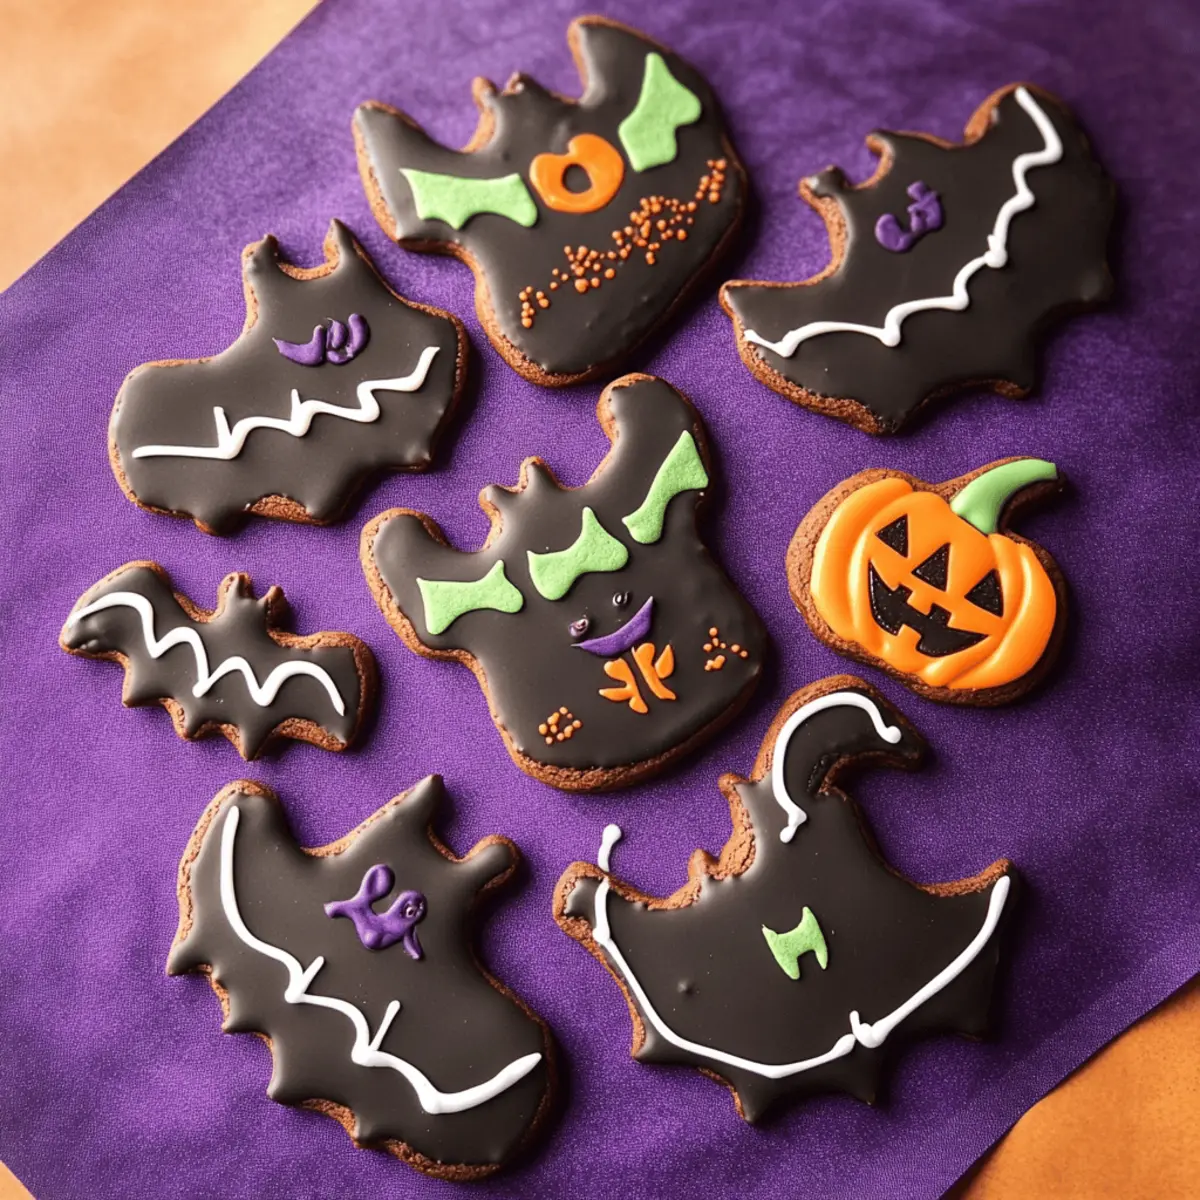
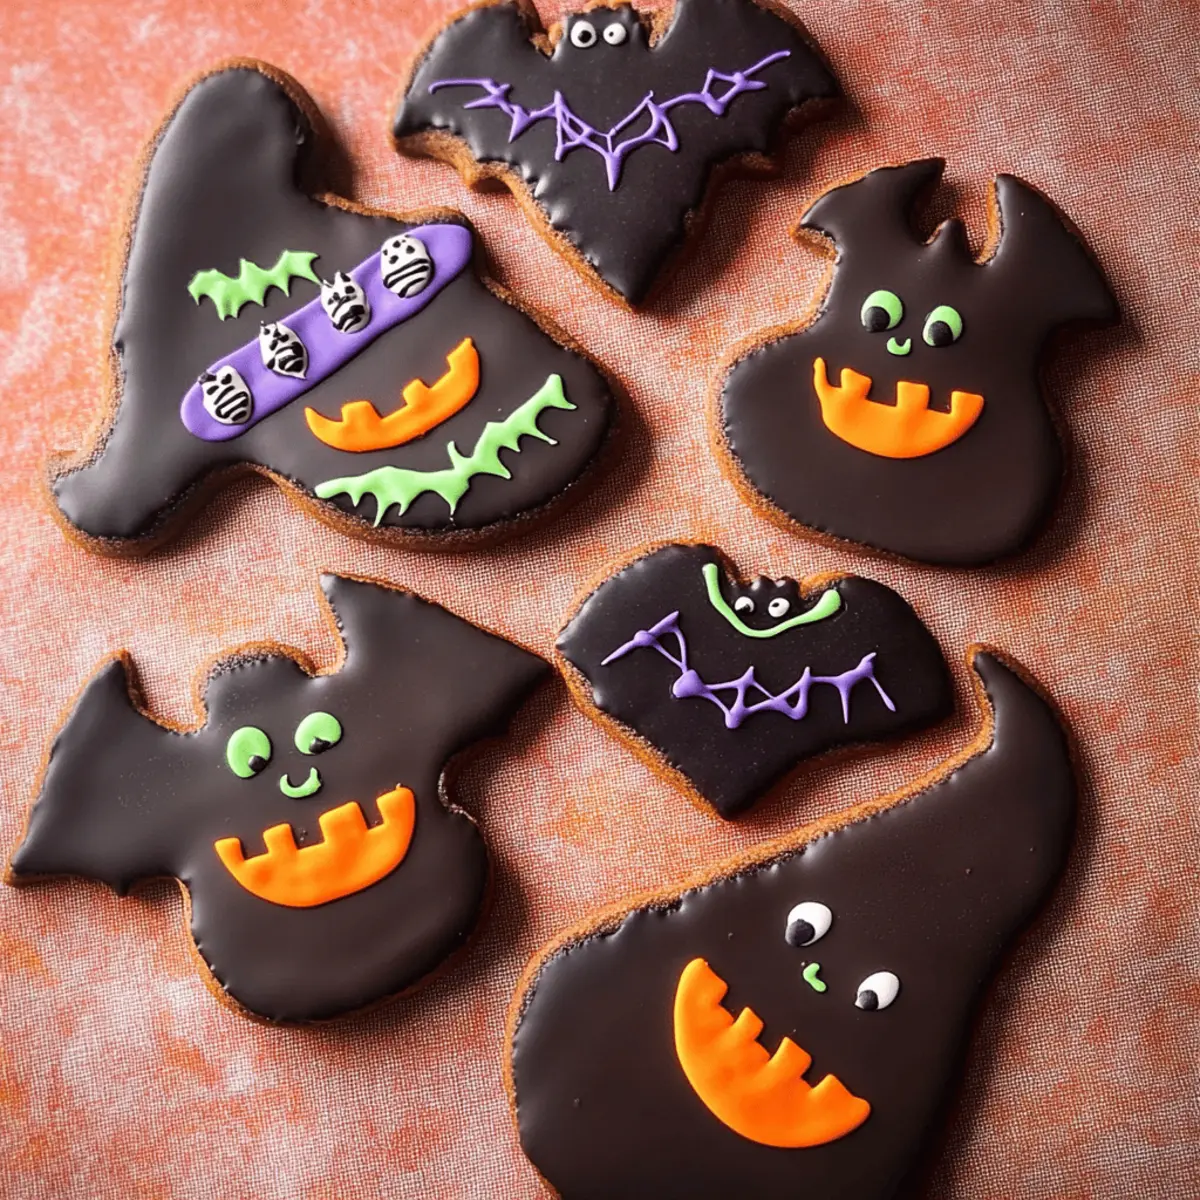
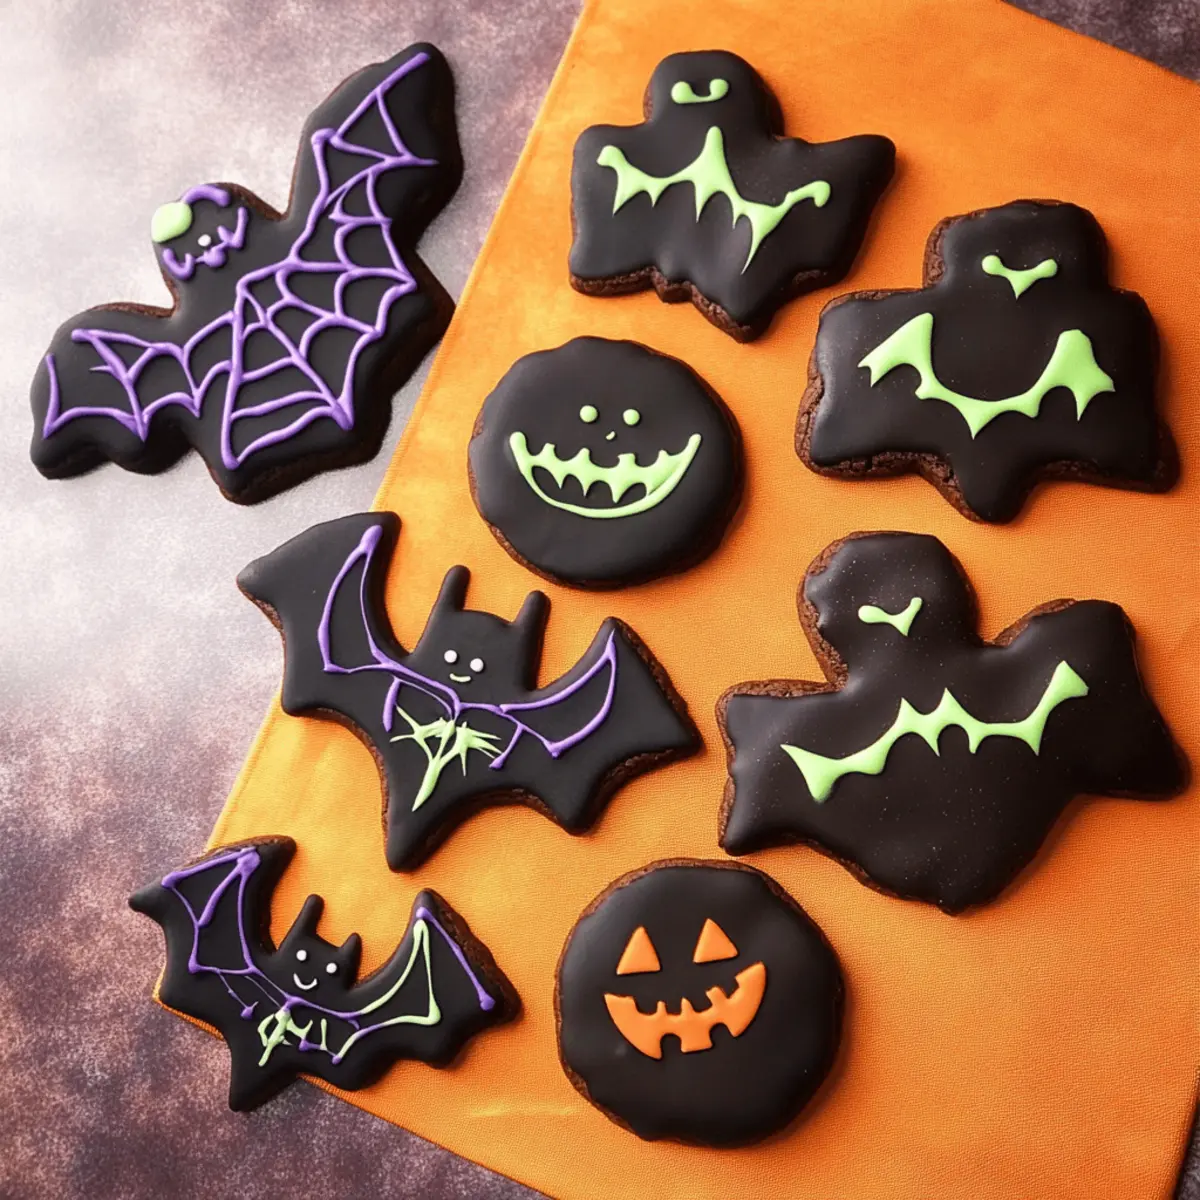
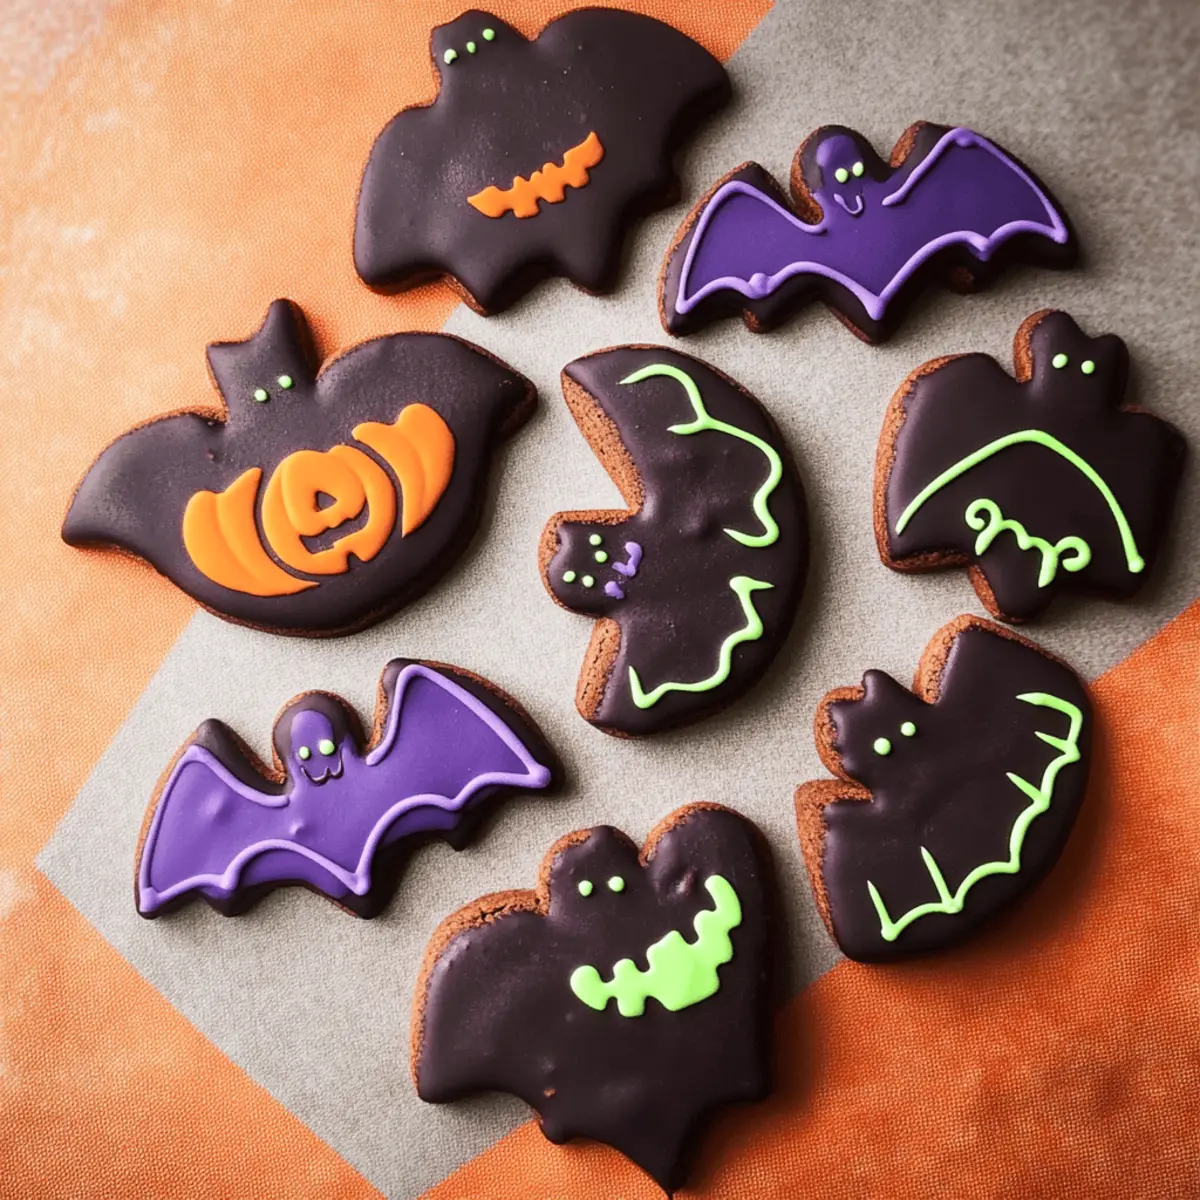
The faint giggles of children filled the air as we prepared to bake a sweet treat that would transform our kitchen into a Halloween wonderland. These Spooktacular Halloween Decorated Chocolate Cookies are not only deliciously rich with chocolate flavor but also serve as the perfect blank canvas for your creative decorating ideas. With family-friendly fun at the forefront, you’ll love how simple this recipe is—an ideal project for including kids in the Halloween festivities. By using black cocoa powder, these cookies take on a strikingly deep hue that makes them the star of any Halloween gathering. Plus, they’re sturdy enough to hold up against the delightful royal icing we’ll mix up to make them truly pop! Ready to add some spooky flair to your holiday traditions? Let’s dive into the tips and tricks that will make your cookie-decorating experience a memorable one.
Why Are These Cookies So Fun?
Family Bonding: Baking these Halloween Decorated Cookies offers a fantastic opportunity for quality time with loved ones, making it a memorable activity everyone will cherish.
Easy Decoration: The simple royal icing technique allows kids to unleash their creativity, transforming each cookie into a spooky masterpiece.
Rich Chocolate Flavor: Made with black cocoa powder, these cookies boast a deep, indulgent chocolate taste that's sure to impress all chocolate lovers.
Versatile Designs: Whether you choose spooky bats or cheerful pumpkins, you can customize your cookies to match any Halloween theme, promising endless fun.
Make-Ahead Convenience: Prepare the dough in advance and chill it, so you can enjoy stress-free baking during the busy holiday season. If you're looking for more cookie ideas, don’t forget to check out my easy Oatmeal Cookies Chewy or the delightful Pineapple Cookies Tropical.
Halloween Decorated Cookies Ingredients
For the Cookie Base
- Butter – This rich ingredient provides a wonderful flavor. Ensure it’s at room temperature for easy creaming.
- Powdered Sugar – Adds sweetness and contributes to a fluffy texture in the cookie dough.
- Egg – Serves as a binding agent, adding necessary moisture to the cookies.
- Flour – Lends structure to your cookies, keeping them sturdy and perfect for decorating.
- Black Cocoa Powder – Delivers a deep, rich chocolate flavor and striking color. Substitute with natural cocoa powder for lighter cookies, though the chocolate flavor will be milder.
- Dutch Process Cocoa Powder – A delightful alternative that gives a softer cocoa taste if black cocoa is too intense.
- Salt – Enhances and balances the flavors, ensuring every bite is delicious.
For the Royal Icing
- Royal Icing – Created with egg whites and powdered sugar, it serves as an eye-catching decorative element that sets hard for beautiful designs.
- Gel Food Coloring – A perfect addition to create festive colors for decorating your Halloween Decorated Cookies.
Step‑by‑Step Instructions for Halloween Decorated Cookies
Step 1: Cream Butter and Sugar
Begin by taking room-temperature butter and placing it in a large mixing bowl. Use an electric mixer to beat the butter and powdered sugar together on medium speed until the mixture becomes light and fluffy, which should take about 3-5 minutes. This fluffy texture will ensure your Halloween Decorated Cookies are soft and delightful!
Step 2: Add Egg
Crack one egg into the butter and sugar mixture, then mix on low speed until fully incorporated. The egg adds moisture and binds all ingredients together, so make sure there are no visible streaks of egg. This step should only take about 1-2 minutes, but it is crucial for the structure of your cookies.
Step 3: Mix Dry Ingredients
In a separate bowl, combine the flour, black cocoa powder, Dutch cocoa powder, and salt. Whisk these dry ingredients together until they are evenly mixed, which helps to distribute the cocoa and salt evenly throughout. This step prepares the dry mixture to be added to the wet ingredients in a smooth transition without clumps.
Step 4: Combine Mixtures
Slowly add the dry ingredients to the wet butter mixture while mixing on low speed. As you mix, scrape down the sides of the bowl to ensure all ingredients are being combined. The dough may appear slightly crumbly but should hold together when pressed. This process typically takes about 2-3 minutes and sets the foundation for your Halloween Decorated Cookies.
Step 5: Chill Dough
Once the dough is well combined, form it into a disc shape and wrap it tightly in plastic wrap. Refrigerate the dough for 30-45 minutes, or even up to 2 days if you’re preparing ahead. Chilling the dough prevents the cookies from spreading too much during baking, resulting in that perfect cookie shape.
Step 6: Roll and Cut
After chilling, place the dough between two sheets of parchment paper, and roll it out to about 4mm thick using a rolling pin. This thickness will ensure your cookies hold their shape while still being soft. Use your favorite Halloween cookie cutters to cut out shapes, such as bats and pumpkins, ensuring each shape is properly formed before moving to the next step.
Step 7: Chill Cut Cookies
Once cut, transfer the cookies to a baking tray lined with parchment paper, spacing them slightly apart. Chill these cut cookies in the fridge for at least 1 hour or overnight; this preserves their shape during baking and makes them even more sturdy for decorating after.
Step 8: Preheat Oven
As the cookies chill, preheat your oven to 160°C (320°F) with the fan assist. Preheating ensures an even temperature throughout the baking process, which is key to achieving that soft yet firm texture in your Halloween Decorated Cookies.
Step 9: Bake
Once the oven is ready and the cookies have chilled, bake them for 10 minutes, or until they look slightly soft in the center. Avoid overbaking, as the cookies will firm up as they cool. Keep an eye on them for that perfect balance of softness and doneness!
Step 10: Cool
After baking, allow the cookies to cool on the baking tray for about 5 minutes. This short wait makes it easier to transfer them to a wire rack without breaking. Let the cookies cool completely before you start decorating, as this will help the royal icing set properly.
Step 11: Decorate
Once your Halloween Decorated Cookies are completely cool, it's time to prepare the royal icing. Whip up your icing while the cookies cool, aiming for a honey-like consistency for easy piping. Decorate the cookies in fun Halloween themes once ready, getting creative with colors and designs!
How to Store and Freeze Halloween Decorated Cookies
Room Temperature: Store the decorated cookies in an airtight container at room temperature for up to 1 week to keep them fresh and tasty.
Fridge: If your climate is warm or humid, you can store them in the fridge for up to 1 week, but note that this may affect the icing's texture.
Freezer: For longer storage, freeze undecorated cookies in an airtight container for up to 1 month. Thaw in the fridge before decorating.
Reheating: If you prefer warm cookies, bake them directly from frozen for a couple of extra minutes to soften slightly; enjoy the delightful chocolate flavor!
Expert Tips for Halloween Decorated Cookies
-
Chill the Dough: Ensure the dough is well-chilled before rolling. This prevents spreading, ensuring your Halloween Decorated Cookies maintain their shapes during baking.
-
Consistent Icing: Aim for a honey-like consistency with your royal icing for easier piping. If it’s too runny, it will not hold its shape.
-
Room Temperature Rest: If your dough has been refrigerated for more than 45 minutes, let it warm up at room temperature for about 10 minutes before rolling out.
-
Cover Icing: To prevent royal icing from drying and forming a crust, keep it covered with a damp cloth when not in use.
-
Baking Watch: Keep an eye on your cookies while they bake; they should look soft at the end of the time to avoid overbaking and losing that tender texture.
Make Ahead Options
These Halloween Decorated Cookies are perfect for busy home cooks looking to save time during the festive season! You can prepare the cookie dough up to 3 days in advance; simply chill it in the refrigerator wrapped tightly in plastic wrap to maintain freshness. If you’d like to freeze the dough, form it into a disc, wrap it well, and it will keep in the freezer for up to 1 month. When you're ready to bake, thaw the dough in the refrigerator overnight and then roll and cut your cookies. Don’t forget to chill the cut cookies for at least 1 hour before baking to ensure they hold their shape. With these make-ahead tips, you can enjoy a stress-free baking experience while still creating deliciously spooky treats!
What to Serve with Spooktacular Halloween Decorated Cookies
As you whip up a storm with these delightful treats, consider these perfectly paired options to complete your festive celebration.
-
Witch's Brew Hot Cocoa: Rich and creamy, this cocoa is the ultimate drink to accompany your cookies, bringing warmth and nostalgia to your Halloween gathering.
-
Crispy Apple Slices: The crunch and natural sweetness of fresh apples create a refreshing contrast to the rich chocolate, making them a delightful and healthful addition to the table.
-
Candy Corn Treats: Embrace the Halloween spirit with these colorful, sweet snacks that provide a fun and festive touch alongside your cookies. They are sure to spark conversations!
-
Pumpkin Spice Cupcakes: Soft, spiced, and oh-so-delicious, these cupcakes mirror the seasonal vibes while balancing out the sweetness of your cookies with hints of cinnamon and nutmeg.
-
Ghoulish Guacamole with Tortilla Chips: The creamy texture of guacamole adds a savory touch to counteract the sweetness of the cookies, making for an exciting flavor adventure.
-
Spooky Fruit Platter: An assortment of blackberries, oranges, and bananas creatively arranged makes a visually stunning and nutritious accompaniment to your spooky treats.
-
Chilled Spiced Apple Cider: This drink brightens the festive atmosphere with its gentle warmth and hints of spices, harmonizing beautifully with the chocolatey richness of the cookies.
-
Pecan Pie Bars: The nutty flavors and buttery crust of these bars offer a lovely counterpart to your Halloween Decorated Cookies, making for a delightful dessert platter.
Halloween Decorated Cookies Variations
Feel free to let your creativity shine by exploring these fun twists on the classic Halloween Decorated Cookies recipe!
-
Dairy-Free: Substitute butter with coconut oil or a dairy-free spread for a scrumptious alternative that everyone can enjoy. It gives the cookies a delightful flavor twist while keeping them tender!
-
Flavor Boost: Add a splash of vanilla extract or almond extract to the dough for a touch of extra warmth and flavor. It blends beautifully with chocolate, creating a delightful aroma as you bake.
-
Nutty Crunch: Mix in some finely chopped nuts, like walnuts or pecans, for a surprise crunch in every bite. The contrast of textures elevates the cookie experience, making them even more enjoyable!
-
Spiced Up: Blend in a teaspoon of cinnamon or pumpkin spice into the dry ingredients for a warm, autumnal flavor. It introduces a delightful hint of warmth that perfectly complements the chocolatey richness.
-
Gluten-Free: Swap all-purpose flour with a gluten-free blend for a delicious treat that everyone can savor. The cookies will still maintain their fabulous structure, so no one will miss the gluten!
-
Bright Icing: Use vibrant gel food coloring in shades of orange or green to bring a festive spirit to your royal icing decorations. Think candy corn colors for a cheerful presentation that adds to the Halloween aesthetic!
-
Crispy Edges: Roll the cookie dough a little thinner for a crispier cookie that pairs beautifully with the soft royal icing. You might even find that this texture contrast brings a delightful surprise to your taste buds!
If you enjoyed these Halloween Decorated Cookies, you may also want to try my delightful Pineapple Cookies Tropical or the unique White Chocolate Cookies for a change!
Halloween Decorated Cookies Recipe FAQs
How do I select the right cocoa powder for my Halloween Decorated Cookies?
Absolutely! For these cookies, I recommend using black cocoa powder for a rich chocolate flavor and a striking hue. If you want a milder taste, natural cocoa powder can be substituted, though the cookies will be lighter in color. Dutch process cocoa powder is another option if black cocoa seems too intense, as it offers a softer chocolate flavor.
How should I store my decorated Halloween cookies?
Store your decorated cookies in an airtight container at room temperature for up to 1 week. If you live in a warm or humid climate, consider refrigerating them to maintain freshness, but be aware this could alter the texture of the royal icing slightly. Just make sure to keep them separated with parchment paper to avoid sticking!
Can I freeze my Halloween Decorated Cookies?
Very! You can freeze undecorated cookies for up to 1 month. To do this, place them in an airtight container lined with parchment paper to prevent them from sticking together. When you're ready to enjoy them, simply thaw the cookies in the fridge before decorating. If you prefer them warm, bake them directly from frozen for a couple of extra minutes.
What can I do if my royal icing is too runny?
If your royal icing is too thin, you can fix it by gradually adding more powdered sugar until it reaches a honey-like consistency, perfect for piping. Aim for a thickness that holds its shape when you pipe it. If you need a detailed guide, mix 1 cup of powdered sugar with 1 teaspoon of water initially, then adjust the texture by adding sugar in small increments.
Are these Halloween cookies safe for kids with allergies?
Yes! However, if you’re catering to specific allergies, please check the ingredient labels carefully. For gluten-free options, you can easily swap all-purpose flour for a gluten-free flour blend. Additionally, ensure the royal icing ingredients do not contain allergens for those sensitive to eggs or sugar. Always better to be safe!
How do I ensure my cookies don’t spread too much while baking?
To prevent your Halloween Decorated Cookies from spreading during baking, it’s imperative to chill your cookie dough thoroughly, ideally for at least 30-45 minutes. This firms up the butter, resulting in well-shaped cookies. When you cut the cookies out, also chilling them again before baking helps maintain their shape beautifully!
Delicious Halloween Decorated Cookies for Festive Fun
Ingredients
Equipment
Method
- Cream Butter and Sugar: Beat the butter and powdered sugar together until light and fluffy, about 3-5 minutes.
- Add Egg: Mix in the egg until fully incorporated on low speed for 1-2 minutes.
- Mix Dry Ingredients: In another bowl, whisk together flour, black cocoa powder, Dutch cocoa powder, and salt.
- Combine Mixtures: Slowly add dry ingredients to the wet mixture while mixing on low, taking 2-3 minutes.
- Chill Dough: Form dough into a disc, wrap it, and refrigerate for 30-45 minutes.
- Roll and Cut: Roll the chilled dough to 4mm thick and use cookie cutters for desired shapes.
- Chill Cut Cookies: Place cut cookies on a tray, chill for at least 1 hour.
- Preheat Oven: Preheat oven to 160°C (320°F) with fan assist.
- Bake: Bake for 10 minutes until slightly soft in the center.
- Cool: Let cookies cool on the tray for 5 minutes before transferring to a wire rack.
- Decorate: Prepare royal icing and decorate cooled cookies with creative designs.


Leave a Reply