
As I rummaged through my pantry, the sight of those innocent eggs sparked a mischievous idea. What if I turned them into something spooktacular for Halloween? Enter my Halloween Deviled Eggs, affectionately known as Swamp Eggs. These naturally dyed treats boast a creamy garlic and dill filling that’s not only visually bewitching but also free from any artificial coloring. They’ll impress guests at your spooky gatherings and make for a healthier option compared to traditional festive snacks. Plus, the fun of dyeing the eggs allows for creativity that’s just as entertaining as the flavors in every bite! Curious about turning your next soiree into a haunted masterpiece? Let’s dive into the recipe!
Why are these Halloween Deviled Eggs special?
Naturally Dyed: Say goodbye to artificial dyes and embrace vibrant colors through natural ingredients!
Wholesome Touch: With a creamy garlic and dill filling, these Swamp Eggs are a healthier alternative for your Halloween gatherings.
Family Fun: Involve the kids in the dyeing process, sparking creativity and making memories together.
Retractable Deliciousness: Perfectly savory, satisfying the palate while remaining light. Serve as a spooky appetizer or snack that will disappear in no time!
Versatile Options: Easily adapt the recipe for any occasion with different colors and fillings, such as spicy sriracha for a thrilling twist.
Halloween Deviled Eggs Ingredients
Prepare to create your very own spooktacular treats!
For the Eggs
- Large Eggs – The base of the recipe; provide structure and protein.
Prep Note: Hard-boiled before dyeing.
For the Dye
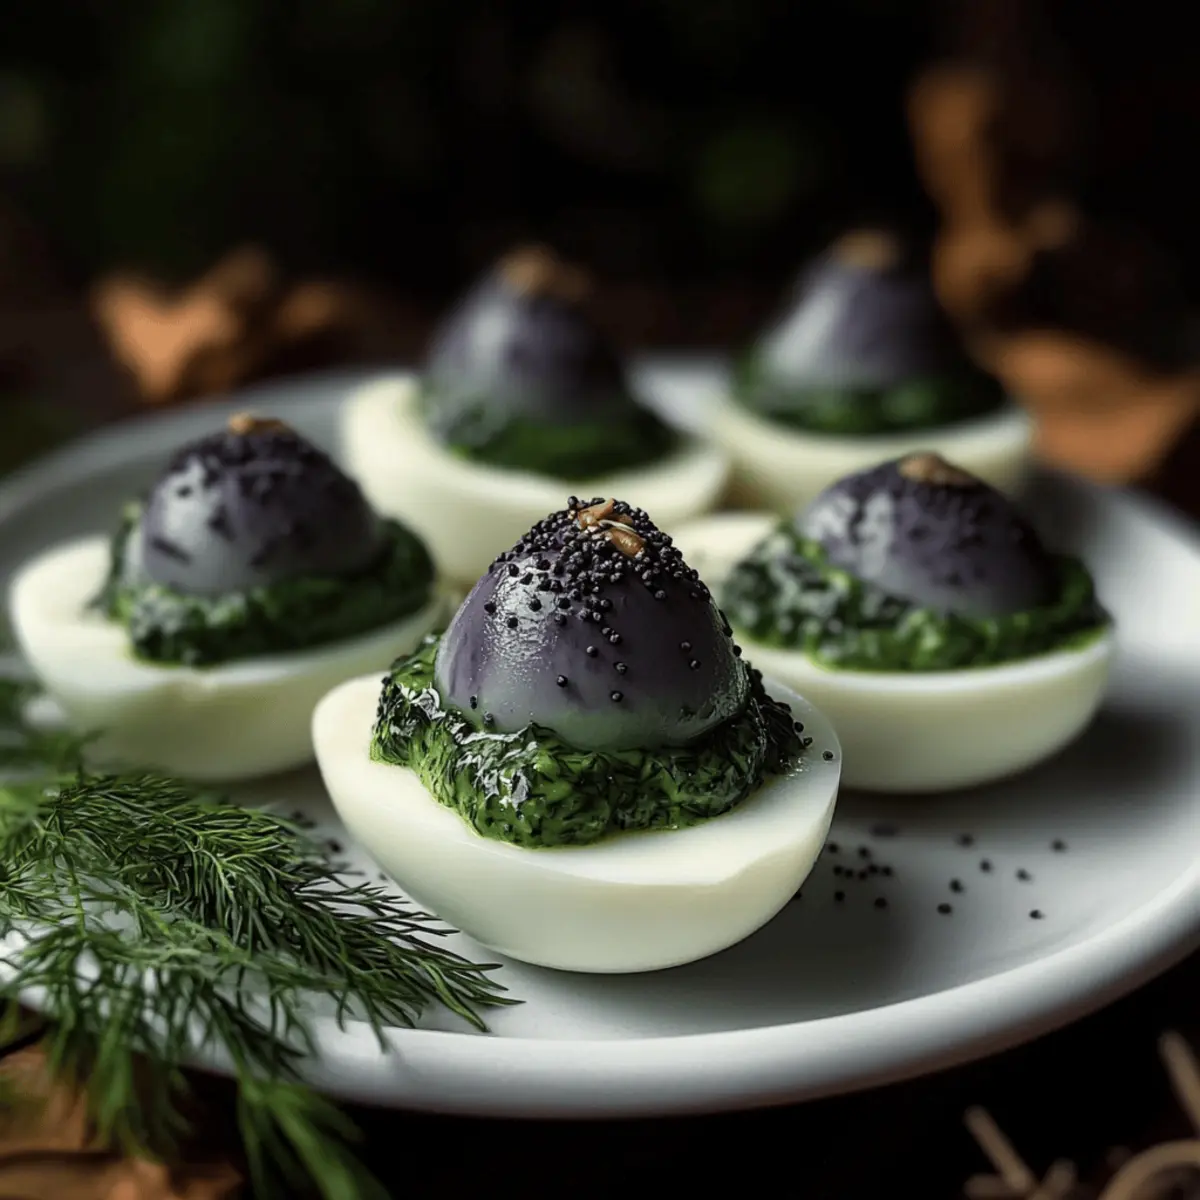
- Frozen Blueberries – For natural dye; imparts a purple hue through boiling.
Substitution: Use beet juice or blackberries for different colors. - Hot Water – Needed to dissolve the dye; essential for infusion.
- Distilled White Vinegar – Helps the dye adhere to the eggshells; enhances color vibrancy.
For the Filling
- Egg Yolks – Create the filling; add richness and creaminess.
- Mayonnaise – Combines with yolks to enhance creaminess and flavor.
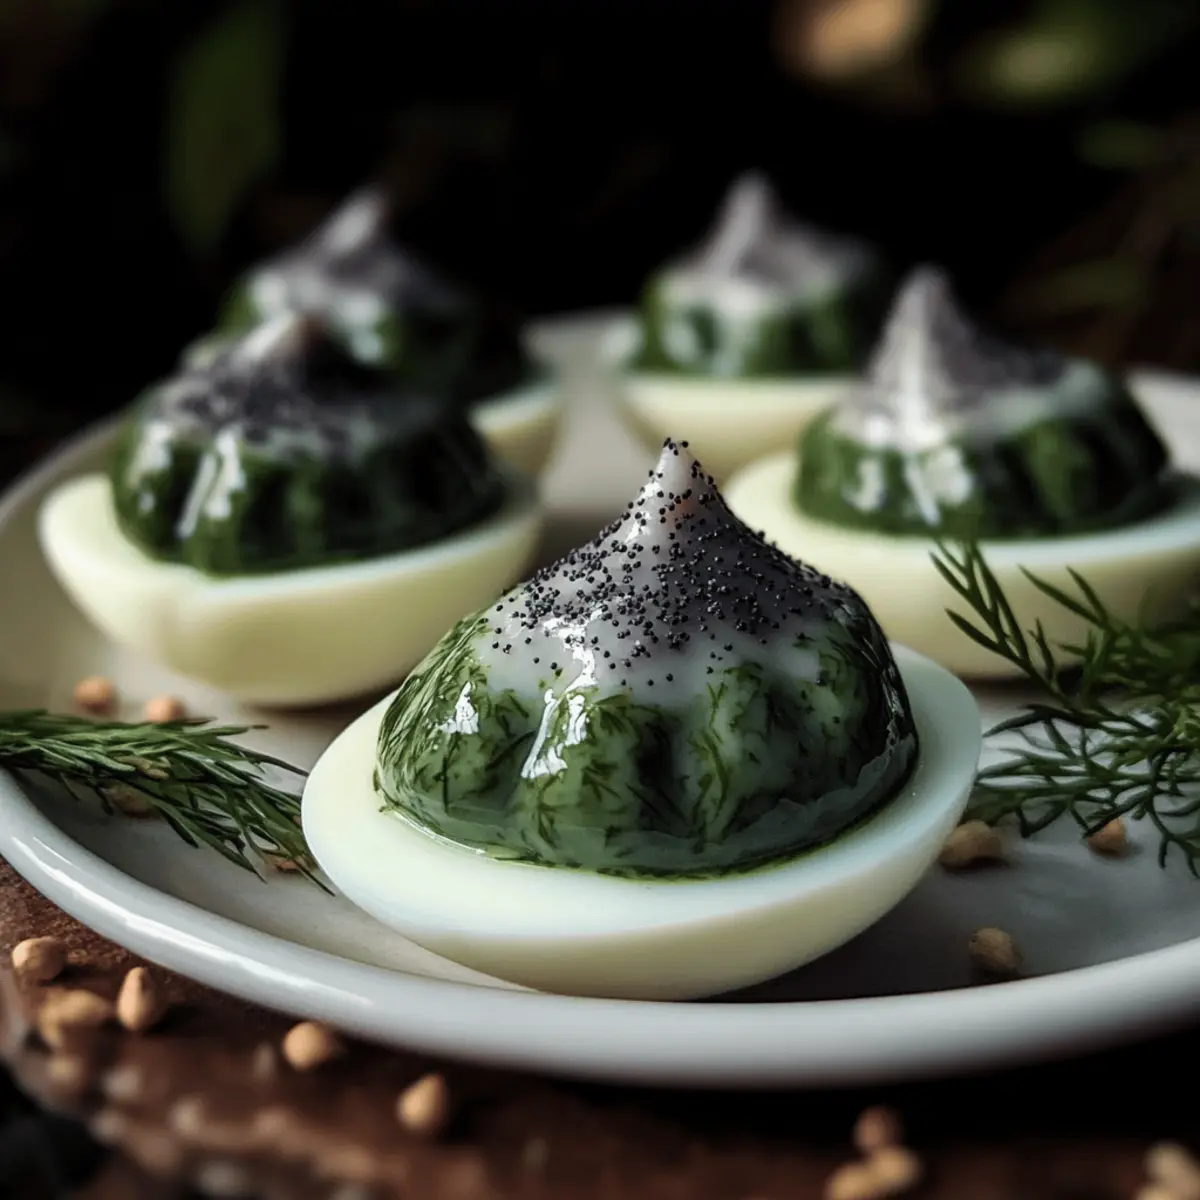
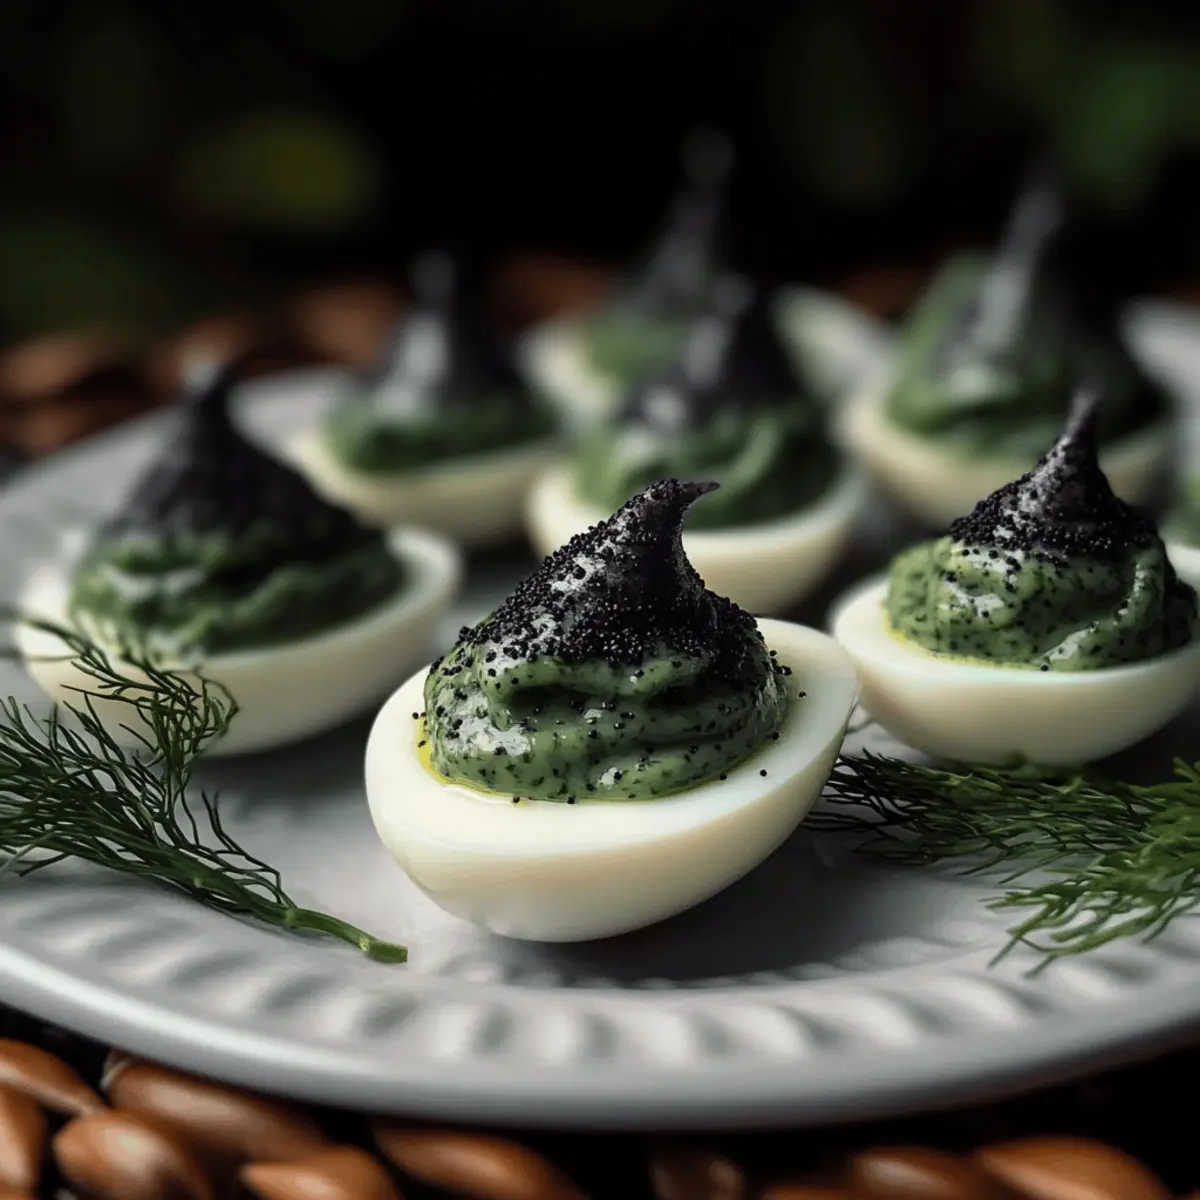
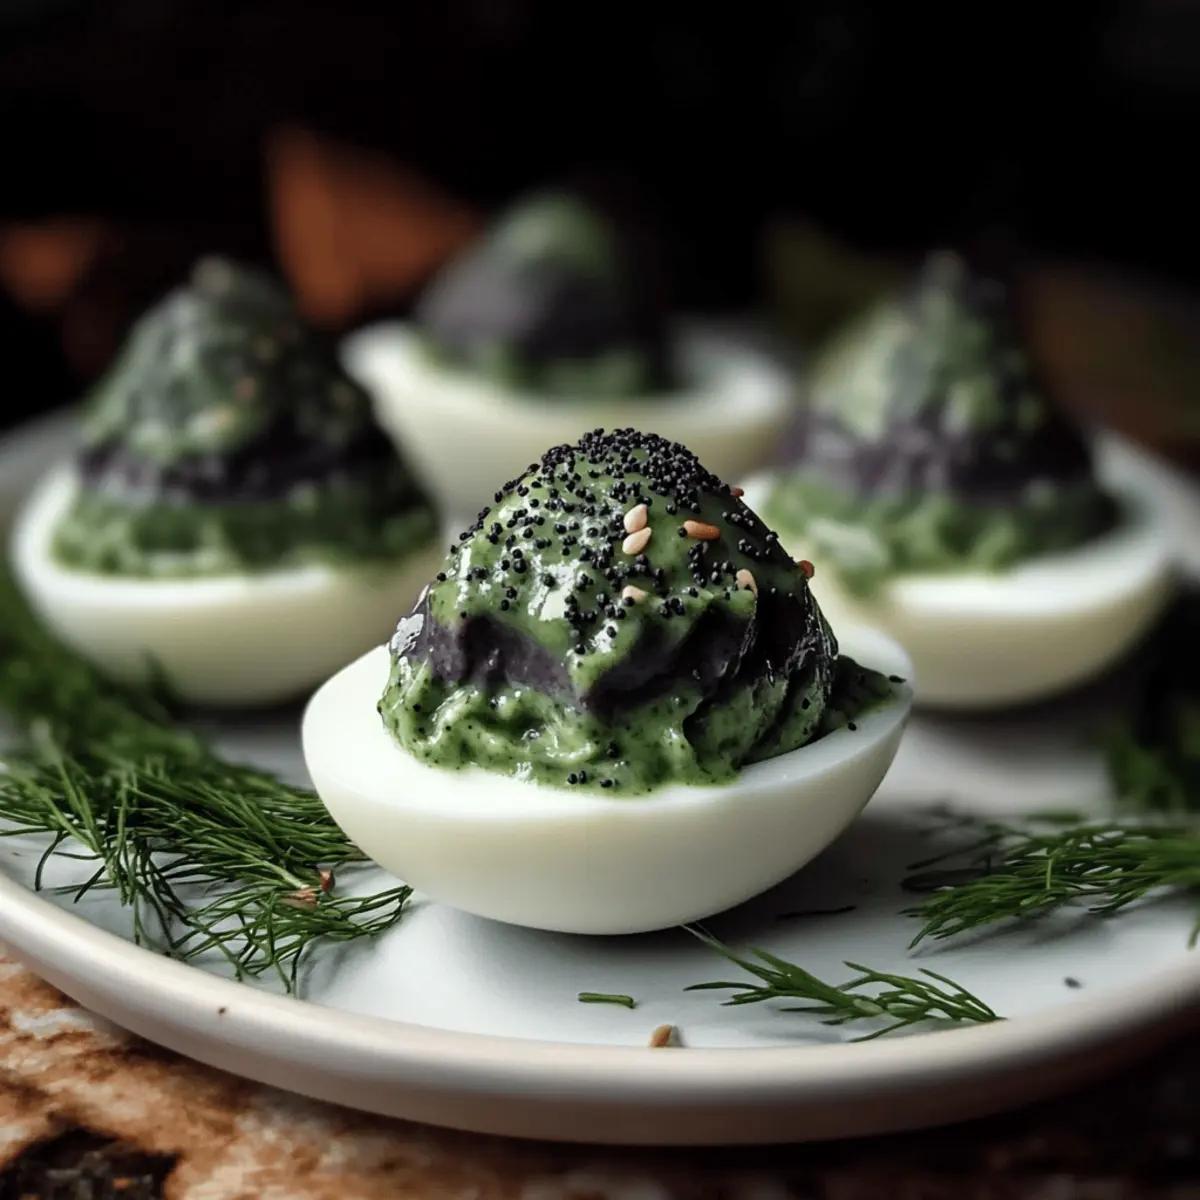
- Liquid Chlorophyll – Natural green dye for the filling; adds visual appeal.
Substitution: Avocado puree can provide a creamy texture and green hue. - Salt & Black Pepper – Basic seasoning for flavor enhancement.
- Minced Fresh Dill – Provides an aromatic herbaceous note to the filling.
Substitution: Fresh parsley or chives can also be used. - Minced Fresh Chives – Adds mild onion flavor and crunch.
- Garlic – Imparts depth of flavor to the filling.
For the Garnish
- Poppy Seeds – Garnish; adds texture and visual interest.
Get ready to excite your guests with these vibrant and delicious Halloween Deviled Eggs!
Step‑by‑Step Instructions for Spooktacular Swamp Eggs: Naturally Dyed Halloween Deviled Eggs
Step 1: Hard-Boil the Eggs
Begin by placing your large eggs in a saucepan and covering them completely with cold water. Bring the water to a boil over medium heat; once boiling, cover the pot and remove it from the heat. Let the eggs sit for 12 minutes, then transfer them to an ice bath to cool for at least 10 minutes before carefully peeling to prevent cracking.
Step 2: Prepare the Dye
While the eggs are cooling, prepare your natural dye. In a saucepan, combine 1 cup of frozen blueberries, 2 cups of hot water, and 2 tablespoons of distilled white vinegar. Bring the mixture to a gentle boil, then reduce the heat and simmer for about 10 minutes, allowing the vibrant purple color to deepen. Once ready, strain the mixture through a fine sieve, discarding the solids.
Step 3: Dye the Eggs
Once your eggs are peeled, it’s time to dye them into spooky Swamp Eggs. Submerge each egg in the prepared blueberry dye solution, ensuring they are fully covered. Refrigerate the eggs in the dye for at least 1 hour, or overnight for a more intense color. Keep an eye on the color development; they should take on a beautiful deep purple hue.
Step 4: Make the Filling
While the eggs are soaking in dye, whip up the creamy filling. In a bowl, mash the egg yolks with 3 tablespoons of mayonnaise, 1 teaspoon of liquid chlorophyll, salt, black pepper, 1 tablespoon of minced fresh dill, 1 tablespoon of minced fresh chives, and 1 clove of minced garlic. Mix until smooth and creamy, adjusting the seasoning to your taste.
Step 5: Fill the Egg Whites
After the eggs have absorbed their spooky color and the filling is ready, it’s time to assemble your Halloween Deviled Eggs. Cut the dyed egg whites in half and gently scoop out the yolks. Fill each egg white with the prepared yolk mixture using a spoon or a piping bag for a decorative touch, creating an appealing swirl in each half.
Step 6: Garnish and Serve
For a final touch, sprinkle poppy seeds on top of your filled Swamp Eggs to add texture and visual interest. Serve these Halloween Deviled Eggs chilled or at room temperature. They make a festive and healthy addition to your spooky gatherings, perfect for impressing your guests with both flavor and appearance!
Make Ahead Options
These Halloween Deviled Eggs are perfect for meal prep and can save you valuable time during the busy Halloween season! You can hard-boil and dye the eggs up to 24 hours in advance—simply store the dyed eggs in the refrigerator. The filled Swamp Eggs can be made up to 2 days before serving; just keep them in an airtight container to maintain their freshness. When you’re ready to impress your guests, assemble your deviled eggs by filling the crackled egg whites with the creamy yolk mixture and garnish with poppy seeds. This simple make-ahead strategy ensures your spooky appetizer is just as delicious while making your preparations hassle-free!
How to Store and Freeze Halloween Deviled Eggs
Fridge: Store unfilled dyed eggs in an airtight container in the fridge for up to 7 days. Once filled, enjoy within 2 days for optimal freshness.
Room Temperature: Serve your Halloween Deviled Eggs at room temperature for up to 2 hours during gatherings. After that, refrigerate leftovers promptly.
Freezer: It's best to avoid freezing filled deviled eggs as the texture may change. However, you can freeze unfilled dyed eggs for up to 3 months.
Reheating: If you have leftover filled eggs, enjoy them cold or at room temperature—no reheating necessary to maintain their fabulous taste!
What to Serve with Spooktacular Swamp Eggs?
Elevate your spooky gathering with delightful sides and drinks that complement the vibrant flavors of your Halloween treats.
-
Crispy Kale Chips: Perfectly crunchy, they add a lovely texture contrast while keeping the meal light and healthy.
-
Charcuterie Board: A selection of cured meats, cheeses, and bite-sized veggies creates a festive platter, perfect for mingling with friends and family.
-
Blood Orange Salad: The tangy sweetness of blood oranges, paired with mixed greens, will brighten up your spread and offer a refreshing bite.
-
Pumpkin Soup: This warm, creamy soup brings a cozy, fall-inspired element to the table and pairs beautifully with the savory flavors of the deviled eggs.
-
Eerie Eyeball Punch: Create a haunting beverage with fruit juices and spooky gummy eyeballs floating atop. This adds a fun and thematic drink option for your guests.
-
Chocolate Spider Cookies: End the meal on a sweet note with these delightful cookies, featuring chocolate and web designs that nod to Halloween while satisfying your sweet tooth.
Halloween Deviled Eggs Variations & Substitutions
Invite your creativity to shine through as you customize these delightful Halloween Deviled Eggs with fun twists and swaps!
- Dye Alternatives: Experiment with beet juice for a vibrant red or use spinach for a spooky green hue—let your imagination run wild!
- Filling Heat: Add a kick with sriracha mixed into the filling for a spicy variation. It's an exciting twist that will tickle your taste buds!
- Cheesy Indulgence: Incorporate cream cheese into your filling for an ultra-creamy texture and rich flavor that's simply irresistible. Blend it well for a dreamy result!
- Herb Swap: Replace fresh dill with basil or cilantro for a different flavor profile. Fresh herbs can give your filling a surprising and delightful twist!
- Sweet & Savory: For a unique touch, add a spoonful of sweet pickle relish to the filling mixture; the sweetness perfectly balances the savoriness. It’s a mix that’s sure to be exciting!
- Themed Colors: Use pink dye from strained raspberry juice for an enchanting Valentine's Day version or golden turmeric for a bright summer treat. Adapting these eggs is as much fun as serving them!
- Crunch Element: Fold in some crushed bacon or nuts for an unexpected crunch that adds texture and depth to your deviled egg delights. The contrast is delightful!
- Vegan Version: Substitute eggs with chickpeas for a plant-based take on deviled eggs, combining them with tahini for a creamy filling and season well—everyone will love it!
Feel free to explore these variations as you craft your Halloween masterpiece! If you're enjoying the concept of swapping veggies, why not try making some delightful Avocado Deviled Eggs? Embrace the fun of seasonal cooking!
Expert Tips for Halloween Deviled Eggs
• Cool Eggs Properly: Allow hard-boiled eggs to cool completely before peeling to minimize cracks, ensuring a beautiful appearance for your Halloween deviled eggs.
• Natural Dyes Work: While natural dyes are healthier, their colors might be less vibrant. Don’t worry; they still deliver delicious and beautiful results!
• Monitor Color Development: Keep an eye on the dyeing time; the longer the eggs sit, the deeper the color. Aim for 1 hour for a nice hue, overnight for a bolder look.
• Add Chlorophyll Last: The color of liquid chlorophyll may darken over time. Mix it into your filling just before serving for the best visual appeal.
• Experiment with Variations: Try different natural colors or fillings like spicy sriracha to make your Halloween deviled eggs uniquely your own!
Spooktacular Swamp Eggs: Naturally Dyed Halloween Deviled Eggs Recipe FAQs
How do I choose ripe ingredients for my Halloween Deviled Eggs?
Absolutely! When selecting eggs, look for ones with clean, uncracked shells. For the dye, frozen blueberries should be plump and intact; avoid any that are mushy or have dark spots all over. If you opt for substitutes like beets or blackberries, choose ones that feel firm to the touch, ensuring vibrant colors in your dye.
What’s the proper way to store my Swamp Eggs?
Once peeled but unfilled, store your dyed eggs in an airtight container in the fridge for up to 7 days. This keeps them fresh and prevents any odors from affecting their taste. However, once you've filled your eggs with the delicious mixture, they should be consumed within 2 days for optimal freshness, but I like to enjoy them sooner if I can!
Can I freeze the Halloween Deviled Eggs?
Yes, but with a little caution! You can freeze unfilled dyed eggs in an airtight container or freezer bag for up to 3 months. To do this, simply hard-boil, dye, and then cool the eggs before freezing. However, avoid freezing the filled Swamp Eggs; the texture of the filling may change upon thawing, leaving you with less-than-ideal results.
What do I do if my coloring comes out too light?
Very common! If your dyed eggs look too pale, they just need more time in the dye. I recommend letting them soak longer—up to overnight for a deeper color. If you’re in a hurry, using more dye, like additional blueberries, can intensify the hue as well. Also, don't forget to monitor the dye bath temperature; it should be warm but not boiling to maintain an even dyeing process.
Are there any dietary considerations when making these Halloween Deviled Eggs?
Definitely! If you're preparing these for guests, be mindful of common allergies such as egg and garlic. If you have guests with egg allergies, consider using a chickpea filling instead for a similar creamy texture. And for those who are lactose intolerant, opt for vegan mayo to ensure everyone can join in the fun of enjoying these spooky treats!
Can I modify the filling for different dietary preferences?
Absolutely! You can adapt the filling to suit diverse diets. For a dairy-free option, use avocado puree in place of mayonnaise, which also adds a creamy texture and a nice green hue. Alternatively, feel free to spice things up with ingredients like sriracha or curry powder for a flavor twist. The more, the merrier when it comes to experimenting!
Spooky Halloween Deviled Eggs: Naturally Dyed Delights!
Ingredients
Equipment
Method
- Begin by placing your large eggs in a saucepan and covering them completely with cold water. Bring the water to a boil over medium heat; once boiling, cover the pot and remove it from the heat. Let the eggs sit for 12 minutes, then transfer them to an ice bath to cool for at least 10 minutes before carefully peeling to prevent cracking.
- While the eggs are cooling, prepare your natural dye. In a saucepan, combine 1 cup of frozen blueberries, 2 cups of hot water, and 2 tablespoons of distilled white vinegar. Bring the mixture to a gentle boil, then reduce the heat and simmer for about 10 minutes, allowing the vibrant purple color to deepen. Once ready, strain the mixture through a fine sieve, discarding the solids.
- Once your eggs are peeled, it’s time to dye them into spooky Swamp Eggs. Submerge each egg in the prepared blueberry dye solution, ensuring they are fully covered. Refrigerate the eggs in the dye for at least 1 hour, or overnight for a more intense color.
- While the eggs are soaking in dye, whip up the creamy filling. In a bowl, mash the egg yolks with 3 tablespoons of mayonnaise, 1 teaspoon of liquid chlorophyll, salt, black pepper, 1 tablespoon of minced fresh dill, 1 tablespoon of minced fresh chives, and 1 clove of minced garlic. Mix until smooth and creamy.
- After the eggs have absorbed their spooky color and the filling is ready, cut the dyed egg whites in half and gently scoop out the yolks. Fill each egg white with the prepared yolk mixture using a spoon or a piping bag for a decorative touch.
- For a final touch, sprinkle poppy seeds on top of your filled Swamp Eggs to add texture and visual interest. Serve these Halloween Deviled Eggs chilled or at room temperature.


Leave a Reply