
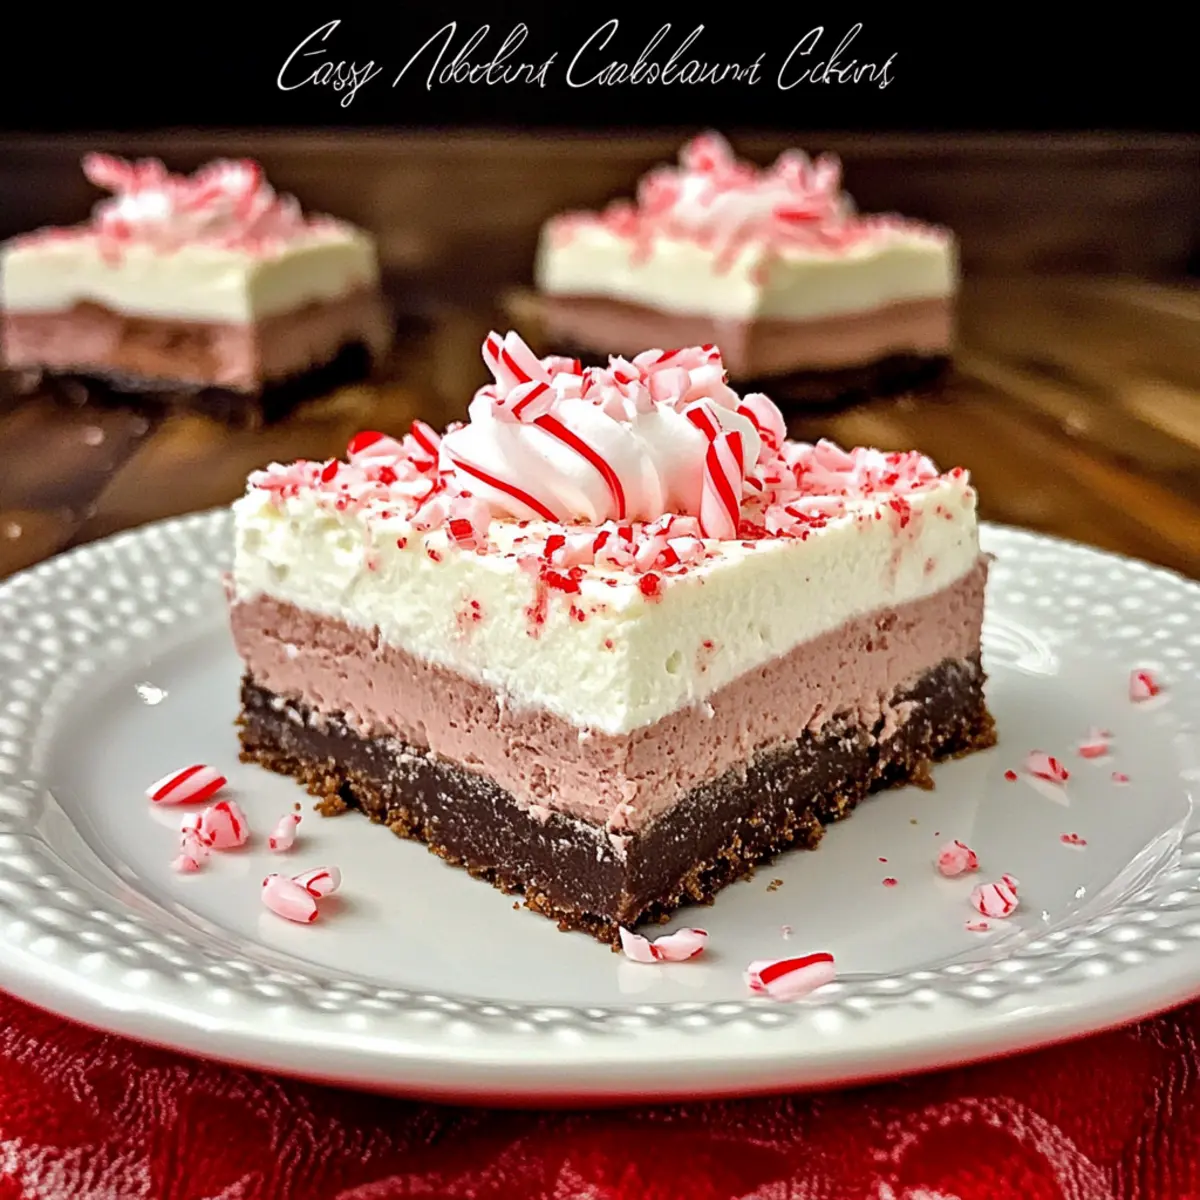
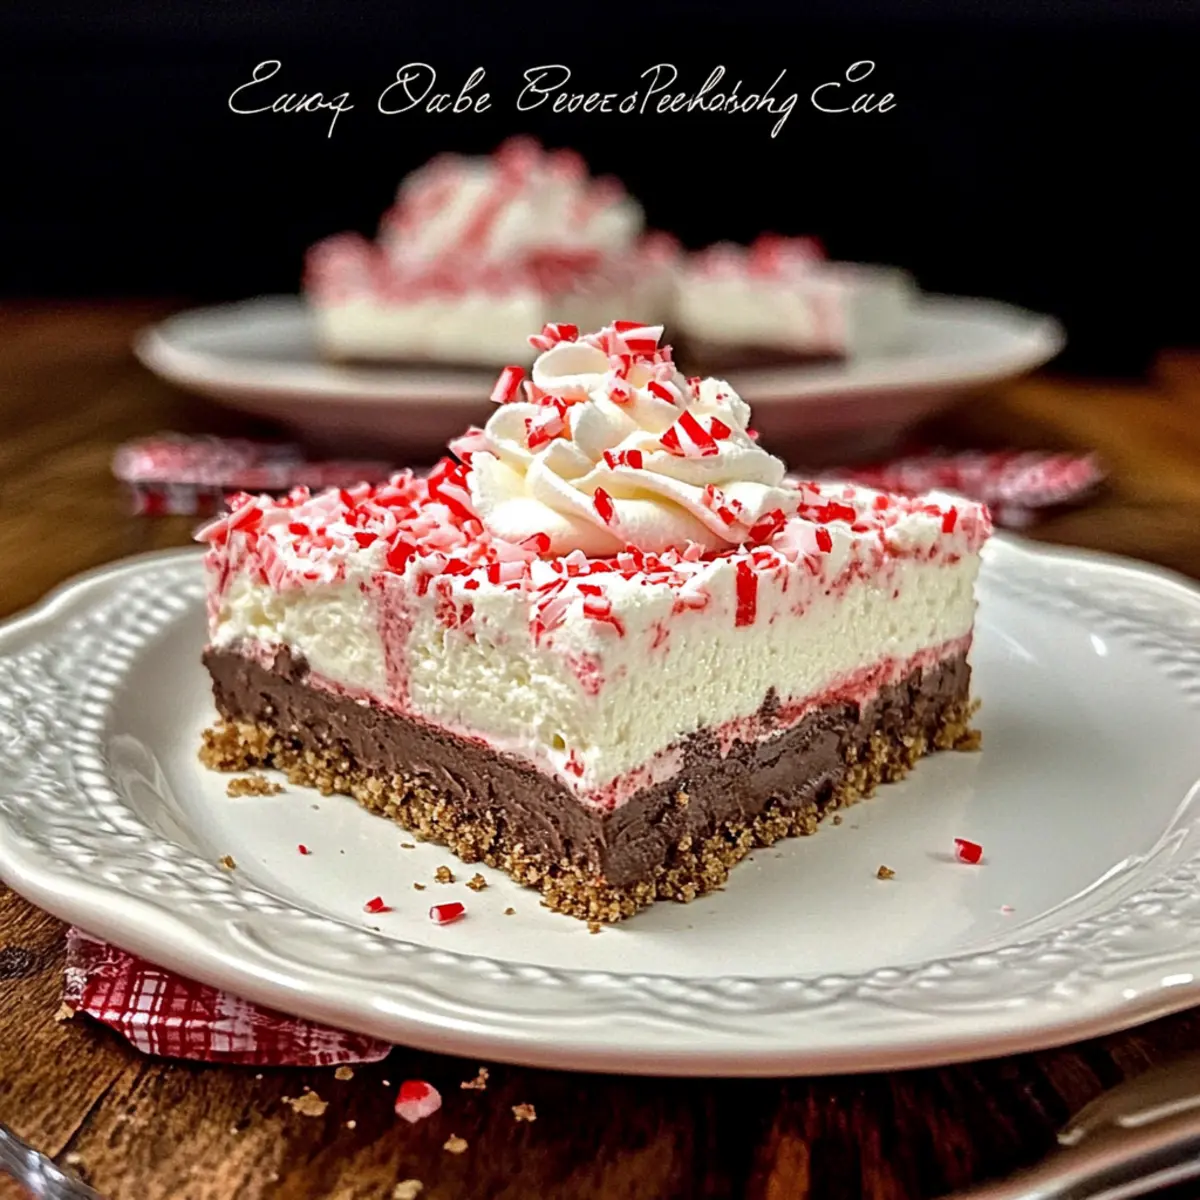
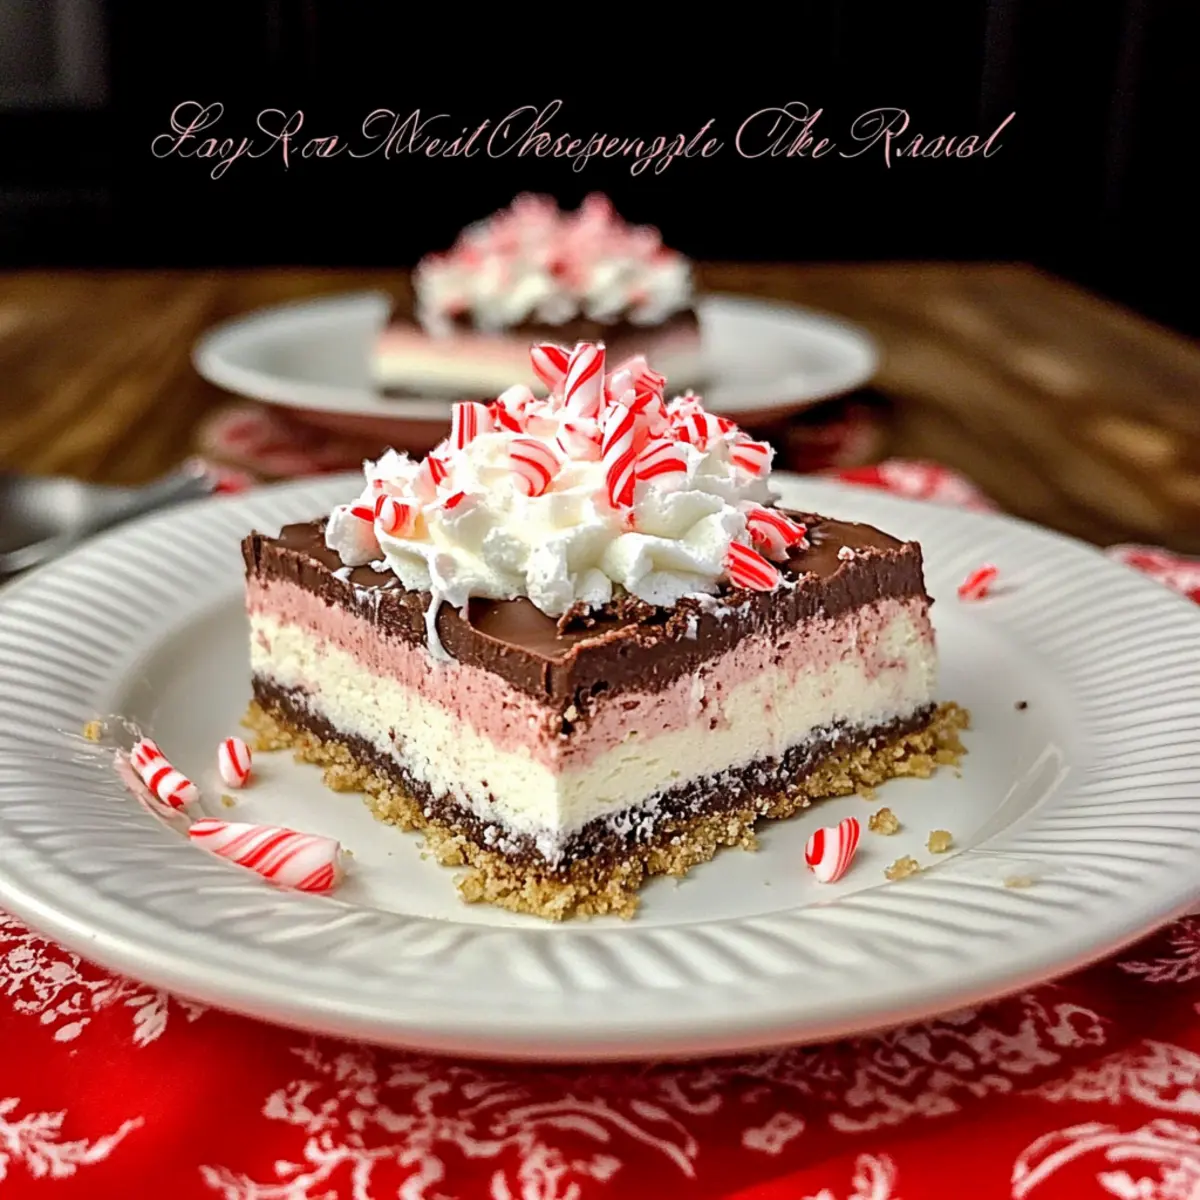
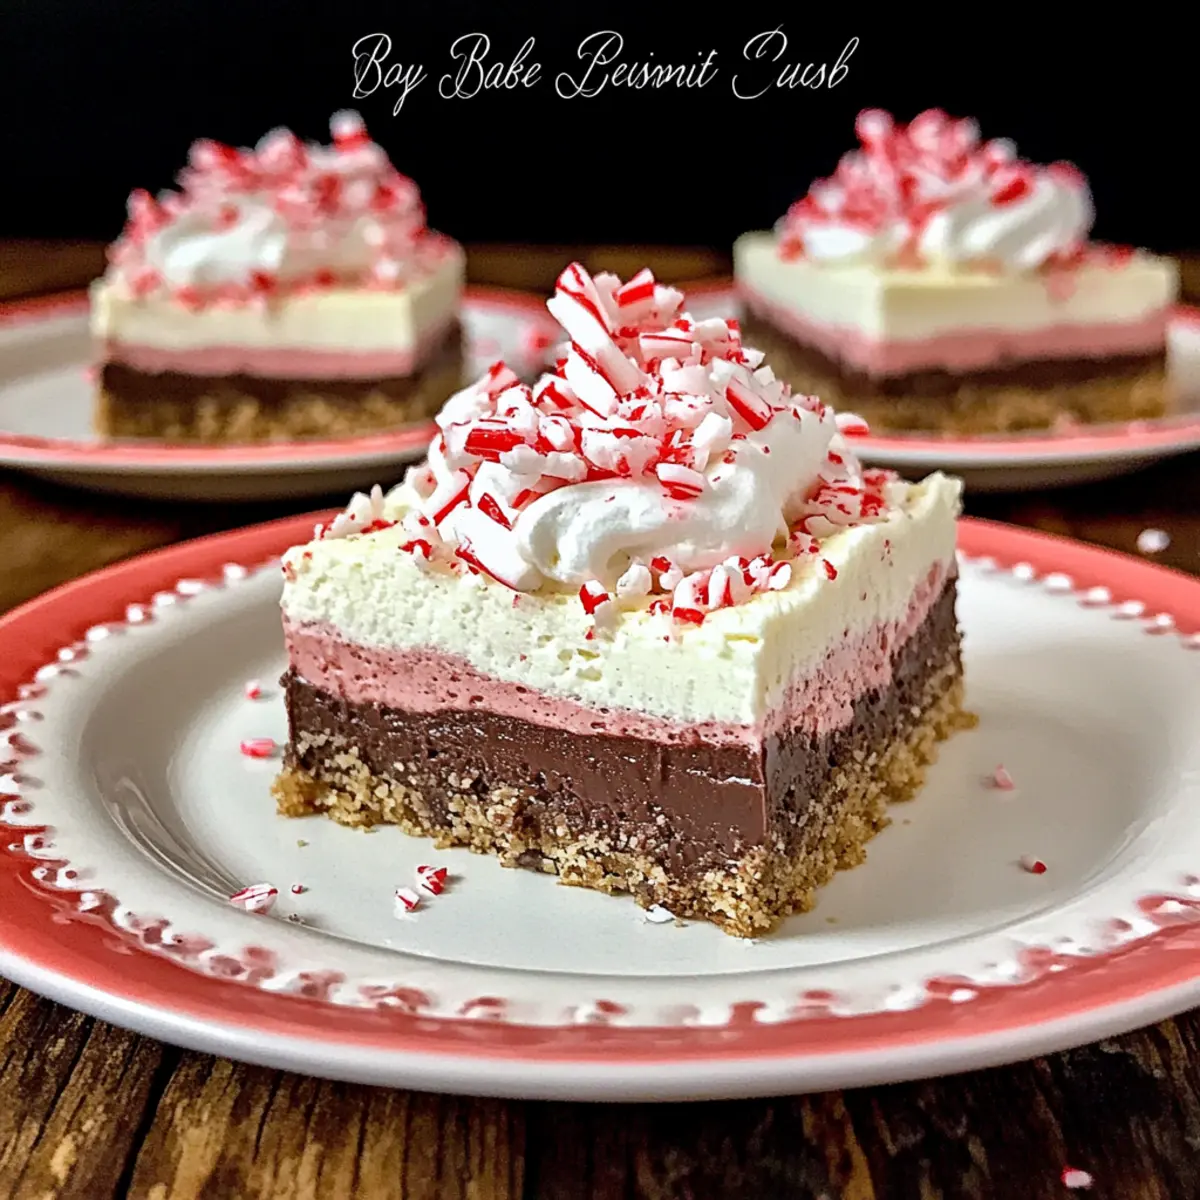
As I stood in my kitchen, the sweet scent of peppermint danced around me, a gentle reminder that the holidays are just around the corner. This Easy No-Bake Chocolate Peppermint Squares recipe combines the blissful flavors of chocolate and mint, creating a delightful no-bake dessert perfect for festive gatherings. What I adore most about this treat is its effortless preparation—no oven required! Plus, it's a showstopper that can please any crowd. With layers of crunchy cookie crust, creamy peppermint cheesecake, and silky chocolate pudding, it looks as good as it tastes. Ready to whip up a dessert that will impress your family and friends? Let's dive into the delicious world of no-bake chocolate peppermint bliss!
Why Is This Recipe a Holiday Favorite?
Simplicity, at its finest: This no-bake dessert requires no intricate baking skills, making it a stress-free option for any home chef.
Creamy, Minty Delight: The luscious peppermint cheesecake layer brings a refreshing zing, perfectly complementing the rich chocolate.
Versatile for All Occasions: Serve this treat at holiday gatherings, potlucks, or cozy evenings in—it's sure to charm everyone.
A Visual Showstopper: The layered presentation is not only stunning but creates an impressive dessert that looks as delightful as it tastes.
Crowd-Pleasing Flavor: It combines the best of both worlds—chocolate and peppermint—making it an irresistible choice for all dessert lovers.
Storage-friendly: Enjoy leftovers for up to three days, or freeze them for a future sweet treat. You might also like my Chocolate Zucchini Cake for another easy and crowd-pleasing dessert option!
No-Bake Chocolate Peppermint Squares Ingredients
For the Crust
- Vanilla Wafer Crumbs – Provides a crunchy base for the dessert; can replace with chocolate cookie crumbs for a richer flavor.
- Unsalted Butter – Binds the crust ingredients and adds creaminess; make sure to melt it before mixing.
- Sugar (2 tablespoons) – Sweetens the crust perfectly; no direct substitutions recommended for the best taste.
For the Peppermint Layer
- Cream Cheese – Creates a smooth and creamy peppermint layer; ensure it's softened for easy mixing.
- Finely Crushed Peppermint Candy Cane (8 oz) or Starlight Mints – Adds delightful minty flavor to the cheesecake; can adjust the amount to taste.
- Milk (2 tablespoons) – Helps blend well with cream cheese; use whole milk for creaminess.
- Sugar (⅓ cup) – Sweetens the peppermint layer wonderfully; powdered sugar can be used for a smoother mix.
- Whipped Topping (1 ¼ cups + additional for topping) – Lightens the cheesecake and serves as a fluffy topping; homemade whipped cream works as a great alternative.
For the Chocolate Layer
- Instant Chocolate Pudding Mix – Forms the rich chocolate layer; ensure it’s a 4-serving size for the right consistency.
- Milk (1 ¾ cups) – Used to mix with the pudding for a smooth rich layer; the choice of whole milk is recommended.
For the Garnish
- Coarsely Chopped Peppermint Candy Cane – Enhances both flavor and presentation, making this no-bake treat even more festive.
Step‑by‑Step Instructions for Easy No-Bake Chocolate Peppermint Squares
Step 1: Crust Preparation
In a medium bowl, combine the vanilla wafer crumbs, melted unsalted butter, and 2 tablespoons of sugar. Mix until well combined and the crumbs are evenly coated. Press the mixture firmly into the bottom of a 9 x 9-inch pan, creating an even layer. Chill in the refrigerator for about 20 minutes, or until set and firm.
Step 2: Peppermint Layer
While the crust is chilling, use an electric mixer to beat the softened cream cheese and 2 tablespoons of milk until smooth and creamy, about 2 minutes. Gradually add in the ⅓ cup sugar and finely crushed peppermint, mixing until fully incorporated. Gently fold in 1 ¼ cups of whipped topping until just combined. Spread this delightful peppermint layer evenly over the chilled crust.
Step 3: Chocolate Layer
In a separate bowl, whisk together the instant chocolate pudding mix and 1 ¾ cups of milk for about 2 minutes, or until the mixture thickens to a pudding-like consistency. Carefully spread the chocolate pudding layer over the peppermint layer, ensuring an even distribution. Allow it to sit for about 5-10 minutes, allowing it to set slightly.
Step 4: Final Topping
Take the remaining whipped topping and spread it over the chocolate layer, creating a smooth and fluffy finish. For a festive touch, sprinkle coarsely chopped peppermint candy cane over the top, allowing the vibrant colors to pop against the layers below. This will add a delightful crunch and enhance the holiday spirit.
Step 5: Chill
Cover the pan with plastic wrap or a lid, and refrigerate the Easy No-Bake Chocolate Peppermint Squares for at least 4 hours. This chilling time allows the layers to firm up, making them easier to cut. For a firmer texture akin to ice cream cake, freeze for about 4 hours before serving.
Helpful Tricks for No-Bake Chocolate Peppermint Squares
-
Softened Cream Cheese: Ensure your cream cheese is fully softened to prevent lumps in your peppermint layer. Gradually mix to achieve a smooth texture.
-
Chill Time Matters: Allowing the dessert to chill for at least 4 hours is crucial. This will help the layers firm up and make cutting easy, enhancing your no-bake experience.
-
Customizable Mint: Adjust the amount of crushed peppermint candy to suit your taste preferences. More can intensify the mint flavor, while less can make it subtler.
-
Easy Cutting: If you freeze the dessert for about 4 hours before cutting, it will hold its shape better. Just remember to let it thaw slightly before slicing.
-
Layer Order: Spread the peppermint layer evenly over the crust and ensure the chocolate layer goes on smooth. This not only looks beautiful but also enhances flavor distribution.
No-Bake Chocolate Peppermint Squares: Creative Twists
Feel free to explore these delightful variations to elevate your no-bake chocolate peppermint squares—adding your unique touch can make each bite even more memorable!
-
Chocolate Crust: Swap vanilla wafer crumbs for chocolate sandwich cookie crumbs for an extra-rich base. This change adds an intense chocolate flavor that perfectly complements the peppermint.
-
Dairy-Free Option: Use dairy-free cream cheese and whipped topping to make this dessert suitable for lactose-intolerant or vegan guests. You won’t lose that creamy texture, and everyone can enjoy!
-
Nutty Addition: Mix in some finely chopped walnuts or pecans into the crust to introduce a lovely crunch and additional flavor depth. This adds a surprise element to each bite!
-
Peppermint Extract Boost: Enhance the mint flavor by adding a few drops of peppermint extract into the cheesecake layer. A little goes a long way, creating a more robust minty experience!
-
Spicy Kick: For those who love some heat, incorporate a pinch of cayenne pepper in the chocolate pudding layer. This unexpected twist will surprise your taste buds with a warm, lingering finish.
-
Use Different Candies: Instead of peppermint candies, try crushed Oreos or other flavored candies in the cheesecake layer. This opens up a world of creativity and flavor profiles, making it fun to switch things up.
-
Top with Chocolate Ganache: For a truly luxurious finish, pour a thin layer of homemade chocolate ganache over the chocolate pudding layer. It adds an elegant glossy finish and rich chocolate intensity.
-
Pretty Presentation: Arrange festive seasonal fruits, like raspberries or pomegranate seeds, on top to add a pop of color. This not only beautifies your dessert but introduces a fresh tartness that pairs beautifully with the minty chocolate.
Try out these variations, and don’t forget to check out my Pistachio White Chocolate cookies for another festive treat or the delicious Chocolate Cupcake Decadent recipe if you want to impress your crowd!
Make Ahead Options
These Easy No-Bake Chocolate Peppermint Squares are a dream for busy home cooks looking to save time during the bustling holiday season! You can prepare the crust and the peppermint layer up to 24 hours in advance by chilling them in the refrigerator. Simply follow the crust preparation steps and set it while mixing the peppermint layer, then spread it on top and seal with plastic wrap. The chocolate layer can be made and added on the day you plan to serve, ensuring it remains just as delicious and fresh. When you're ready to entertain, simply chill for a few hours more or freeze for about 4 hours for a delightful icy treat that everyone will love!
What to Serve with Easy No-Bake Chocolate Peppermint Squares
Imagine a festive gathering where flavors of mint and chocolate harmonize with complementary dishes to enhance your dessert experience.
-
Rich Hot Chocolate: The creamy texture and deep chocolate flavor make it a cozy pairing that warms the heart. A dollop of whipped cream on top can beautifully echo the dessert's fluffy topping.
-
Peppermint Bark: This sweet companion amplifies the minty essence while offering a crunchy contrast to the smooth bars. A delightful addition to a dessert table.
-
Vanilla Ice Cream: Its creamy vanilla flavor balances the rich chocolate layers, providing a soothing, cold contrast to each bite. Perfect for those who enjoy a classic combination!
-
Chocolate-Dipped Strawberries: Fresh strawberries bring a juicy brightness that cuts through the sweetness. Their vibrant color adds a stunning visual contrast to your dessert platter.
-
Red Velvet Cupcakes: These moist, luscious cupcakes are festive and pair beautifully with chocolate, enhancing the overall celebration of flavors. Topped with cream cheese frosting, they make an elegant addition to any gathering.
-
Coffee or Espresso: A cup of warm coffee is the perfect drink to accompany these squares, offering a delightful bitterness that balances the sweetness and enhances the decadent chocolate taste.
-
Almond Biscotti: Crunchy with a hint of nutty flavor, these cookies provide a wonderful texture contrast alongside the smooth, creamy squares. Enjoy them for dipping or as a delightful nibble!
How to Store and Freeze No-Bake Chocolate Peppermint Squares
Fridge: Keep your squares covered in an airtight container for up to 3 days. This helps maintain their creamy texture and delicious flavors.
Freezer: You can freeze leftovers for up to 2 months. Wrap them tightly in plastic wrap and then foiled for best results.
Thawing: To enjoy frozen squares, transfer them to the fridge the night before to allow them to thaw slowly without losing texture.
Reheating: No reheating is necessary for this no-bake dessert. Just slice and serve chilled for a refreshing treat!
No-Bake Chocolate Peppermint Squares Recipe FAQs
What type of cookie crumbs are best for the crust?
Absolutely! While vanilla wafer crumbs give a classic flavor, you can easily substitute with chocolate cookie crumbs, like Oreos, for a richer taste that enhances the chocolate experience.
How should I store leftovers?
To keep your No-Bake Chocolate Peppermint Squares fresh, store them in an airtight container in the refrigerator for up to 3 days. This ensures they maintain their creamy texture and delicious flavors.
Can I freeze these squares?
Yes, you can! For freezing, wrap the squares tightly in plastic wrap and then cover with foil to prevent freezer burn. They can be frozen for up to 2 months. When you're ready to enjoy them, simply transfer them to the refrigerator to thaw overnight.
What should I do if my cream cheese is lumpy?
First, ensure that your cream cheese is fully softened; this is key! If lumps appear during mixing, try to beat the mixture longer at a lower speed. If it’s too stubborn, you can pass the mixture through a fine mesh sieve to smooth it out before folding in the whipped topping.
Can I use other types of candy for the peppermint flavor?
Very! While crushed peppermint candy canes are traditional, you can also use crushed Starlight mints or even mint chocolate candies to switch things up. Just adjust the quantity based on your mint preference!
Are there any dietary considerations?
Be mindful that this recipe contains dairy and sugar, making it unsuitable for lactose-intolerant individuals or those on a sugar-restricted diet. Additionally, the whipped topping can be substituted with a dairy-free alternative for a vegan version, and you can swap out the sugar with a suitable sweetener to adjust for various dietary needs.
No-Bake Chocolate Peppermint Squares That Wow Your Guests
Ingredients
Equipment
Method
- In a medium bowl, combine the vanilla wafer crumbs, melted unsalted butter, and 2 tablespoons of sugar. Mix until well combined and the crumbs are evenly coated. Press the mixture firmly into the bottom of a 9 x 9-inch pan, creating an even layer. Chill in the refrigerator for about 20 minutes, or until set and firm.
- While the crust is chilling, use an electric mixer to beat the softened cream cheese and 2 tablespoons of milk until smooth and creamy, about 2 minutes. Gradually add in the ⅓ cup sugar and finely crushed peppermint, mixing until fully incorporated. Gently fold in 1 ¼ cups of whipped topping until just combined. Spread this delightful peppermint layer evenly over the chilled crust.
- In a separate bowl, whisk together the instant chocolate pudding mix and 1 ¾ cups of milk for about 2 minutes, or until the mixture thickens to a pudding-like consistency. Carefully spread the chocolate pudding layer over the peppermint layer, ensuring an even distribution. Allow it to sit for about 5-10 minutes, allowing it to set slightly.
- Take the remaining whipped topping and spread it over the chocolate layer, creating a smooth and fluffy finish. For a festive touch, sprinkle coarsely chopped peppermint candy cane over the top, allowing the vibrant colors to pop against the layers below.
- Cover the pan with plastic wrap or a lid, and refrigerate the Easy No-Bake Chocolate Peppermint Squares for at least 4 hours.


Leave a Reply