
The rich aroma of melted chocolate fills the air, mingling beautifully with the comforting scent of creamy peanut butter. If you're seeking a delightful twist on traditional desserts, look no further than these No-Bake Nutter Butter Truffles. As a passionate home chef, I love whipping up this incredibly easy dessert that satisfies both my sweet tooth and my love for homemade treats. Thanks to their quick preparation and no-bake nature, these truffles are perfect for any occasion—from cozy nights in to festive gatherings. Plus, they offer a fun way to indulge without turning on the oven! Curious to see how to create these scrumptious bites that blend crunchy cookie goodness with smooth chocolate bliss? Let’s dive in together!

Why are Nutter Butter Truffles a must-try?
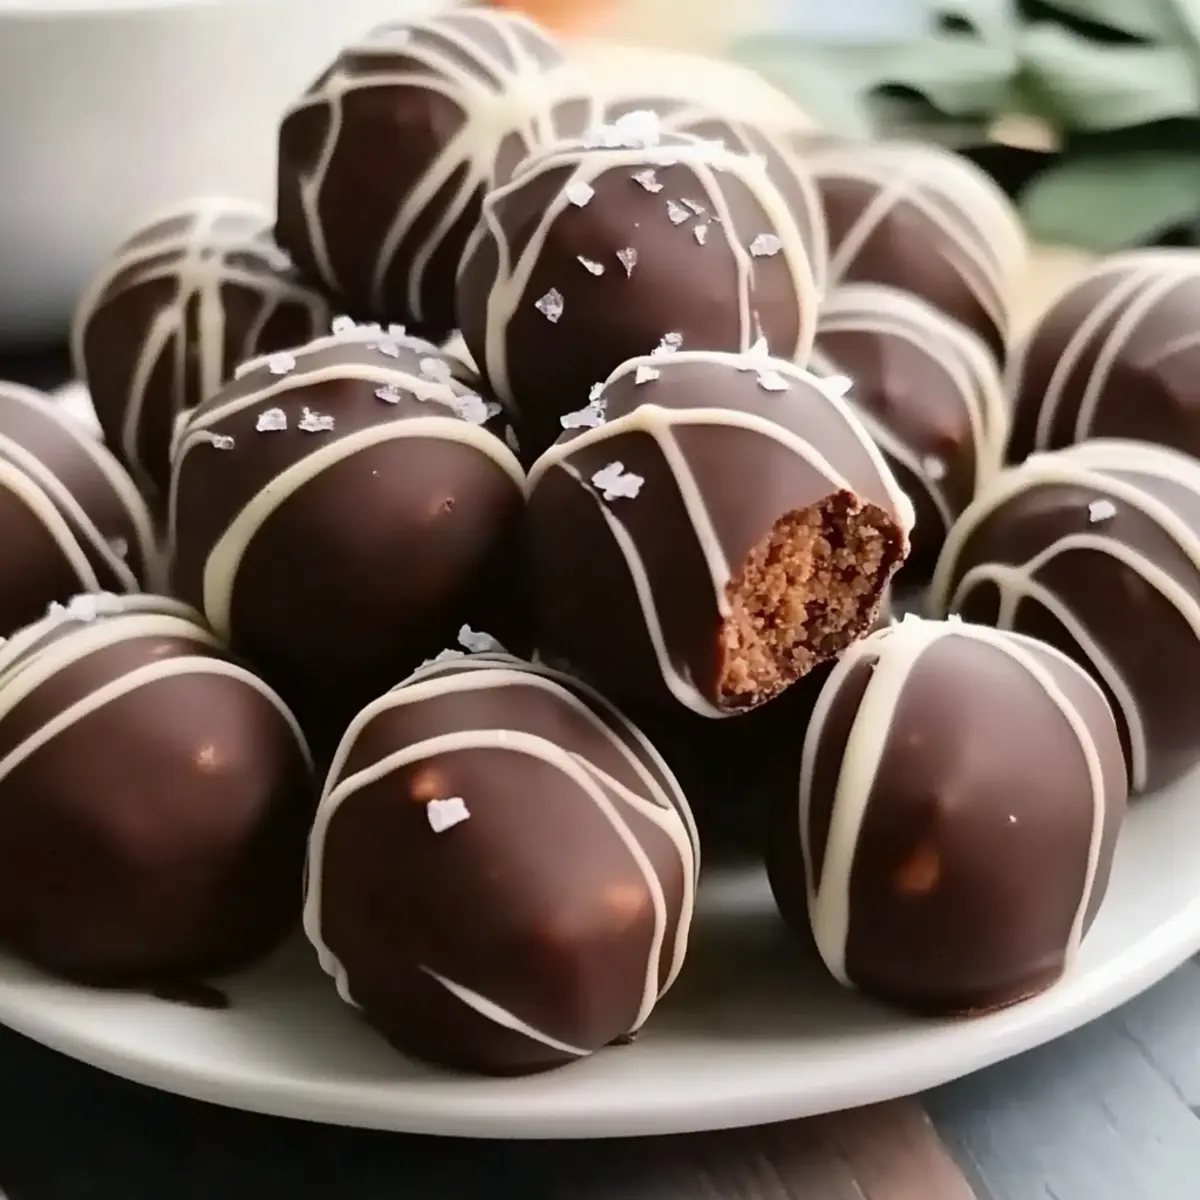
Irresistible Delight: These truffles blend the classic taste of Nutter Butter cookies with creamy peanut butter and rich chocolate for a treat everyone will love.
No-Bake Convenience: Perfect for when you’re short on time or don’t want to heat up the kitchen. Simply mix, roll, and chill!
Customizable Creations: Feel free to switch up chocolate types or add toppings like sea salt or sprinkles to make them uniquely yours.
Crowd-Pleasing Treat: Whether at a party or a cozy night in, these truffles are sure to impress family and friends—making them a hit every time!
Easy to Store: Keep them in the fridge or freezer for a sweet snack anytime, resembling the joyous feeling of homemade goodness without the fuss. If you're looking for more quick dessert ideas, check out this delicious Garlic Butter Steak or the creamy Butternut Squash Soup.
Nutter Butter Truffles Ingredients
For the Truffles
- Nutter Butter Cookies – The base of the truffles, providing crunchy flavor; gluten-free cookies can be used for a gluten-free option.
- Creamy Peanut Butter – Adds richness and a smooth texture; try almond butter for a delicious twist.
- Powdered Sugar – Sweetens and helps bind the mixture; reduce a bit for a less sweet treat or opt for a sugar substitute.
For the Coating
- Chocolate Chips – This rich coating brings the truffles together; dark chocolate offers depth, while milk chocolate enhances sweetness.
- Coconut Oil (optional) – Aids in achieving a smooth chocolate coating; feel free to skip it if you prefer a straightforward dip.
These Nutter Butter Truffles are so simple yet incredibly satisfying – perfect for any time you crave a quick and easy dessert!
Step‑by‑Step Instructions for Nutter Butter Truffles
Step 1: Crush Cookies
Begin by crushing the Nutter Butter cookies into fine crumbs. You can use a food processor for quick results or place the cookies in a zip-top bag and crush them with a rolling pin. Aim for a powder-like texture to ensure easy mixing. This should take about 2-3 minutes.
Step 2: Mix Ingredients
In a large mixing bowl, combine the crushed Nutter Butter cookies with creamy peanut butter and powdered sugar. Use a spatula or your hands to thoroughly mix until a dough-like consistency forms, which may take about 2-4 minutes. The mixture should be well-blended but not overly sticky.
Step 3: Form Truffles
Scoop out the dough using a tablespoon and roll it into 1-inch balls with your hands. Place each ball on a lined baking sheet, making sure they are spaced apart to avoid sticking. This step should take around 5-10 minutes, and you should have a beautiful tray of Nutter Butter Truffles ready for the next phase.
Step 4: Melt Chocolate
In a microwave-safe bowl, add the chocolate chips and, if desired, coconut oil. Microwave in 30-second intervals, stirring between each interval until the chocolate is fully melted and smooth, which should take about 1-2 minutes total. Be careful not to overheat, as burnt chocolate can ruin the truffles.
Step 5: Coat Truffles
Gently dip each Nutter Butter truffle into the melted chocolate, ensuring it’s fully coated. Allow any excess chocolate to drip off back into the bowl. Place the coated truffles back on the lined baking sheet, ensuring they don’t touch each other. This step should take about 5-7 minutes and creates a beautiful chocolate layer around each truffle.
Step 6: Optional Toppings
While the chocolate is still wet, sprinkle a pinch of sea salt on top of each truffle, if desired, to enhance the flavors. This quick addition can be done in about 2 minutes and adds an extra touch of sophistication to your Nutter Butter Truffles.
Step 7: Chill
Refrigerate the truffles for at least 1 hour to allow the chocolate to set and the truffles to firm up. After chilling, they will become beautifully solid, making them the perfect sweet treat to enjoy at any time. Allow a little time for chilling to ensure the best texture for your Nutter Butter Truffles.
Make Ahead Options
These Nutter Butter Truffles are an excellent choice for meal prep, making them convenient for busy days! You can prepare the truffle mixture up to 24 hours in advance. Simply follow the recipe to crush the cookies, mix the ingredients, and form the truffles into balls, then store them in an airtight container in the refrigerator. If you’d like to prep even further ahead, the truffles can also be coated in chocolate up to 3 days before serving. Just make sure to let them chill properly and keep them cooled to maintain their delicious texture. When ready to enjoy, simply take them out and serve—these treats will be just as delightful as when freshly made!
Expert Tips for Nutter Butter Truffles
-
Mix Thoroughly: Ensure you mix the ingredients well to prevent crumbling. If the mixture feels too dry, add a touch more peanut butter for better binding.
-
Temperature Matters: Let the chocolate melt gently and cool slightly before dipping the truffles. This helps achieve a smoother finish and prevents the coating from cracking.
-
Space Them Out: While forming and coating the truffles, give them enough space on the baking sheet. This prevents them from sticking together and allows the chocolate to set evenly.
-
Experiment with Coatings: Don’t hesitate to try different types of chocolate for coating your Nutter Butter Truffles. Dark chocolate adds depth, while white chocolate brings sweetness.
-
Chill to Firm: Give the truffles ample time in the fridge to chill. This step is key for achieving the perfect texture and making them easier to enjoy!
What to Serve with Irresistible No-Bake Nutter Butter Truffles
These delightful truffles are perfect for crafting a cozy and memorable meal experience.
-
Creamy Mashed Potatoes: The rich, buttery flavor of mashed potatoes provides a classic, comforting touch to balance the sweetness of the truffles.
-
Fresh Fruit Salad: A refreshing mix of berries and citrus complements the rich flavors of the truffles while adding a burst of natural sweetness and vibrant colors to your table.
-
Chocolate Dipped Pretzels: Enhance the crunch factor with a salty-sweet treat that pairs beautifully with the creamy peanut butter in the truffles. Together, the duo adds delightful variety to your dessert spread.
-
Coffee or Espresso: A warm cup enhances the chocolatey notes of the Nutter Butter Truffles, creating an inviting atmosphere for dessert time.
-
Vanilla Ice Cream: Creamy, cold vanilla ice cream serves as the perfect contrast to the rich truffles, offering a delightful melt-in-your-mouth experience.
-
Caramel Sauce: Drizzling warm caramel over the truffles elevates the dessert with a sweet touch, adding a decadent layer of flavor that’s irresistible.
-
Sparkling Raspberry Lemonade: This bubbly drink beautifully offsets the rich dessert and provides a refreshing palate cleanser, making each bite more enjoyable.
-
Fluffy Whipped Cream: Adding a dollop of whipped cream on the side makes for a light and airy accompaniment, enhancing the overall indulgence of your dessert experience. Enjoy!
Storage Tips for Nutter Butter Truffles
Room Temperature: Keep Nutter Butter Truffles at room temperature for up to 1 day in a cool, dry place, but they taste best chilled.
Fridge: Store in an airtight container in the refrigerator for up to 1 week. This helps maintain their creamy texture and delightful flavor.
Freezer: Freeze truffles in a single layer on a baking sheet for about 2 hours until firm, then transfer to an airtight container for up to 3 months.
Reheating: No need to reheat; simply enjoy straight from the fridge or freezer for a refreshing treat!
Nutter Butter Truffles Variations & Substitutions
Feel free to let your creativity shine and customize these delightful truffles to suit your tastes and preferences!
-
Gluten-Free: Substitute regular Nutter Butter cookies with gluten-free versions for an equally delicious treat without the gluten. Everyone can enjoy them!
-
Nut-Free: Use sunbutter in place of peanut butter for a safe, nut-free alternative that still offers creamy goodness. Kids and allergy sufferers will love them!
-
Sugar-Free: Opt for a sugar alternative or reduce the powdered sugar for a lighter option. These truffles can still be sweet without compromising flavor.
-
Chocolate Lovers: Try coating the truffles in dark chocolate or even white chocolate for a sweet twist. Each option brings out different flavor profiles to enjoy!
-
Flavor Variations: Mix in a teaspoon of vanilla extract for a deeper flavor or add a dash of cinnamon for a warm, comforting touch. It’s like adding a cozy hug to each bite!
-
Add Crunch: Incorporate chopped nuts or crushed pretzels into the truffle mixture for an extra crispy texture. The contrast with the smooth chocolate is always a hit!
-
Salted Caramel: Drizzle a bit of salted caramel on top of the chocolate coating for an indulgent flavor boost that adds a delightful sweetness and texture.
Explore these variations in your Nutter Butter Truffles, and don't forget to serve them at your next gathering or cozy night in. For more easy dessert inspirations, check out this decadent Reeses Peanut Butter recipe or warm up with some comforting Butternut Squash Soup. Enjoy!

Nutter Butter Truffles Recipe FAQs
How do I select the right Nutter Butter cookies?
Absolutely! Look for Nutter Butter cookies that are fresh and intact, without any dark spots or visible signs of moisture. If you use gluten-free cookies, make sure they're certified gluten-free for the best results.
What is the best way to store Nutter Butter Truffles?
Very! Store your Nutter Butter Truffles in an airtight container in the refrigerator to keep them fresh for up to 1 week. If you want to enjoy them later, freeze them in a single layer on a baking sheet for about 2 hours, then transfer to an airtight container where they can last for up to 3 months.
Can I freeze Nutter Butter Truffles?
Yes, you absolutely can! To freeze, first, let the truffles set in the fridge for at least 1 hour. Then, arrange them in a single layer on a baking sheet and freeze for about 2 hours. Once they’re firm, transfer them to a freezer-safe bag or container and enjoy them within 3 months. Make sure to label them with the date so you can keep track!
What if my mixture is too dry when making the truffles?
Indeed, this can happen! If your truffle mixture feels crumbly or too dry, just add a little more creamy peanut butter, one tablespoon at a time, until it reaches a dough-like consistency. Mixing thoroughly will help ensure the truffles hold together nicely.
Are Nutter Butter Truffles safe for pets?
No, they are not! While these truffles are delicious for humans, they contain ingredients like chocolate and peanut butter that can be harmful to pets, especially chocolate, which is toxic to dogs. Always keep these treats away from your furry friends to keep them safe!
Can I use alternatives for some ingredients?
Certainly! If you're looking to change things up, you can swap out creamy peanut butter for almond butter to create a different flavor. For the chocolate coating, feel free to use dark chocolate, white chocolate, or even add different toppings like crushed nuts or sprinkles to make it your own. Enjoy the process!

Decadent Nutter Butter Truffles for Easy No-Bake Indulgence
Ingredients
Equipment
Method
- Begin by crushing the Nutter Butter cookies into fine crumbs, using a food processor or zip-top bag with a rolling pin.
- In a large mixing bowl, combine the crushed cookies with creamy peanut butter and powdered sugar until a dough-like consistency forms.
- Scoop out the dough and roll it into 1-inch balls, placing them on a lined baking sheet.
- In a microwave-safe bowl, melt the chocolate chips and coconut oil in 30-second intervals, stirring until smooth.
- Dip each truffle into the melted chocolate, allowing excess to drip back into the bowl, and place on the baking sheet.
- Sprinkle a pinch of sea salt on top of each truffle while the chocolate is still wet, if desired.
- Refrigerate the truffles for at least 1 hour to allow the chocolate to set.


Leave a Reply