
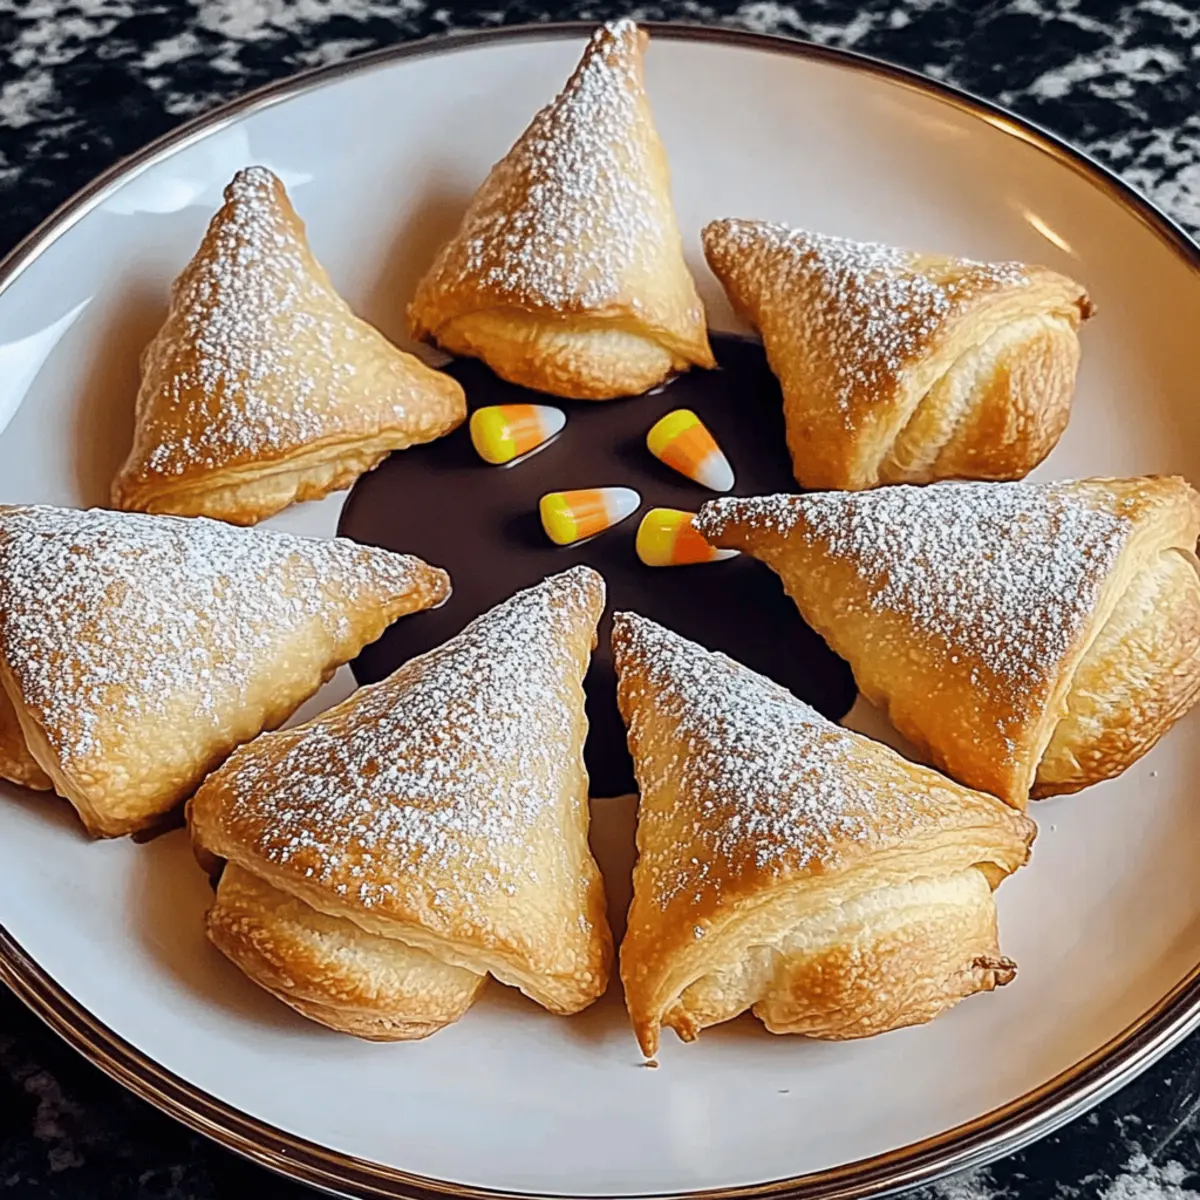
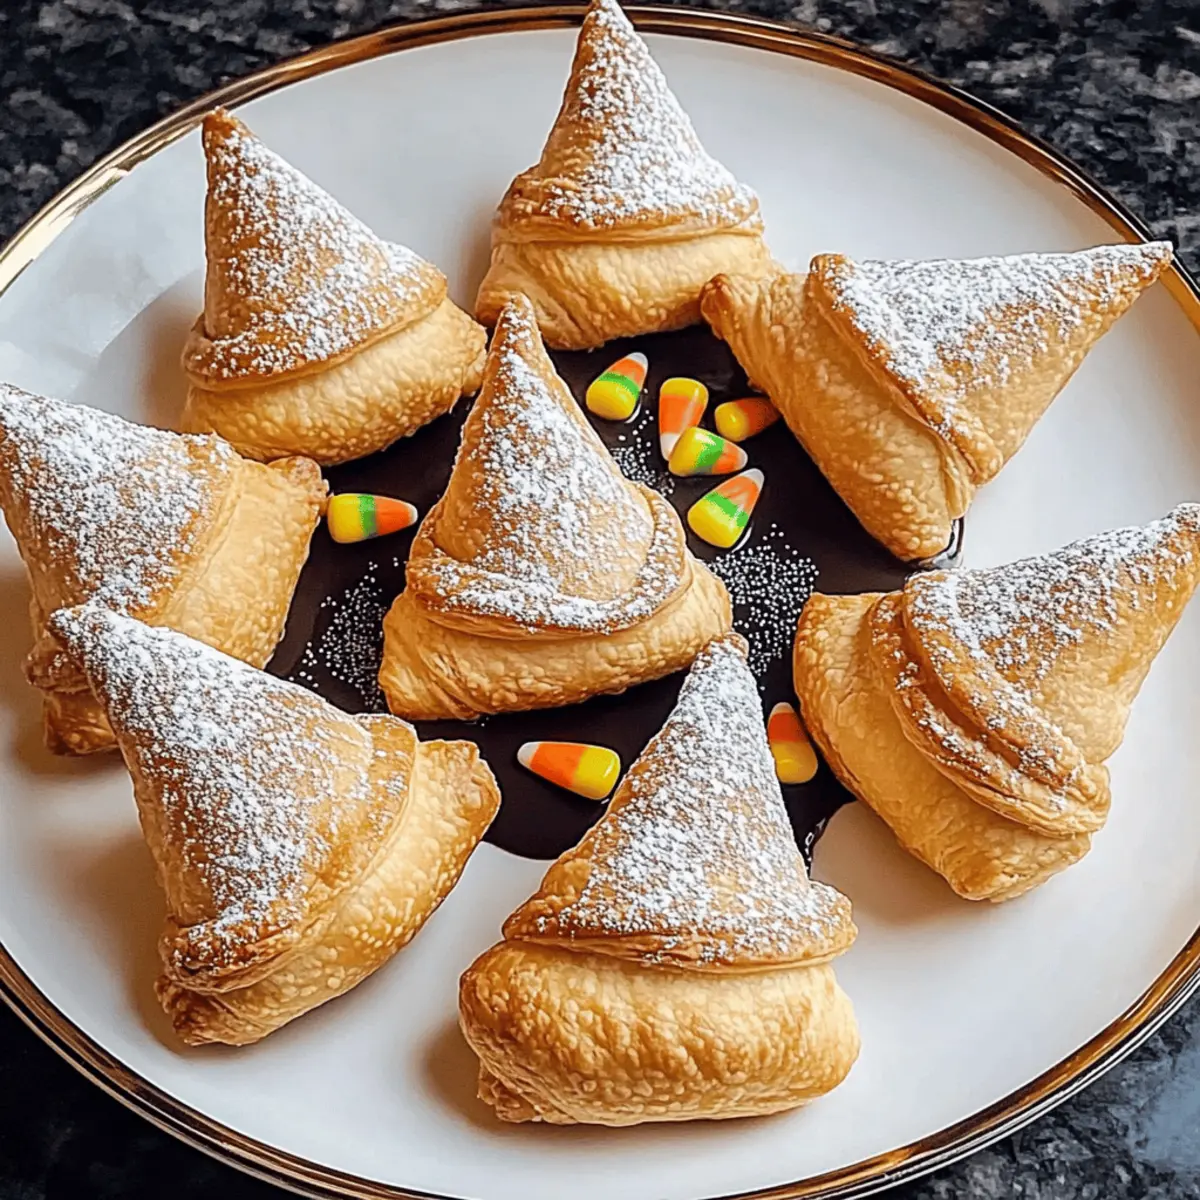
As I strolled through the crisp autumn air, I couldn’t help but be enchanted by the sight of colorful leaves and the whispers of Halloween magic around every corner. That’s when the idea for Spooky Crescent Roll Witch Hats struck me, merging creativity and deliciousness into one irresistible Halloween treat! This whimsical recipe takes barely any time—under 30 minutes—making it perfect for busy festivities. With flaky crescent roll dough encasing gooey chocolate and crowned with fun candy corn, these playful hats are sure to steal the spotlight at any gathering. And the best part? You can customize them with your favorite fillings, like peanut butter or mini marshmallows. Are you ready to conjure up some Halloween fun in your kitchen? Let’s dive into this delightful recipe together!
Why Will You Adore These Halloween Treats?
Simplicity: The recipe is approachable, blending ready-made crescent roll dough with simple fillings, perfect for home cooks of all skill levels.
Whimsical Appeal: These treats bring a fun and festive vibe to any gathering, making them a hit with both kids and adults alike.
Customizable Flavors: You can easily swap out fillings—try peanut butter, mini marshmallows, or even cream cheese for a savory twist.
Quick Preparation: In just under 30 minutes, you can have a delicious dessert that's perfect for impromptu Halloween parties—no long baking times here!
Crowd-Pleasing Presentation: The fun shape and colorful candy corn topping will have your guests marveling—a perfect addition to any Halloween spread, alongside goodies like Hawaiian Roll French or Pepperoni Pizza Roll.
Spooky Crescent Roll Witch Hats Ingredients
Are you ready to create these delightful Halloween treats? Here’s everything you’ll need to conjure up some magic!
For the Witch Hats
- Crescent Roll Dough – this flaky base creates the perfect hat shape; use refrigerated dough for convenience.
- Semi-Sweet Chocolate Chips – these provide a rich, gooey filling; feel free to substitute with mini marshmallows or a nut butter for a different flavor.
- Candy Corn – adds a festive, colorful touch to your witch hats; swap with other candies or edible glitter for varied decoration.
- Cooking Spray – keeps your dough from sticking; can also be replaced with parchment paper for less cleanup.
Jump into the kitchen and let the Halloween festivities begin with these fun and easy treats!
Step‑by‑Step Instructions for Spooky Crescent Roll Witch Hats – Easy Halloween Treats
Step 1: Preheat the Oven
Begin by preheating your oven to 375°F (190°C). While the oven warms up, prepare a baking sheet by lining it with parchment paper or lightly spraying it with cooking spray. This step is crucial as it ensures that your Spooky Crescent Roll Witch Hats will bake evenly and not stick to the pan.
Step 2: Prepare the Dough
Unroll the refrigerated crescent roll dough and gently separate it into individual triangles. Keep the triangles intact while working, as these will form the bases of your witch hats. For best results, lay them on a flat surface where you can easily access and fill each triangle with your chosen ingredients.
Step 3: Fill the Dough
At the wide end of each crescent triangle, place a generous mound of semi-sweet chocolate chips. You can also experiment by switching the chocolate with mini marshmallows or peanut butter for a whimsical twist. Ensure that the filling is evenly spread, leaving enough space around the edges to pinch the dough closed properly in the upcoming step.
Step 4: Shape the Hats
Carefully roll each triangle from the wide end toward the pointed tip, creating a hat shape. As you roll, pinch the seams together tightly to prevent any filling from leaking out during baking. The aim is to create a well-sealed witch hat that retains its contents and bakes into a delightful treat.
Step 5: Bake
Arrange your filled and shaped witch hats on the prepared baking sheet, giving them space to expand. Bake in the preheated oven for about 12-15 minutes, observing them closely as they bake. They should turn a rich golden brown, indicating they are flaky and perfectly cooked.
Step 6: Garnish with Candy Corn
Once the Spooky Crescent Roll Witch Hats are golden and baked to perfection, remove them from the oven and let them cool for a couple of minutes. While they are still warm, gently place a piece of candy corn on the tip of each hat for a delightful finishing touch. The warmth will help the candy adhere better, making your treats both beautiful and tasty.

Spooky Crescent Roll Witch Hats Variations
Feel free to unleash your creativity and customize these treats with different fillings and flavors!
-
Nut Allergy Friendly: Substitute chocolate chips with sunflower seed butter or a nut-free chocolate option for a delightful twist without allergens.
-
Savory Surprise: Replace the sweet fillings with herb-infused cream cheese for a savory witch hat experience that’s perfect for any Halloween charcuterie board.
-
Fruity Flavors: Fill with diced apples, cinnamon, and a sprinkle of sugar to create a delicious caramel apple version that’s bursting with flavor.
-
Colorful Sprinkles: Amp up the fun by drizzling melted white chocolate over the finished hats and adding colorful sprinkles for added festivity.
-
S'mores Style: Swap chocolate chips for marshmallows and chocolate chunks, and top with graham cracker crumbs for a nostalgic s’mores experience in spooky form.
-
Heat It Up: For those who like a little spice, try filling the hats with a jalapeño cream cheese blend, giving your treats a daring kick that surprises the palate.
-
Dipping Delights: Serve your witch hats alongside a rich caramel or chocolate dipping sauce; it's an interactive treat that adds a fun twist to munching.
-
Gourmet Touch: Use almond paste mixed with dark chocolate as a filling for a sophisticated flavor profile, perfect for impressing adult guests at your Halloween gathering.
And if you’re looking for more delightful ideas, you might want to try making Breakfast Egg Muffins or indulge in some scrumptious Tteokbokki Spicy Korean for a taste that’s sure to enchant!
How to Store and Freeze Spooky Crescent Roll Witch Hats
Room Temperature: Keep any leftover witch hats in an airtight container at room temperature for up to 2 days to maintain their flaky texture.
Fridge: For longer freshness, you can store them in the fridge for up to 5 days, but be mindful that they may become less flaky. Reheat to restore some crunch.
Freezer: If you want to prepare ahead, freeze unbaked witch hats for up to 2 months. Simply shape and then wrap each hat tightly in plastic wrap before placing them in a freezer bag.
Reheating: To enjoy your stored Spooky Crescent Roll Witch Hats, simply reheat them in an oven preheated to 350°F for about 5-7 minutes, until warmed through.
Make Ahead Options
These Spooky Crescent Roll Witch Hats are perfect for meal prep, allowing you to spend less time in the kitchen when Halloween festivities roll around! You can prepare the filled and shaped hats up to 24 hours ahead of time—just cover them tightly with plastic wrap and refrigerate to keep them fresh. When you're ready to bake, take them out of the fridge and let them sit at room temperature for about 15 minutes before popping them in a preheated oven. This will help ensure they maintain their flaky texture and deliciousness. After baking, garnish them with candy corn while they are warm for the best adhesion, and you’ll have delightful treats ready to impress at your gathering!
Expert Tips for Spooky Crescent Roll Witch Hats
Seal It Well: Ensure each seam is tightly pinched after shaping; this prevents any delicious filling from leaking out during baking.
Watch Your Timer: Keep an eye on the baking time—over-baked hats can turn hard, while under-baked ones may lose their delightful flaky texture.
Get Creative with Fillings: Don't hesitate to explore fillings beyond chocolate; mini marshmallows and peanut butter also make fantastic options for your Spooky Crescent Roll Witch Hats.
Cool Before Decorating: Allow the hats to cool slightly before adding candy corn to help it stick better and avoid melting it away.
Experiment with Toppings: Consider using edible glitter or colorful sprinkles as extra decorations to make your Halloween treats even more festive and eye-catching!
What to Serve with Spooky Crescent Roll Witch Hats?
These delightful witch hats deserve a vibrant spread to complement their whimsical charm and tasty fillings!
-
Crispy Green Salad: A fresh mix of greens and crunchy vegetables adds a refreshing contrast, lightening the sweet treats while inviting a burst of color to your table.
-
Pumpkin Soup: Creamy and savory, this rich soup pairs beautifully, creating a warm and comforting experience perfect for an autumn gathering.
-
Cheesy Garlic Breadsticks: The buttery, cheesy flavor of these breadsticks balances out the sweetness of the witch hats, making for a satisfying bite.
-
Apple Cider: Serve this warm or chilled for a festive drink that enhances the fall theme; its sweet-tart flavor harmonizes well with the sugary treats.
-
Chocolate Pudding Cups: Keep the dessert theme going with these silky cups, offering a rich chocolate experience that echoes the witch hats' gooey filling—perfect for chocoholics!
-
Spiced Cookies: Gingerbread or cinnamon-spiced cookies provide a crunchy, spiced companion, ideal for adding a touch of seasonal warmth to your spread.
The combinations create a delightful party atmosphere that brings families and friends together over delicious flavors and Halloween cheer!
Spooky Crescent Roll Witch Hats Recipe FAQs
What type of crescent roll dough should I use?
Absolutely! For the best results, I recommend using refrigerated crescent roll dough, as it provides the perfect flaky texture. You'll find it in the refrigerated section of your grocery store, ready to roll out and create your witch hats without any fuss.
How should I store leftovers, and how long will they last?
You can store any leftover Spooky Crescent Roll Witch Hats in an airtight container at room temperature for up to 2 days. For longer freshness, consider keeping them in the fridge for up to 5 days. Just be aware that refrigeration might make them a bit less flaky, so reheat in your oven at 350°F for about 3-5 minutes to regain some of that delightful crunch!
Can I freeze Spooky Crescent Roll Witch Hats?
Yes, you can! If you want to make these treats in advance, freeze the unbaked witch hats. Simply shape them and wrap each hat tightly in plastic wrap, then place them in a freezer bag. They can be stored in the freezer for up to 2 months. When you’re ready to bake, simply remove them from the freezer and bake directly from frozen; just add a couple of extra minutes to the baking time.
Why do some witch hats leak filling during baking, and how can I fix this?
Very common! To prevent any filling from leaking during baking, make sure you pinch the seams tightly after rolling each triangle into a hat shape. A proper seal is essential for keeping your gooey goodness inside. If you notice any gaps, simply re-pinching the seams can help create a better seal.
Can I use alternative fillings for my witch hats?
The more the merrier! You can absolutely experiment with various fillings beyond chocolate chips. Mini marshmallows, creamy peanut butter, or even herb-infused cream cheese for a savory twist all work beautifully. Just remember to adjust your amounts to avoid overstuffing, which could lead to leaks.
Is this recipe suitable for children or those with allergies?
It's essential to check! While the Spooky Crescent Roll Witch Hats are fun and kid-friendly, always consider any allergies of your guests or family members. The main ingredients (crescent roll dough, chocolate chips, and candy corn) may contain allergens like gluten, dairy, or nuts. Be sure to opt for allergy-friendly alternatives if needed, and ensure that those with dietary restrictions stay safe while still enjoying festive treats!

Spooky Crescent Roll Witch Hats – Easy Halloween Treats to Delight
Ingredients
Equipment
Method
- Preheat your oven to 375°F (190°C). Prepare a baking sheet by lining it with parchment paper or lightly spraying it with cooking spray.
- Unroll the refrigerated crescent roll dough and separate it into individual triangles without breaking them.
- At the wide end of each crescent triangle, place a generous mound of semi-sweet chocolate chips. Ensure enough space around the edges to pinch the dough closed.
- Roll each triangle from the wide end toward the pointed tip, pinching the seams together tightly to create a sealed hat.
- Arrange the shaped witch hats on the baking sheet and bake for about 12-15 minutes until golden brown.
- Remove from the oven and let cool for a couple of minutes. Add a piece of candy corn to the tip of each hat while still warm.


Leave a Reply