
As I stood in my kitchen, a tantalizing aroma drifted from the frying pan, transporting me straight to the bustling streets of Bangkok. The star of the show? A Thai Fried Chicken Sandwich that truly satisfies cravings for something vibrant and flavorful. Trust me, this sandwich isn’t just any meal—it’s a celebration of textures and tastes, with tender chicken thighs marinated in coconut milk and curry powder, creating a symphony of flavor with every bite. What I love most about this recipe is its quick prep time and the gluten-free option using rice flour for that perfect crisp. Whether you’re hosting a casual gathering or simply treating yourself to a delicious homemade delight, this sandwich will surely impress. Are you ready to fill your kitchen with irresistible scents and make a culinary memory? Let’s dive into the recipe!

Why Is This Sandwich Irresistible?
Crispy Perfection: The crispy coating achieved with rice flour creates a delightful crunch that pairs perfectly with the tender, juicy chicken.
Bold Flavors: A marinade of coconut milk and curry powder infuses the chicken with vibrant, aromatic flavors that transport your taste buds.
Quick & Easy: With simple steps, this sandwich can be whipped up in no time, making it a great choice for busy weeknights.
Versatile Serving: Pair it with a light Asian slaw or sweet potato fries for a delicious meal that appeals to everyone. For more flavors, check out my Pesto Chicken Lettuce for a fresh twist or my Mushroom Chicken Comfort for something hearty.
Crowd-Pleasing: Whether you're hosting friends or enjoying a weeknight dinner, this Thai Fried Chicken Sandwich is bound to be a hit!
Gluten-Free Option: Easily swap with rice flour or cornstarch, ensuring everyone can enjoy this flavorful delight!
Thai Fried Chicken Sandwich Ingredients
Get ready to make this irresistible Thai Fried Chicken Sandwich with these handpicked ingredients!
For the Chicken
• Chicken Thighs – provide juiciness and a flavorful base for the sandwich; substitute chicken breasts if desired, but monitor cooking to prevent drying.
• Coconut Milk – tenderizes the chicken and adds creaminess; no substitution necessary, but canned coconut cream may be a richer alternative.
• Curry Powder – infuses the chicken with aromatic spices; using a Thai curry mix gives the best flavor.
• Garlic – adds depth of flavor; freshly minced garlic is recommended for the best aroma.
• Ginger – contributes warmth and spice to the marinade; fresh ginger is preferable; ground ginger can be used in a pinch.
For the Coating
• Rice Flour or Cornstarch – creates a crispy coating; you can substitute with all-purpose flour if gluten isn’t a concern, but the texture will differ.
• Vegetable Oil – used for frying; ensure oil is heated to the correct temperature (350°F/175°C) for optimal frying.
For the Sandwich Assembly
• Buns – serve as the sandwich base; soft, toasted buns complement the sandwich well.
• Thai Chili Sauce – provides heat; can substitute with sriracha mixed with sweet chili sauce or hot sauce with honey.
• Mayonnaise or Plain Yogurt – adds creaminess in the spicy sauce; flavored plant-based alternatives work for a vegan option.
• Fresh Cucumber and Pickled Carrots – add crunch and freshness; other crunchy vegetables like radishes can work as well.
• Cilantro and Thai Basil – herbs that enhance flavor freshness; while any fresh herb can substitute, the unique taste of Thai basil is recommended.
Now you’re ready to create a Thai Fried Chicken Sandwich that will leave everyone craving more!
Step‑by‑Step Instructions for Thai Fried Chicken Sandwich
Step 1: Marinate the Chicken
In a mixing bowl, combine coconut milk, curry powder, minced garlic, grated ginger, salt, and sugar until well blended. Add the chicken thighs, ensuring they are fully coated in the marinade. Cover and refrigerate for at least 1 hour, but preferably overnight, to allow the flavors to seep in and tenderize the chicken for your Thai Fried Chicken Sandwich.
Step 2: Prepare the Coating
On a large plate, mix rice flour or cornstarch with a pinch of salt and pepper for seasoning. Remove the chicken thighs from the marinade, letting the excess drip off before dredging them in the flour mixture. Ensure each piece is evenly coated, then set aside to allow the coating to adhere, creating a perfect crisp for your sandwich.
Step 3: Heat the Oil
In a deep skillet or Dutch oven, pour vegetable oil and heat it to 350°F (175°C) over medium heat. To test if the oil is ready, drop a small bit of the coating into the oil—if it sizzles right away, you're set! This optimal frying temperature will achieve that golden-brown crispiness for your Thai Fried Chicken Sandwich.
Step 4: Fry the Chicken
Carefully add the coated chicken thighs to the hot oil in batches, ensuring not to overcrowd the pan. Fry for about 5-7 minutes on each side or until the chicken is golden brown and reaches an internal temperature of 165°F (75°C). Once cooked, remove the chicken and drain on a wire rack, allowing excess oil to drip off for a perfect crunch.
Step 5: Make the Spicy Mayo
In a small bowl, whisk together the Thai chili sauce and mayonnaise or plain yogurt until creamy and well-mixed. This spicy mayo will elevate your Thai Fried Chicken Sandwich, adding a delicious kick that beautifully balances the flavors of the tender chicken and fresh toppings.
Step 6: Assemble the Sandwich
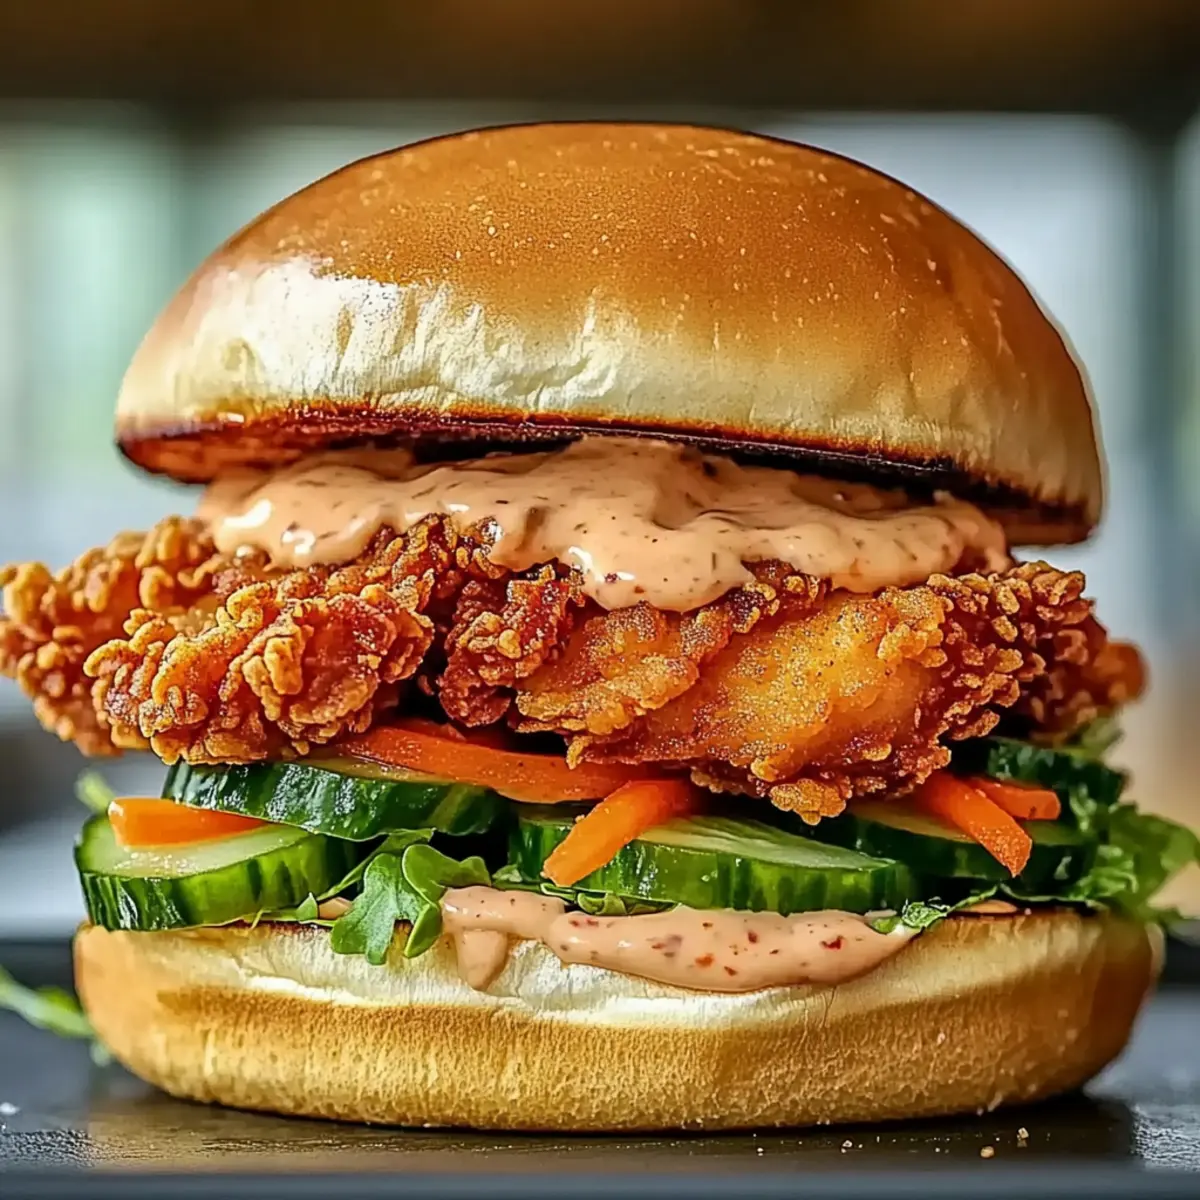
Toast your buns until lightly golden for added texture. Spread a generous amount of spicy mayo on both sides of each bun. Layer in the fried chicken, followed by fresh cucumber slices, pickled carrots, and a sprinkle of cilantro and Thai basil for a vibrant finish. Close the sandwich and prepare to relish each delightful bite!

Thai Fried Chicken Sandwich Variations
Feel free to mix it up and create your own version of this delightful sandwich that tantalizes the taste buds!
- Dairy-Free: Use almond or coconut yogurt instead of mayonnaise for the spicy mayo. This keeps the creaminess while catering to dairy sensitivities.
- Spicy Twist: Add sliced jalapeños or crushed red pepper flakes into the spicy mayo for an extra kick that pairs beautifully with the tender chicken.
- Vegetarian Option: Swap chicken for crispy tofu marinated in the same coconut milk and curry powder mix. This twist is just as satisfying and full of flavor!
- Asian Slaw Addition: Top your sandwich with a simple Asian slaw made of cabbage and carrots dressed with rice vinegar. This adds a crunchy texture and freshness.
- Gluten-Free Crust: Stick with the rice flour or try chickpea flour as a unique coating to maintain a gluten-free option with a different flavor profile.
- Herbaceous Flair: Incorporate fresh mint along with cilantro and basil for an herbaceous boost that brightens the overall flavor.
- Sweet Sauce: Drizzle some sweet chili sauce on the finished sandwich for a perfect balance of sweet and spicy that enhances every bite.
- Delicious Dip: Serve the sandwich with a side of spicy Thai peanut sauce for dipping, adding extra flavor and a fun twist to your meal.
No matter how you choose to customize your Thai Fried Chicken Sandwich, it’s bound to impress! And if you're in the mood for more delicious chicken creations, be sure to check out my Garlic Parmesan Chicken or indulge in a warm Cheesy Chicken Spaghetti!
How to Store and Freeze Thai Fried Chicken Sandwich
Fridge: Store leftover components separately in airtight containers; the fried chicken keeps well in the fridge for up to 3 days, retaining its flavors.
Freezer: For longer preservation, freeze the fried chicken individually for up to one month. Wrap each piece tightly in plastic wrap before placing in a freezer bag to prevent freezer burn.
Reheating: To enjoy your Thai Fried Chicken Sandwich again, reheat the chicken in a hot oven or air fryer to maintain crunchiness. Avoid microwaving, as it may result in a soggy texture.
Bun Storage: Store buns at room temperature in a cool spot or in a sealed bag for a couple of days, ensuring they remain soft for your next sandwich creation!
What to Serve with Crispy Thai Fried Chicken Sandwich
Elevate your meal experience with mouthwatering sides that perfectly complement this delightful sandwich.
-
Asian Slaw: A light and crunchy slaw with a sesame dressing enhances the sandwich’s bold flavors while adding freshness.
-
Sweet Potato Fries: These crispy, sweet delights provide a wonderful contrast to the savory chicken, satisfying those fried food cravings.
-
Cucumber Salad: Refreshing and cool, a simple cucumber salad seasoned with rice vinegar balances the richness of the sandwich beautifully.
-
Thai Potato Salad: Creamy yet zesty, this dish showcases similar flavors to the sandwich while offering a delightful change of texture.
-
Chilled Coconut Drink: For a truly tropical pairing, serve with a coconut drink that can refresh and cool down the palate between bites.
-
Mango Sticky Rice: As a sweet finish, this classic dessert rounds off the meal, leaving everyone satisfied with its sweet, creamy flavors.
Each option offers a unique twist that enhances the delightful taste of your Thai Fried Chicken Sandwich!
Expert Tips for the Best Thai Fried Chicken Sandwich
- Marinate Longer: Allowing the chicken to marinate overnight not only enhances flavor but also ensures a tender texture, making your Thai Fried Chicken Sandwich irresistible.
- Check Oil Temperature: Maintaining a steady temperature of 350°F during frying is crucial. Too hot, and the coating may burn; too cool, and it won't crisp properly.
- Avoid Soggy Sandwiches: To keep leftovers fresh, store chicken separately from the buns and veggies. When reheating, use an air fryer or oven instead of a microwave to retain crispiness.
- Perfect Coating: If using rice flour or cornstarch, ensure thorough dredging of the chicken to achieve the crispiness that defines this Thai Fried Chicken Sandwich.
- Experiment with Spice: Feel free to adjust the amount of Thai chili sauce in the mayo to suit your heat preference, providing a custom kick to your sandwich!
Make Ahead Options
These Thai Fried Chicken Sandwiches are perfect for meal prep enthusiasts looking to save time on busy weeknights! You can marinate the chicken thighs in the coconut milk and curry mixture up to 24 hours in advance to enhance the flavors. Additionally, prepare the spicy mayo and store it in the refrigerator for up to 3 days. When you’re ready to serve, simply dredge the marinated chicken in the rice flour or cornstarch, fry it until golden and crispy, and then assemble the sandwiches with fresh veggies. To maintain the chicken's crunch, avoid microwaving; instead, reheat the fried chicken in an oven or air fryer for that freshly fried taste.
Thai Fried Chicken Sandwich Recipe FAQs
How do I choose the right chicken for my sandwich?
Absolutely! For this Thai Fried Chicken Sandwich, I recommend using chicken thighs for their juiciness and flavor. If you prefer a leaner option, chicken breasts can be substituted, but be cautious with cooking time as they can dry out more quickly. Look for thighs that are bright in color and have a good amount of marbling for the best results.
How should I store leftover Thai Fried Chicken Sandwich components?
Very good question! Store leftover fried chicken, buns, and vegetables separately in airtight containers. The chicken will stay fresh in the refrigerator for up to 3 days. This method helps maintain their individual textures and flavors, allowing you to enjoy this delicious sandwich later!
Can I freeze the fried chicken?
Definitely! To keep your fried chicken for longer, I recommend wrapping each piece tightly in plastic wrap before placing them in a freezer bag. This will prevent freezer burn. It can be frozen for up to one month. When you're ready to enjoy it again, reheat in an oven or air fryer for that crispy goodness.
What if my chicken doesn't turn out crispy?
If your chicken lacks that glorious crunch, there are a few reasons this might happen. First, ensure the oil is at the correct temperature (350°F/175°C) before frying, as oil that is too cool won’t crisp the coating. Second, ensure there’s enough room in the frying pan; overcrowding can lead to steaming instead of frying. Lastly, dredging the chicken thoroughly in rice flour or cornstarch can also make a huge difference in achieving that desired crispy texture.
Is this recipe suitable for gluten-free diets?
Absolutely! The recipe allows for a gluten-free option by using rice flour or cornstarch instead of all-purpose flour for the coating. This ensures everyone can enjoy a delicious Thai Fried Chicken Sandwich! However, do double-check that all your sauces and additional ingredients are gluten-free as well.
Can pets eat any of the ingredients in this sandwich?
Generally, while the individual ingredients (like chicken and vegetables) can be safe for pets, the spices, especially cayenne in the Thai chili sauce, may not be suitable for them. Always play it safe by avoiding giving your pets any seasoned food. If you're considering sharing the chicken with your furry friend, it’s best to serve them plain, unseasoned chicken as a treat!

Crispy Thai Fried Chicken Sandwich You Can't Resist
Ingredients
Equipment
Method
- In a mixing bowl, combine coconut milk, curry powder, minced garlic, grated ginger, salt, and sugar until well blended. Add the chicken thighs and refrigerate for at least 1 hour.
- On a large plate, mix rice flour or cornstarch with a pinch of salt and pepper. Dredge chicken thighs in the mixture until fully coated, then set aside.
- Heat vegetable oil in a deep skillet to 350°F (175°C).
- Fry coated chicken thighs in batches for 5-7 minutes on each side until golden brown. Drain on a wire rack.
- Whisk together Thai chili sauce and mayonnaise or yogurt in a small bowl for the spicy mayo.
- Toast buns until golden, spread spicy mayo, and layer fried chicken, cucumber, pickled carrots, cilantro, and Thai basil. Close the sandwich and serve.


Leave a Reply