
As I watched the flowers bloom and the sun warm the earth, a delightful thought popped into my mind: it’s time to whip up some Easter Cake Pops! These festive treats not only celebrate spring’s vibrant colors, but they also offer a fun and engaging way to bond with family while in the kitchen. With both from-scratch and boxed cake mix options, you can whip up these colorful cake pops in no time, making them a perfect choice for busy cooks. The hands-on decoration process allows kids to unleash their creativity, transforming simple ingredients into adorable egg-shaped sweets that become the star of any Easter gathering. Are you ready to dive into this joyful baking adventure? Let’s get started!
Why Are Easter Cake Pops So Fun?
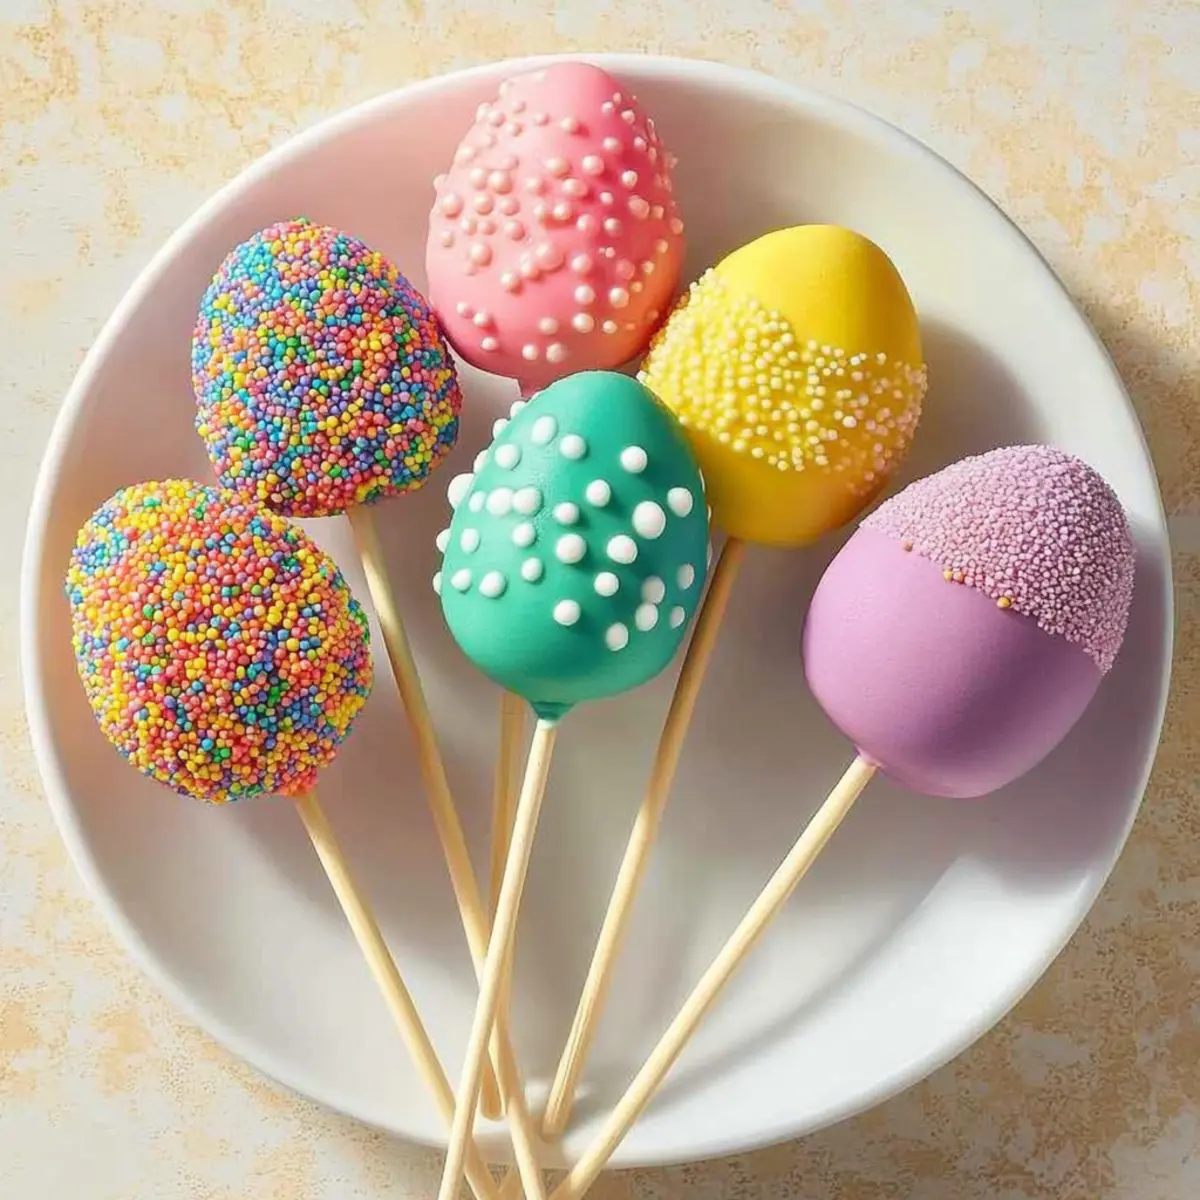
Colorful Creation: Easter Cake Pops come alive with vibrant colors and whimsical patterns, making them the ultimate festive treat for spring celebrations.
Family Bonding: Involve the kids in the decoration process! It's a fantastic way to create lasting memories while boosting their creativity.
Versatile: Whether you choose a boxed mix or bake from scratch, this recipe caters to all skill levels and dietary preferences.
Quick and Easy: With straightforward steps, you'll have delicious cake pops ready to impress your guests in no time.
Crowd-Pleaser: Perfect for any gathering, these delightful sweets are sure to put smiles on everyone’s faces, whether served at Easter brunch or for a birthday party. If you're looking for more fun treats, check out these Pecan Caramel Cake or our delightful Chocolate Cupcake Decadent options!
Easter Cake Pops Ingredients
For the Cake Base
- Cake Mix – Use your favorite flavor here, as it forms the base of your Easter Cake Pops; can be substituted with homemade cake for a personal touch.
- Prepared Frosting – Essential for binding the cake crumbs together; choose a flavor that complements your cake mix for a harmony of taste.
For Assembly
- Lollipop Sticks – Provides the perfect handle for your cake pops; consider using candy-coated sticks for an extra festive flair.
- Candy Coating Disks – The colorful outer layer that makes your Easter Cake Pops eye-catching; opt for pastel colors to align with the spring theme, ensuring they’re melted properly for a smooth coat.
Optional Toppings
- Sprinkles/Candies – These add personality and flavor to your pops; use seasonal decorations to make your delightful treats burst with color and joy.
With these Easter Cake Pops ingredients in hand, you’re all set to create a fun, tasty treat that’s bound to bring smiles to your family gathering!
Step‑by‑Step Instructions for Easter Cake Pops
Step 1: Bake the Cake
Start by preparing your cake mix according to package instructions and pour it into a greased 13x9-inch pan. Bake at 350°F (175°C) for about 25-30 minutes, or until a toothpick inserted in the center comes out clean. Once baked, allow the cake to cool completely in the pan before transferring it to a wire rack.
Step 2: Prepare the Cake Mixture
Crumble the cooled cake into a large bowl using your hands or a fork, making sure the crumbs are coarse yet even. Gradually mix in ¼ cup of prepared frosting, adding more until the mixture is moist enough to hold together when rolled into a ball. This cake mixture will form the base of your delightful Easter Cake Pops.
Step 3: Shape the Pops
Once your cake mixture is well-combined, take about 1.25 to 1.5 ounces of the mixture and roll it into egg shapes, which will resemble miniature Easter eggs. Place these shaped cakes on a parchment-lined baking sheet and refrigerate them for 20-30 minutes. This step ensures they firm up, making them easier to handle when you coat them later.
Step 4: Melt the Candy Coating
While the cake pops chill, prepare your candy coating. In a microwave-safe bowl, melt the candy wafers in 30-second intervals at 50% power, stirring between each interval, until smooth and completely melted. Be sure to keep an eye on them to avoid burning; the coating should be glossy and fluid for the best results on your Easter Cake Pops.
Step 5: Coat the Cake Pops
Remove the chilled cake pops from the refrigerator. Dip the tip of each lollipop stick into the melted candy coating and then insert it halfway into a cake pop. Next, completely dip the cake pops into the melted candy coating, allowing any excess coating to drip back into the bowl before placing them upright in a foam block to set.
Step 6: Decorate the Pops
While the candy coating is still wet, sprinkle your preferred decorations, such as colorful sprinkles or candies, to give your Easter Cake Pops a festive look. Be creative with the toppings! Once decorated, allow the pops to sit in the foam block for at least 30 minutes, or until the coating has fully hardened.

How to Store and Freeze Easter Cake Pops
Room Temperature: Keep Easter Cake Pops in a cool, dry place for up to 2 days. Make sure they’re in a single layer to avoid squishing the decorations.
Fridge: Store cake pops in an airtight container in the refrigerator for up to 1 week. To maintain their freshness and decoration, layer them with parchment paper between each layer.
Freezer: For longer storage, freeze cake pops in a single layer on a baking sheet until solid, then transfer them to a freezer-safe bag. They can last up to 2 months.
Reheating: To thaw frozen pops, simply leave them in the fridge overnight before serving. Avoid thawing at room temperature to maintain their texture and flavor.
Expert Tips for Easter Cake Pops
- Uniform Size: Ensure each egg-shaped cake pop is similar in size for even coating and consistent baking; this prevents some pops from being too dense or falling apart.
- Right Chill Time: Don’t skip the chilling step! Refrigerating the shaped pops for 20-30 minutes helps them firm up, making coating easier and preventing them from losing shape.
- Proper Melting: Always melt the candy coating in 30-second intervals to ensure it stays smooth; if it thickens, add a teaspoon of vegetable oil to restore its texture before dipping.
- Adhesion Strategy: Apply sprinkles immediately after coating while it's still wet; this ensures that decorations stick well to your Easter Cake Pops without slipping off.
- Avoid Water Contact: Any contact with water can seize your candy coating, leading to a gritty finish; keep tools and bowls dry for the best results.
Easter Cake Pops Variations & Substitutions
Get ready to unleash your inner cake artist and make these delightful creations even more personal and playful!
-
Gluten-Free: Swap in any gluten-free cake mix to accommodate those with dietary restrictions without sacrificing flavor.
-
Different Flavors: Experiment with a range of frosting flavors, like cream cheese or chocolate, to complement your cake mix and keep things fresh.
-
Egg Shapes: For a twist, try forming the pops into bunnies or chicks! Use different molds to create a variety of festive shapes.
-
Theme Toppings: Customize decorations based on holidays, like candy hearts for Valentine's Day or spooky sprinkles for Halloween! Unleash your creativity and have fun with it.
-
Bakery-Style: For an extra layer of flavor, dip the cake pops in a layer of chocolate ganache before applying the candy coating. It adds a rich, decadent touch!
-
Spicy Kick: Add a pinch of cinnamon or cayenne to your cake mix for a surprising burst of heat, perfect for adventurous taste buds.
-
Coconut Coating: Try rolling finished pops in shredded coconut instead of sprinkles for a tropical flair. It's a delightful texture contrast that adds a fun chew!
-
Mocha Magic: Infuse your cake mix with coffee or espresso powder for a delightful mocha flavor that coffee lovers will adore.
For further inspiration and sweet indulgences, check out this delightful Chocolate Zucchini Cake or explore the festive charm of Pecan Pie Dump Cake. Enjoy the baking adventures!
Make Ahead Options
These delightful Easter Cake Pops are perfect for busy home cooks looking to save time during the spring festivities! You can prepare the cake base and shape the pops up to 24 hours in advance, then refrigerate them to keep them firm and flavorful. Just ensure the shaped cake pops are wrapped or covered to prevent them from drying out. When you're ready to serve, simply melt the candy coating and dip the pops as instructed. They’ll be just as delicious and festive, allowing you to enjoy precious moments with your family while the cake pops are transformed into beautiful treats at a moment's notice!
What to Serve with Easter Cake Pops?
Imagine the delight of setting a beautiful table filled with treats that not only taste delicious but also create a festive atmosphere perfect for spring gatherings.
-
Fresh Fruit Salad: A mix of berries, melon, and citrus adds a refreshing, sweet contrast, balancing the richness of the cake pops. The vibrant colors also mirror those of the pops, enhancing your Easter spread.
-
Mini Quiches: Savory bites filled with eggs and cheese create a delightful contrast to sweet cake pops. Their delicate flavors and comforting textures can appeal to guests both young and old.
-
Chocolate-Covered Strawberries: These treats echo the indulgent sweetness of cake pops while introducing a fresh fruit element that brightens the table. Plus, their chocolatey exterior provides a nice complement to the candy coating!
-
Lemonade or Fruit Punch: A chilled drink packed with fruity flavors complements the sweetness of the cake pops beautifully. Their refreshing taste quenches thirst while enhancing the festive feel of your celebration.
-
Carrot Sticks with Hummus: For a crunchy, nutritious option, offer crisp carrot sticks paired with creamy hummus. The savory dip balances the sweetness of your desserts and gives guests a healthy munching option.
-
Coconut Macaroons: These chewy, sweet treats echo the flavors and textures of the cake pops, adding another layer of indulgence to your dessert table. Their lightly toasted exterior offers a pleasant crunch.
Let your Easter gathering sing with flavor and color by pairing these delightful options with your lively Easter Cake Pops!

Easter Cake Pops Recipe FAQs
What type of cake mix should I use for Easter Cake Pops?
You can use your favorite flavor of cake mix—chocolate, vanilla, or even strawberry. If you prefer a personal touch, feel free to substitute the boxed mix with a homemade cake recipe. Just ensure that the texture remains fluffy and holds together well when crumbled.
How do I store leftover Easter Cake Pops?
Absolutely! Store your Easter Cake Pops in an airtight container in the refrigerator for up to a week. To keep them fresh and preserve their decorations, layer pops with parchment paper between each layer to prevent them from sticking to one another.
Can I freeze Easter Cake Pops?
Yes, you can! To freeze your Easter Cake Pops, place them in a single layer on a baking sheet until solid. Then, transfer them to a freezer-safe bag. They can be frozen for up to 2 months! When you’re ready to enjoy them, simply thaw in the refrigerator overnight. Avoid leaving them at room temperature to maintain their delicious texture.
What should I do if my candy coating isn't smooth?
If your candy coating thickens, don’t fret! Just add a teaspoon of vegetable oil to the melted candy and stir. This will restore its smoothness, allowing for an even and glossy finish on your cake pops. Remember to melt the candy coating in 30-second intervals to prevent burning.
Are Easter Cake Pops suitable for children with nut allergies?
Certainly! As long as you choose a cake mix and candy coating free from nuts, these delightful treats can be a safe option. Always check the labels on your ingredients to ensure they meet your specific dietary needs. You can also use gluten-free cake mix for those with gluten sensitivities, making them a versatile treat for everyone.
How can I involve my kids in making Easter Cake Pops?
Involving the kids in the process is a joyful experience! Let them help crumble the cooled cake, shape the pops, and decorate with sprinkles and candies. They’ll love the hands-on activity, and it’s a great way to create lasting memories while enjoying the fun of baking together!

Easter Cake Pops: Festive Treats Your Family Will Love
Ingredients
Equipment
Method
- Bake the cake mix according to package instructions in a greased 13x9-inch pan at 350°F for about 25-30 minutes.
- Once baked, allow the cake to cool completely, then crumble it into a large bowl.
- Mix in prepared frosting gradually until moist enough to hold together when rolled into balls.
- Shape the mixture into egg shapes (1.25 to 1.5 ounces each), place on a parchment-lined baking sheet, and refrigerate for 20-30 minutes.
- Melt the candy coating in a microwave-safe bowl in 30-second intervals until smooth.
- Dip the tip of each lollipop stick into the melted coating and insert into each cake pop. Dip the pops completely in the coating.
- Sprinkle with desired decorations while the coating is still wet and allow to set in a foam block.


Leave a Reply