
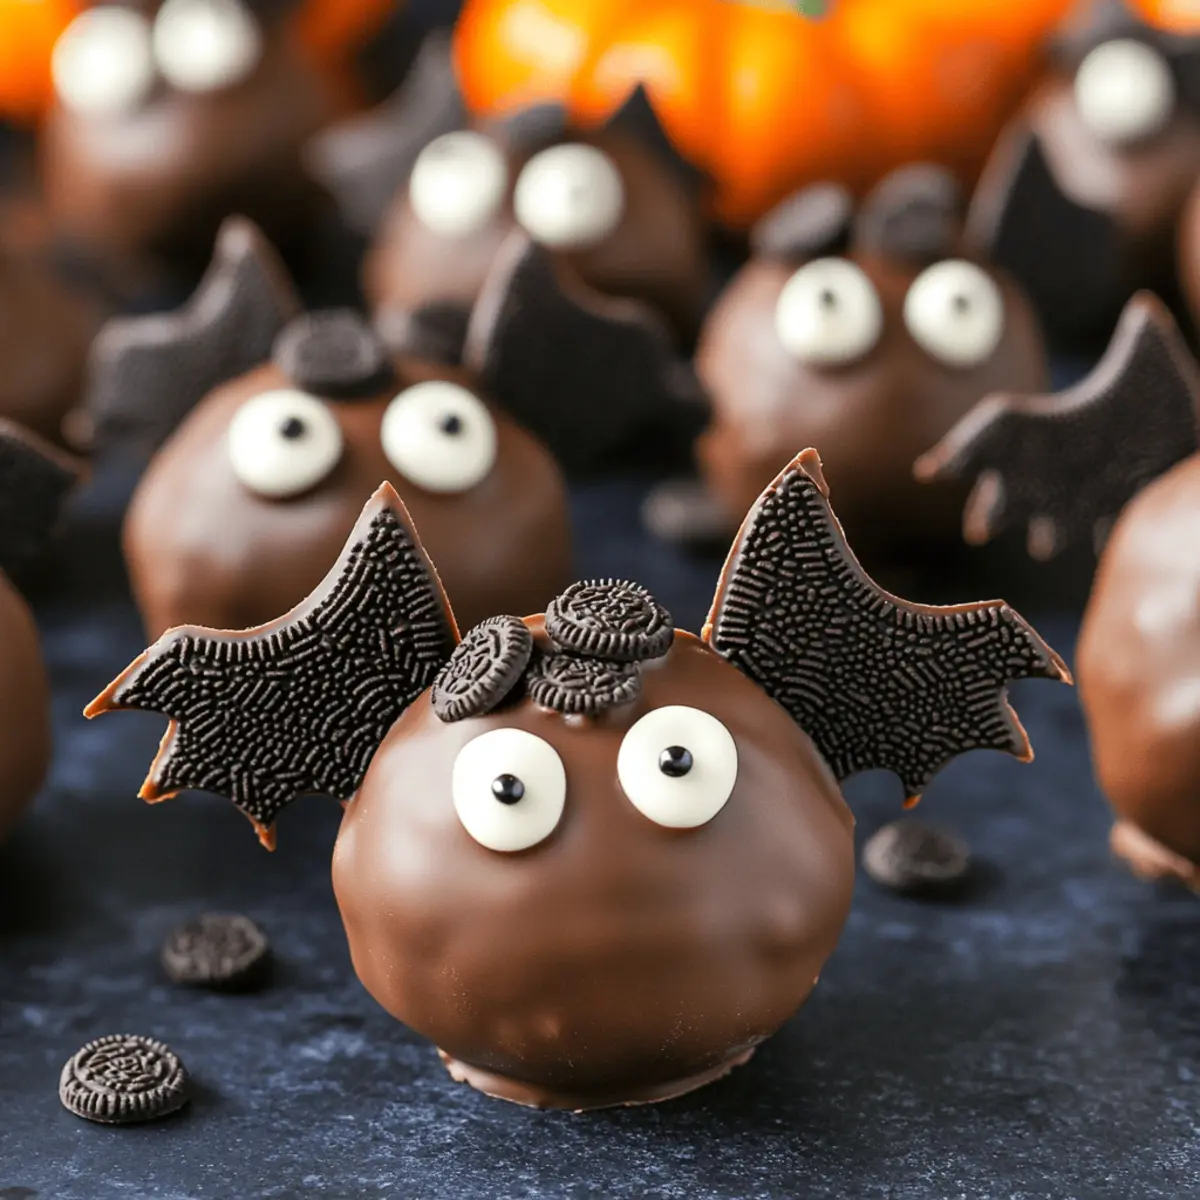
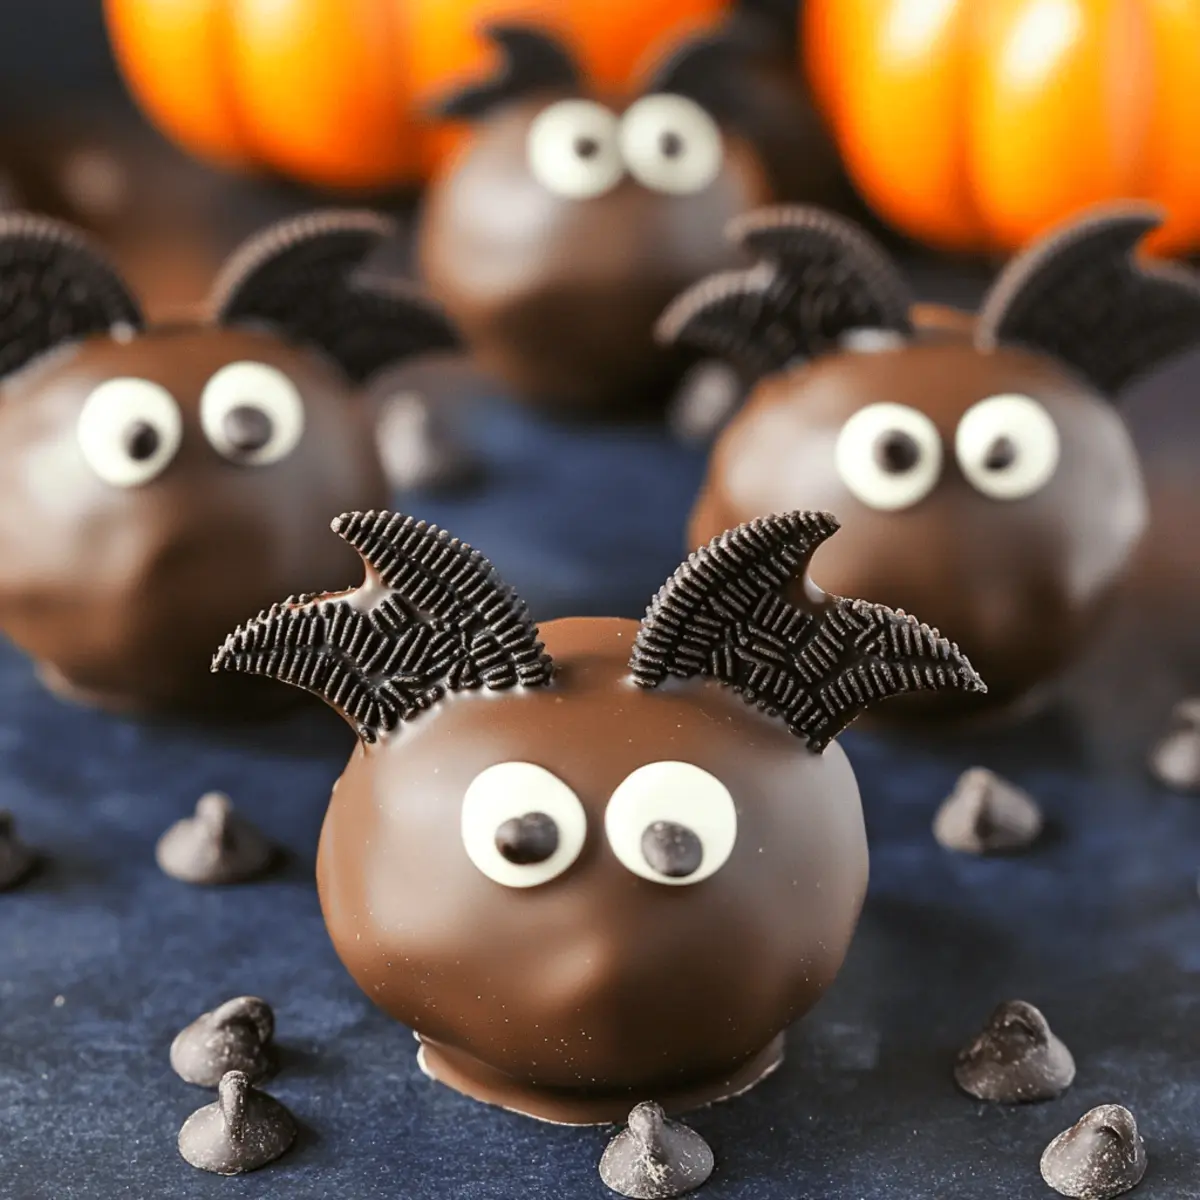
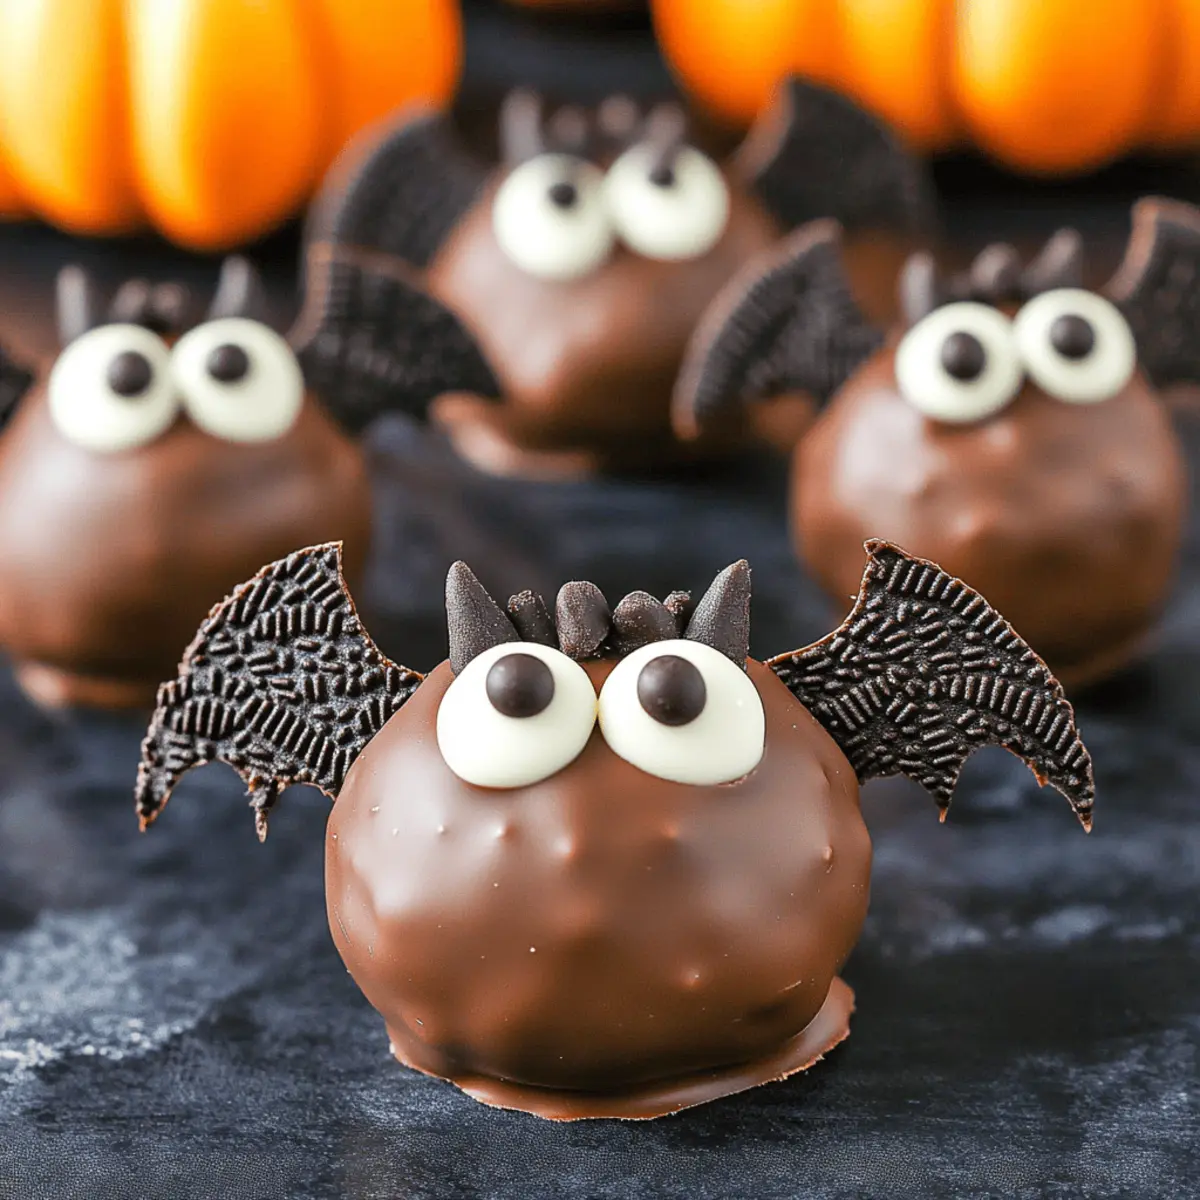
As the crisp autumn air settles in, the spirit of Halloween brings out the playful side of our kitchens. I’ve recently discovered that making treats like these Irresistible Bat Oreo Cookie Balls is not just easy, but a delightful way to create festive fun without turning on the oven! These no-bake treats balance a rich, creamy essence with a chocolatey outer layer, and they'll surely be the highlight of your Halloween gathering. What I love most is how you can prepare them in advance, leaving you more time to enjoy the spooky season with family and friends. Ready to bring a bit of whimsy to your table? Let's dive into this delightful and surprisingly simple recipe!

Why You’ll Love Bat Oreo Cookie Balls
Effortless Preparation: These no-bake Bat Oreo Cookie Balls take minimal time to whip up, allowing you to spend more time enjoying the festivities!
Adorable Presentation: With their cute bat shape, they not only taste great but also make a striking addition to your Halloween spread that will impress guests.
Versatile Ingredients: You can easily customize these treats using different flavored cookies or chocolate coatings for unique twists – think about trying them with Pineapple Cookies Tropical for a fun fusion!
Family-Friendly Fun: Making these together can become a cherished Halloween tradition. Get the kids involved in shaping and decorating for a sweet bonding experience.
Perfect Storage: They stay fresh in the fridge for up to a week, which means you can prepare them ahead of time and have a delicious treat on hand whenever the craving strikes!
Irresistible Bat Oreo Cookie Balls Ingredients
• For the Cookie Base
- Oreo Cookies – Essential for sweetness and structure; you can substitute with Oreo THINS for easier wing cutting.
- Cream Cheese – Binds the cookie crumbs together, adding a creamy texture; full-fat is best for richness.
• For the Chocolate Coating
- Chocolate Candy Coating – This adds a luscious layer and perfect finishing touch; consider Ghirardelli melting wafers, Wilton Candy Melts, or Almond Bark as substitutes.
• For Wing Decorations
- Additional Oreo Halves – Remove the filling to create bat wings, approximately 30 pairs needed for decorating the cookie balls.
- Mini Chocolate Chips – Perfect for cute eyes; they’ll add a touch of whimsy to your Irresistible Bat Oreo Cookie Balls.
With these simple ingredients, you're just a few steps away from a delightful Halloween treat that everyone will love!
Step‑by‑Step Instructions for Irresistible Bat Oreo Cookie Balls: Easy Halloween Treats
Step 1: Crush the Oreos
Begin by placing your Oreo cookies into a food processor or blender. Pulse the cookies until they transform into fine crumbs, about 30 seconds. If you don’t have a food processor, you can seal the cookies in a plastic bag and crush them with a rolling pin. The goal is to achieve a uniform crumb texture, which will form the foundation of your Irresistible Bat Oreo Cookie Balls.
Step 2: Mix the Ingredients
In a large mixing bowl, combine the crushed Oreo crumbs with softened cream cheese. Ensure the cream cheese is at room temperature for easy mixing. Use a spatula or your hands to blend the mixture thoroughly until it becomes a cohesive, dough-like consistency. This creamy filling will give your cookie balls their lovely texture, blending sweet and savory flavors.
Step 3: Form the Balls
Scoop out about one tablespoon of the mixture and roll it into a ball in your palms, aiming for roughly 1-inch in diameter. Place the formed balls onto a parchment-lined baking sheet. Repeat this process until all the mixture is shaped into delightful little spheres, keeping them approximately an inch apart. This step creates the base of your delectable Halloween treat.
Step 4: Chill the Cookie Balls
Cover the baking sheet with a piece of plastic wrap and place it in the refrigerator for about 1 hour. This chilling time is essential, as it helps the cookie balls firm up and makes them easier to dip later. You’ll know they’re ready when they hold their shape well, providing that perfect texture when coated in chocolate.
Step 5: Prepare the Wings
While your cookie balls chill, it's time to prepare the bat wings. Open several Oreo halves and gently remove the cream filling to separate the cookie halves. Cut each Oreo half in a way that resembles wings—aim for about 30 pairs for decorating your Bat Oreo Cookie Balls. Set these cut cookies aside for assembly.
Step 6: Dip in Chocolate
Melt your chocolate candy coating in a microwave-safe bowl, heating it in 30-second intervals and stirring until smooth. Once melted, dip each chilled cookie ball into the chocolate coating, fully covering it. Let the excess chocolate drip off before placing them back on the parchment-lined sheet. The coating should be shiny and even, creating a deliciously rich shell around your Irresistible Bat Oreo Cookie Balls.
Step 7: Attach the Decorations
While the chocolate coating is still soft, quickly attach the prepared Oreo wings to each cookie ball, pressing gently to ensure they adhere. Next, use mini chocolate chips to create eyes by placing two on each ball. If you’d like to add ears, you can use small pieces of the Oreo cookie for extra flair. Act swiftly to avoid the chocolate setting before adding these fun decorations.
Step 8: Cool and Store
Once all your Bat Oreo Cookie Balls are decorated, allow the chocolate to set completely at room temperature or place them in the refrigerator for about 20 minutes. Once firm, transfer your spooky treats to an airtight container for storage in the fridge. They are now ready to impress your guests and stay fresh for up to 1 week.
Make Ahead Options
These Irresistible Bat Oreo Cookie Balls are ideal for meal prep, saving you time during the hectic Halloween season! You can prepare the cookie mixture and shape it into balls up to 24 hours in advance. Simply refrigerate them after forming, ensuring they’re tightly covered to maintain their moisture and shape. Additionally, the assembled cookie balls can be frozen for up to 3 months—just thaw in the fridge overnight before serving. When you're ready to serve, melt the chocolate coating and dip the chilled cookie balls, quickly attaching the wings and decorations before the chocolate sets. This way, you’ll have festive treats with minimal last-minute effort!
Irresistible Bat Oreo Cookie Balls Variations
Feel free to get creative as you customize these Bat Oreo Cookie Balls for an even more delightful Halloween treat!
-
Gluten-Free: Swap traditional Oreos for gluten-free sandwich cookies to cater to those avoiding gluten. The taste remains deliciously intact!
-
Nutty Twist: Add finely chopped nuts or a sprinkle of nut butter to the filling for an exciting crunch. The nutty flavor pairs surprisingly well with chocolate!
-
Minty Fresh: Use Mint Oreos instead of regular ones for a refreshing peppermint twist that will surprise your taste buds. This minty version adds a fun seasonal flair to your treats!
-
Colorful Coating: Try using colored melting chocolate or candy melts to match your Halloween theme. A bright purple or green coating will make your bats stand out even more!
-
Heat it Up: For those who enjoy a bit of spice, add a pinch of cayenne or chili powder to the cream cheese filling. This unexpected heat against the sweetness will create a unique flavor sensation!
-
Mini Treats: Roll the mixture into smaller bite-sized balls for mini versions. Perfect for kids or when you want to have just a little something sweet. These little bites are also great for parties!
-
Decorative Sprinkles: Before the chocolate hardens, add spooky sprinkles or edible glitter on top for a festive touch. It’s a fun visual boost that celebrates Halloween!
You can also think about pairing these with easy recipes like Breakfast Egg Muffins for a complete festive spread or enjoy them alongside Oreo Balls Decadent for a delightful variety. Enjoy the fun of creating your own twist on these deliciously spooky treats!
Expert Tips for Irresistible Bat Oreo Cookie Balls
-
Consistent Chilling: Ensure you chill the cookie balls for just 1 hour. This makes them firm enough to dip without chocolate hardening too quickly.
-
Extra Cookies: Keep a few extra Oreos on hand when cutting for wings. Broken pieces can happen, and it’s good to have backup!
-
Chocolate Melting: Use a microwave for melting the chocolate. Melting in intervals ensures smoother and more consistent results when coating your cookie balls.
-
Decorating Efficiency: Attach wings and eyes immediately after dipping in chocolate while it's still soft for easier decoration – this helps everything stick well!
-
Creative Variants: Experiment with different cookie flavors for unique takes on these Halloween treats! Substituting with mint or peanut butter Oreos adds fun new layers of flavor to your delicious Bat Oreo Cookie Balls.
How to Store and Freeze Bat Oreo Cookie Balls
Fridge: Store your Bat Oreo Cookie Balls in an airtight container for freshness, and they’ll keep well in the refrigerator for up to 1 week.
Freezer: For longer storage, freeze the cookie balls before dipping them in chocolate. They can last up to 3 months; just thaw them in the fridge before coating.
Reheating: There’s no need to reheat; these treats are best enjoyed chilled. Just pull them from the fridge and serve for a sweet pick-me-up!
Wrap Well: If freezing, wrap each ball in plastic wrap or use freezer bags to prevent freezer burn and keep flavors intact. Enjoy these irresistible Bat Oreo Cookie Balls any time!
What to Serve with Bat Oreo Cookie Balls
Delightful treats like these Bat Oreo Cookie Balls deserve equally charming companions to create a complete Halloween feast.
-
Festive Fruit Skewers: Colorful fruit skewers not only balance the sweetness but add a refreshing crunch that complements the rich chocolate.
-
Spooky Cheese Platter: Featuring an assortment of cheeses, crackers, and ghoulish snacks like ghost-shaped cheese slices, this adds a savory element to your dessert table.
-
Pumpkin Spice Hot Cocoa: Cozy up your gathering with creamy hot cocoa spiced with pumpkin flavor, enhancing the fall vibes alongside the treats.
-
Caramel Apple Slices: Drenched in smooth caramel, these provide a chewy contrast to the creamy cookie balls, evoking classic Halloween flavors.
-
Chocolate-Covered Pretzels: Offering a mix of sweet and salty, they perfectly accompany the sweet richness of the Bat Oreo Cookie Balls.
-
Candy Corn Cupcakes: These festive cupcakes not only tie into the Halloween theme but also deliver a fun surprise for guests with each bite.
-
Ghostly Meringue Cookies: Light and airy, these cookies add a whimsical touch while their crisp texture contrasts beautifully with the cookie balls.
With these creative pairings, your Halloween gathering will be a treat for the senses!
Bat Oreo Cookie Balls Recipe FAQs
How do I know if my Oreo cookies are fresh enough to use?
Absolutely! Check for freshness by examining the packaging date or looking for any signs of moisture or dark spots on the cookies. Fresh Oreos should be crisp and free from any packaging damage. If you find that the cookies feel soft or stale, it's best to use a fresh package for the best flavor in your Bat Oreo Cookie Balls.
How long can I store my Bat Oreo Cookie Balls?
Very! You can keep your delicious Bat Oreo Cookie Balls stored in the refrigerator for up to 1 week in an airtight container. Just make sure they are covered well to prevent them from drying out or absorbing any fridge odors. This means you can whip them up in advance and have a delightful treat ready for your Halloween gathering!
Can I freeze Bat Oreo Cookie Balls?
Definitely! To freeze your Bat Oreo Cookie Balls, I recommend doing so before dipping them in chocolate. Simply roll the mixture into balls and place them on a baking sheet lined with parchment paper. Freeze them for about 1 to 2 hours until solid, then transfer them to freezer bags or wrap each one in plastic wrap. They can be stored this way for up to 3 months. Thaw them in the fridge overnight when you're ready to dip and decorate!
What should I do if my chocolate coating is too thick?
This can happen sometimes, but no worries! If your chocolate coating is too thick, try adding a tiny bit of vegetable oil or shortening to the melted chocolate to thin it out. Start with 1 teaspoon and stir until combined. This will help you achieve a smoother consistency that's easier to dip. Also, make sure to melt the chocolate slowly in the microwave, stirring in 30-second intervals to avoid burning.
Are there any dietary considerations I should keep in mind?
Yes, it's important to consider allergies! The primary ingredients—Oreo cookies and cream cheese—contain dairy and may contain gluten, so check for alternatives if you're serving guests with dietary restrictions. For a gluten-free version, look for gluten-free sandwich cookies. If you have any pet allergies, ensure to keep these sweet treats away from pets, as chocolate can be toxic to them.
Can I customize these Bat Oreo Cookie Balls with other flavors?
Absolutely! The beauty of these Bat Oreo Cookie Balls lies in their versatility. Feel free to swap out the classic Oreos for other sandwich cookies like mint or peanut butter for varied flavors. You can even use colored chocolate melts for festive decorations during different holidays. The more the merrier when it comes to experimenting in the kitchen!
Irresistible Bat Oreo Cookie Balls: Easy Halloween Treats You’ll Love
Ingredients
Equipment
Method
- Begin by placing your Oreo cookies into a food processor or blender and pulse until fine crumbs form, about 30 seconds.
- In a large mixing bowl, combine the crushed Oreo crumbs with softened cream cheese until the mixture is cohesive.
- Scoop about one tablespoon of the mixture and roll it into a ball, placing them on a parchment-lined baking sheet.
- Cover the baking sheet with plastic wrap and refrigerate for about 1 hour.
- Prepare bat wings by opening Oreo halves, removing cream filling, and shaping them into wings.
- Melt the chocolate candy coating in a microwave-safe bowl in 30-second intervals, stirring until smooth.
- Dip each chilled cookie ball into the chocolate coating, then let excess drip off.
- While the chocolate is still soft, attach Oreo wings and mini chocolate chips for eyes.
- Once decorated, let the chocolate set at room temperature or in the refrigerator for about 20 minutes.
- Store in an airtight container in the fridge for up to 1 week.


Leave a Reply