
As I was scrolling through photos of past Easter celebrations, I stumbled upon a delightful sight: brightly colored cookies crafted into fun basket shapes. Inspired, I couldn’t wait to create my own version of these Adorable Easter Basket Cookie Cups. With a quick prep time and a recipe that invites creativity, these treats are not only a fun dessert but also a perfect way to engage kids during the holiday. Each cup boasts a crunchy sugar cookie base, filled with fluffy buttercream frosting, and topped with whimsical chocolate bunnies and candy eggs that will make anyone smile. Want to turn your Easter brunch into a festive masterpiece? Let's get baking and bring joy to the table together!
Why Are These Cookie Cups So Special?
Joyful creativity is at the heart of this recipe! Your family will love assembling these playful Easter Basket Cookie Cups together, making it a delightful bonding experience. Quick prep time means you can whip them up in a flash, leaving you more time to enjoy the festivities. Customizable toppings allow you to cater to everyone’s favorite holiday candies – swap in jellybeans or pastel chocolates as you wish! Crowd-pleaser appeal guarantees these cookies will be a hit at any gathering, leaving guests eager for seconds. Want to explore more fun cookie ideas? Check out my Oatmeal Cookies Chewy for an equally delightful treat!
Easter Basket Cookie Cups Ingredients
For the Cookie Base
• Pillsbury Ready-To-Bake Sugar Cookie Dough – This base provides the sweet crunch and structure; feel free to use homemade dough if you're up for it!
For the Buttercream Frosting
• Butter – Adds richness; use unsalted for better control over sweetness.
• Shortening – Ensures a fluffy texture in the frosting; you can omit it for a classic but less airy buttercream.
• Powdered Sugar – Sweetens and thickens your frosting; sift for a smoother consistency.
• Milk – Adjusts the frosting to your desired creaminess; add a little at a time.
• Vanilla – Enhances flavor; swap with almond extract for a unique twist.
For Decoration
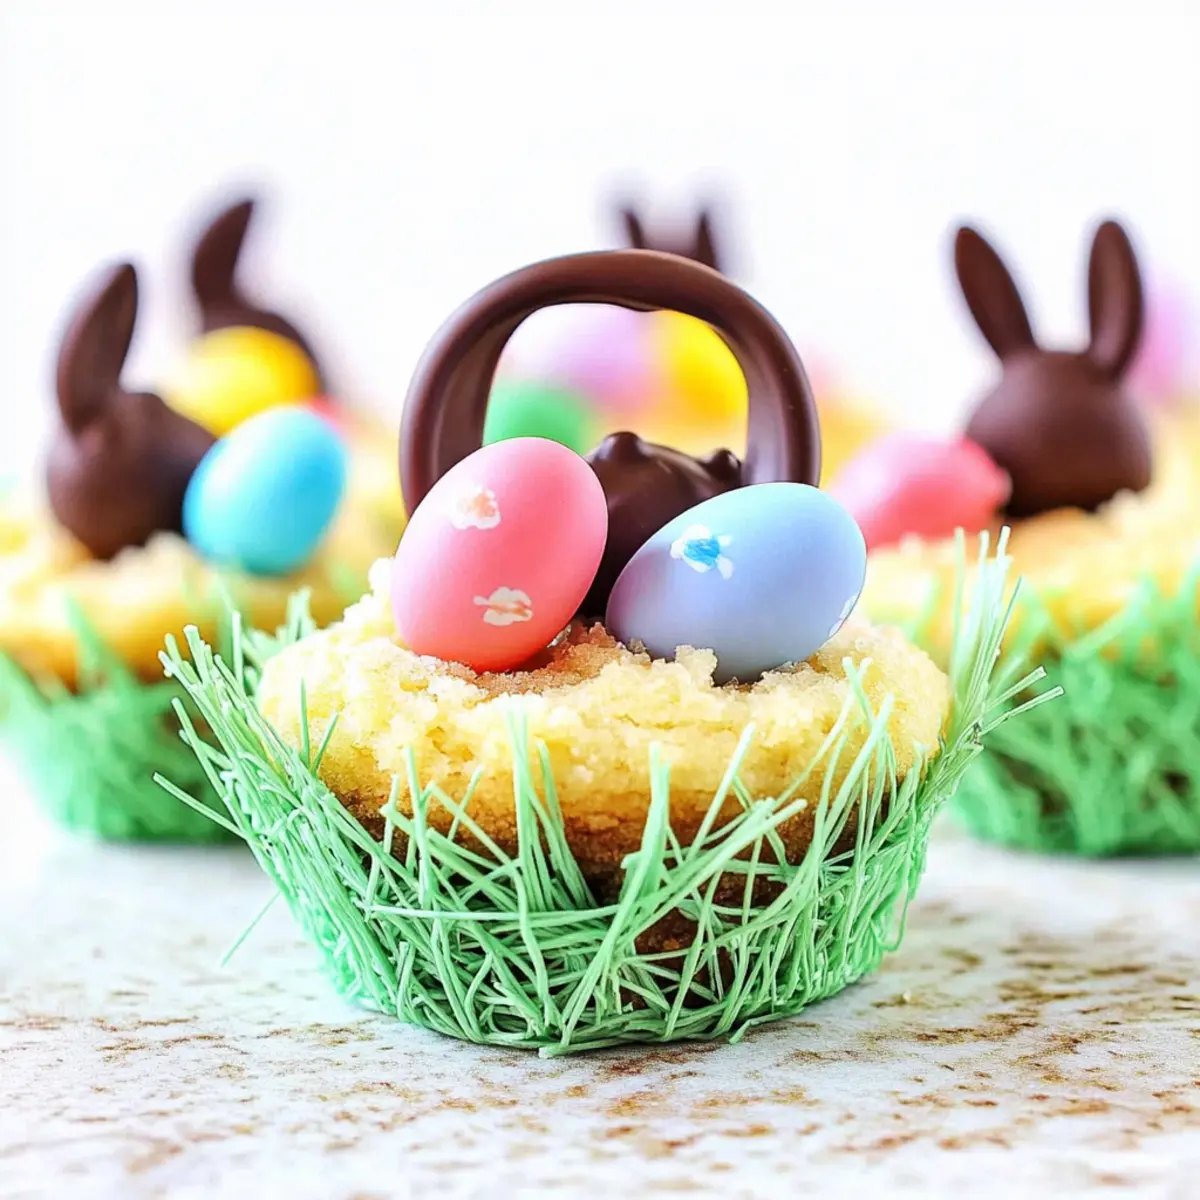
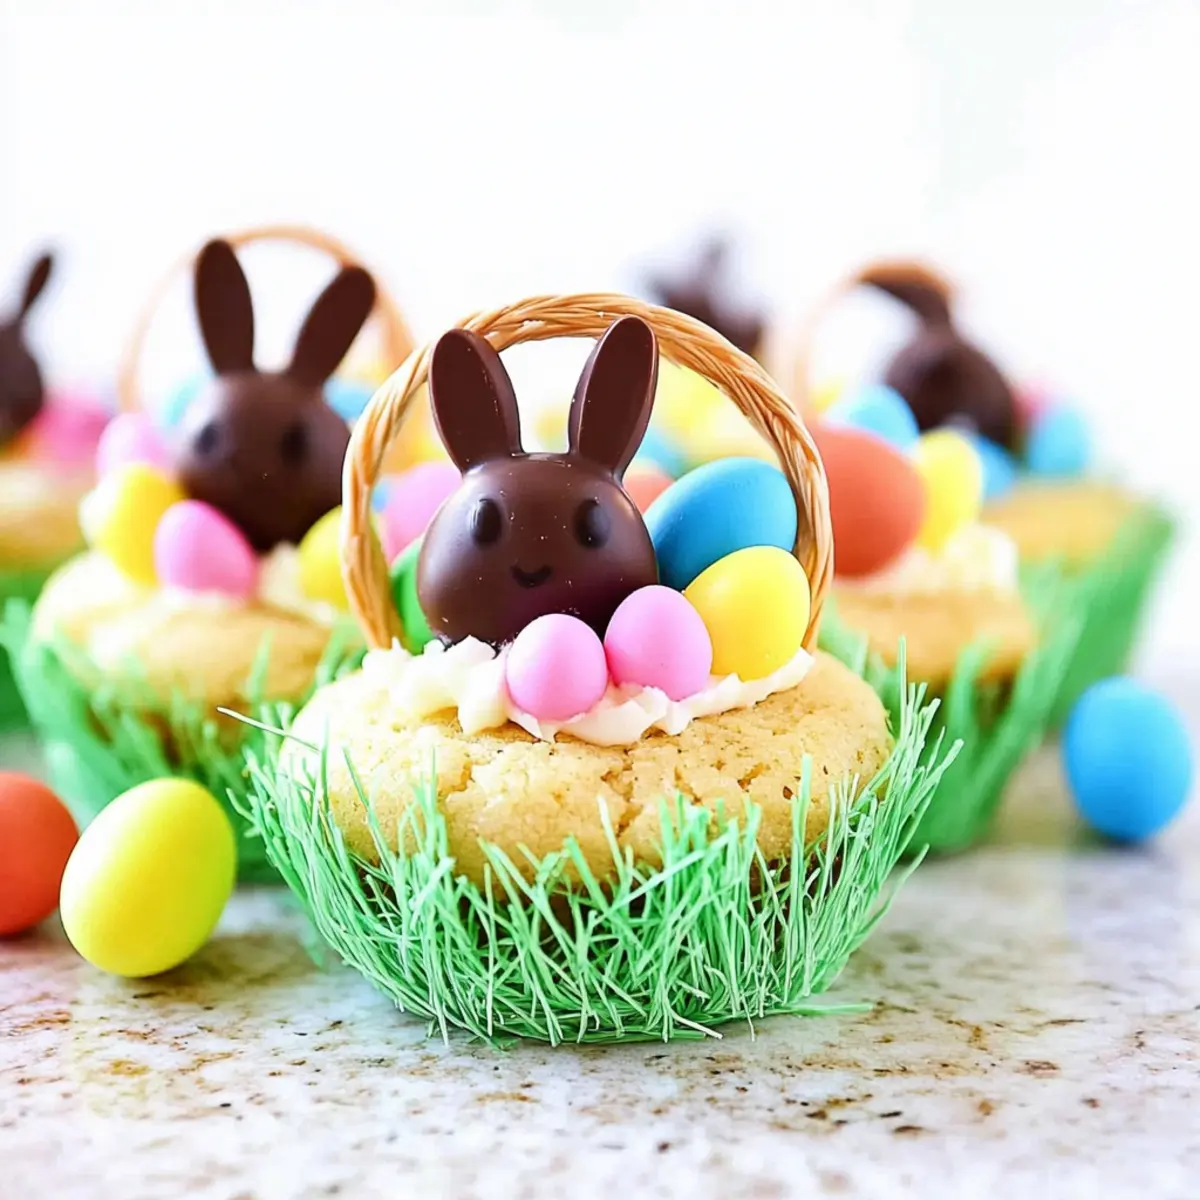
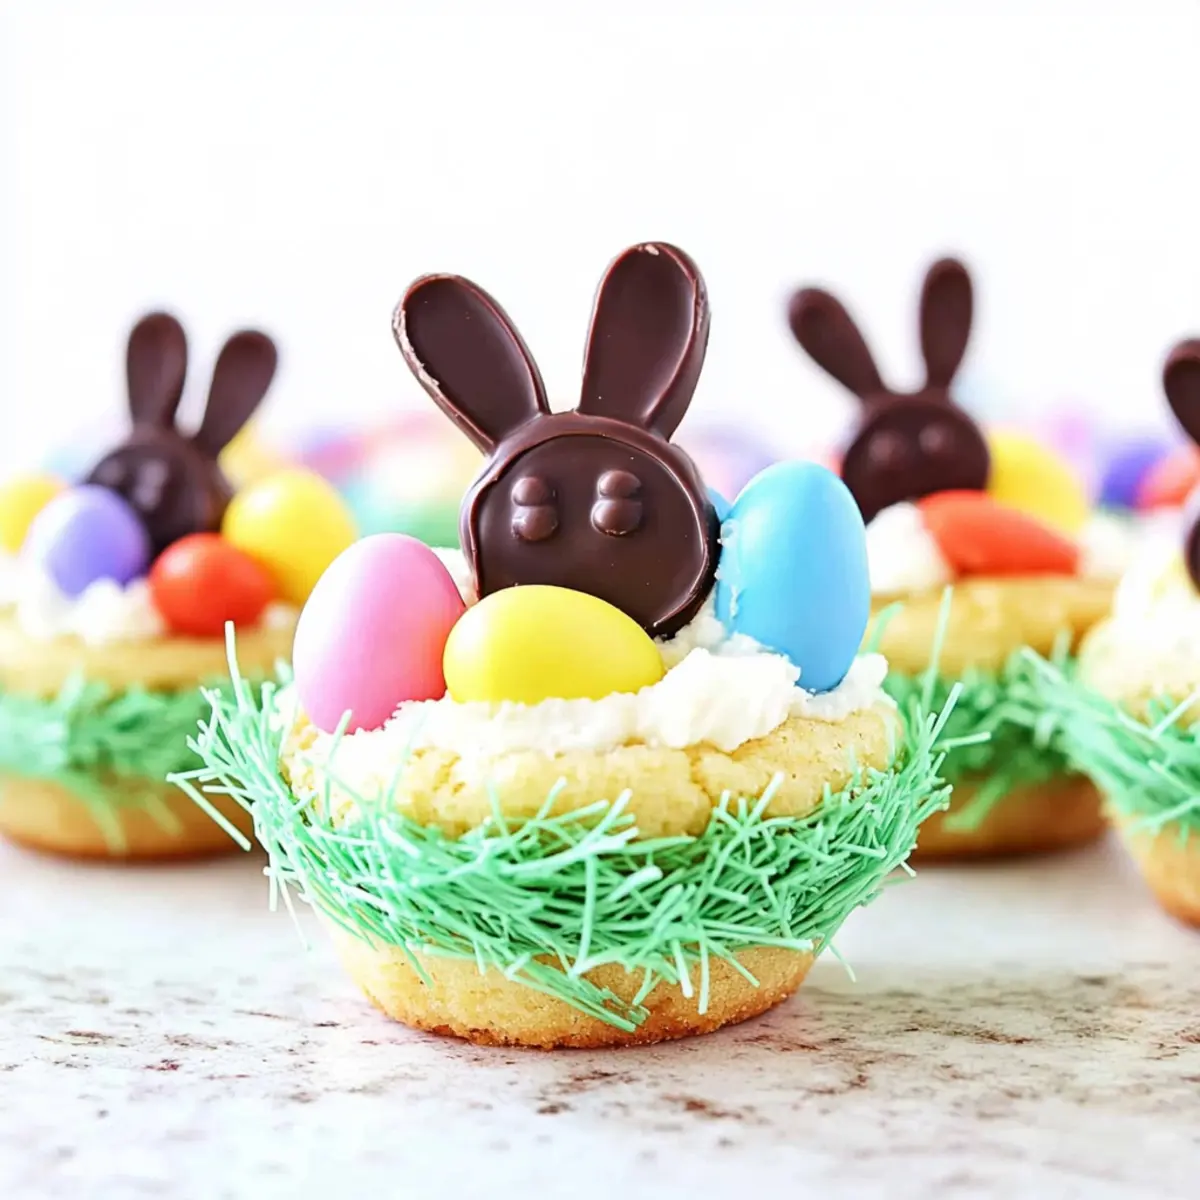
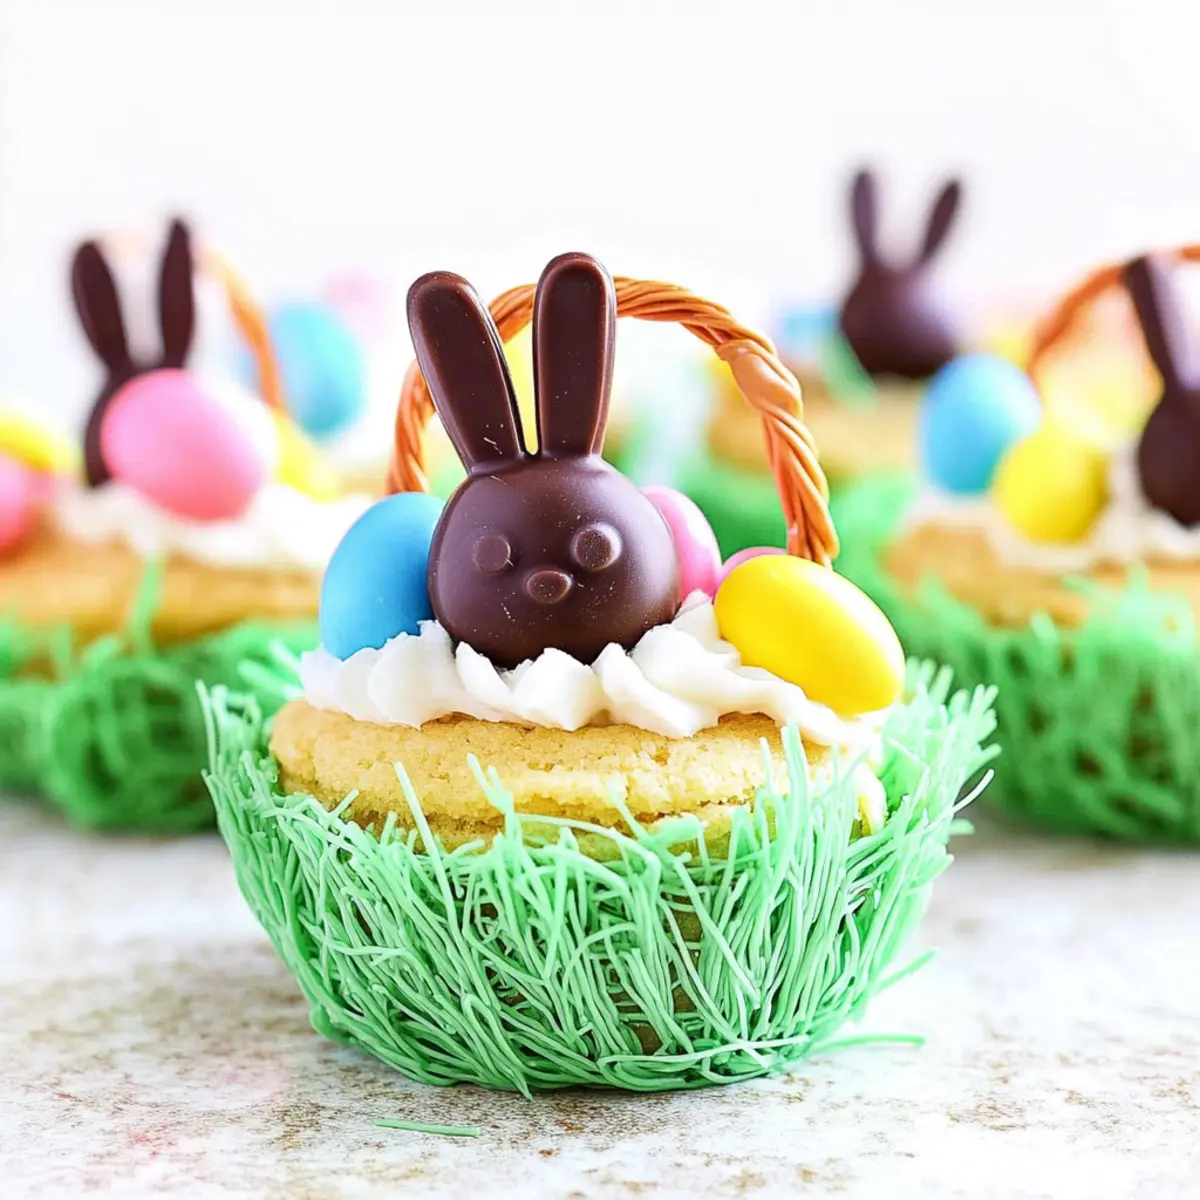
• Twizzlers Pull 'n Peel Licorice – Creates delightful basket handles; any edible licorice works too!
• Ghirardelli Chocolate Bunnies – These add a festive touch; substitute with your favorite chocolate bunnies for personalization.
• Cadbury Mini Chocolate Eggs – Brighten up each basket with these colorful treats; any pastel candy can be used instead.
• Green Gel Paste Icing Color – Colors the frosting to look like grass; feel free to use natural food coloring for a healthier option.
Get ready to assemble your Easter Basket Cookie Cups and spread joy with every bite!
Step‑by‑Step Instructions for Easter Basket Cookie Cups
Step 1: Preheat and Prepare
Begin by preheating your oven to 375°F (190°C). While it heats, place a silicone mini bundt pan on a baking sheet to provide stability during baking. This setup ensures your Easter Basket Cookie Cups hold their shape. Prepare the pan with a touch of oil or cooking spray to prevent sticking, so the finished cookie cups come out clean and ready for decorating.
Step 2: Shape the Dough
Slice 8 squares of cookie dough in half, yielding 16 pieces. Gently press one full square and one half-square of dough into each greased bundt mold. Ensure the dough fills the molds evenly, creating a base for your delightful Easter Basket Cookie Cups. This step is all about forming the base that will encase the sweet frosting later on.
Step 3: Bake to Perfection
Carefully place your filled bundt pan into the preheated oven and bake for 15-19 minutes, keeping an eye on them until the edges are lightly golden. If using a mini muffin pan instead, aim for 12-14 minutes. The cookies should be firm and golden, indicating they’re ready to create the perfect cookie cup.
Step 4: Cool Completely
Once baked, remove the pan from the oven and allow the cookies to cool in the pan for about 10 minutes. This cooling time is crucial for solidifying their structure. Then, transfer the cookies to a wire rack to cool completely. It’s important to let them cool fully before decorating; warm cookies can melt your frosting!
Step 5: Make the Buttercream Frosting
While the cookies cool, prepare the fluffy buttercream frosting. In a large mixing bowl, beat softened butter and shortening together until light and fluffy, about 2-3 minutes. Gradually add in the powdered sugar, mixing until smooth. Finally, adjust the consistency with milk and mix in vanilla extract, achieving a creamy, pipeable frosting for your Easter Basket Cookie Cups.
Step 6: Decorate with Grass
Using a pastry bag fitted with decorating tip #233, fill each cooled cookie cup generously with the buttercream frosting. Create “grass” effects by piping in a zigzag motion to mimic the look of grass in your baskets. This step adds both visual appeal and sweetness, transforming your cookie cups into adorable Easter baskets.
Step 7: Assemble and Finish
To complete your delightful Easter Basket Cookie Cups, carefully attach Twizzlers Pull 'n Peel Licorice as handles. Ensure they are securely positioned, and then sprinkle the tops with Ghirardelli chocolate bunnies and Cadbury mini chocolate eggs. This final touch makes your festive treat not only visually stunning but also packed with flavor and fun!
Easter Basket Cookie Cups Variations
Feel free to explore exciting changes to the classic Easter Basket Cookie Cups and let your creativity shine!
-
Gluten-Free: Swap out regular cookie dough for gluten-free sugar cookie dough to accommodate dietary needs without sacrificing taste. These gluten-free delights will still be a hit at your Easter gathering!
-
Chocolate-Filled: Substitute the sugar cookie base with a rich chocolate cookie dough for a decadent twist. Chocolate lovers will rejoice at this indulgent variation!
-
Fruit Flavor: Use fruit-flavored candies instead of chocolate for a burst of color and zesty flavor. Think bright jellybeans or fruity gummies to liven up your baskets!
-
Nutty Delight: Add finely chopped nuts into the frosting for an unexpected crunch. Pecans or almonds can elevate the flavor while providing a lovely texture contrast.
-
Meringue Topping: Instead of frosting, top the cookie cups with whipped meringue for a light and airy finish. Gild them with a quick toasting for that elegant touch.
-
Savory Twist: Create a savory cookie by using herb-infused dough and filling with cream cheese. These unique treats could surprise your guests and spark conversations around the table!
-
Mini Versions: Make mini Easter Basket Cookie Cups using a mini muffin pan for bite-sized delights. Perfect for kids or as a cute addition to a dessert table!
-
Tropical Theme: Swap out the chocolate eggs with coconut macaroons and add a hint of pineapple flavor in your frosting. It’s a delightful way to bring a tropical feel to your holiday!
For more cookie inspiration, why not try my Pineapple Cookies Tropical for another delicious twist? Enjoy experimenting, and let your imagination run wild with these variations!
Expert Tips for the Best Easter Basket Cookie Cups
- Licorice Handles: Flatten the Twizzlers before attaching to ensure they hold their shape and stay put on the cookie cups.
- Cooling Time: Allow the cookies to cool completely before decorating; warm cookies can melt your frosting, ruining your festive look.
- Cookie Consistency: For a perfect cookie cup, ensure the dough fills the molds evenly to create a sturdy base for the frosting and toppings.
- Frosting Texture: Adjust the milk gradually in your buttercream frosting to achieve your desired consistency; too much can make it runny!
- Decorative Ideas: Don’t hesitate to swap candies or chocolates based on your family’s favorites, making these Easter Basket Cookie Cups even more special!
How to Store and Freeze Easter Basket Cookie Cups
Room Temperature: Keep the cookie cups in an airtight container at room temperature for up to 3 days to maintain freshness without drying out.
Fridge: If your kitchen is warm or if you want to keep them longer, store them in the refrigerator for up to 5 days. Just ensure they are well-wrapped to avoid absorbing other flavors.
Freezer: For longer storage, freeze the unassembled cookie cups for up to 2 months. After baking and cooling, place them in a freezer-safe container, and thaw in the fridge before decorating.
Reheating: If you'd like to enjoy them warm, reheat the cookie cups in the oven at 350°F (175°C) for about 5-7 minutes, but avoid reheating frosted ones to prevent melting the buttercream.
What to Serve with Easter Basket Cookie Cups?
Transform your festive gathering into an unforgettable feast by pairing these whimsical treats with delightful accompaniments that enhance their charm.
- Light Fruit Salad: A refreshing mix of seasonal fruits adds a burst of sweetness and color, balancing the richness of the cookie cups.
- Vanilla Ice Cream: Creamy vanilla ice cream provides a delicious contrast to the crunchy cookie, making each bite even more indulgent. Pair with a drizzle of chocolate sauce for extra flair!
- Sparkling Lemonade: This bright, fizzy drink brings a citrusy kick that complements the sweetness of the cookie cups and awakens your palate.
- Chocolate Chip Cookies: For the cookie lovers in your family, serving classic chocolate chip cookies alongside these baskets can create a fun cookie bar experience!
- Carrot Cake: Celebrate the Easter theme with a slice of moist, spiced carrot cake that pairs beautifully with the festive vibes of the cookie cups.
- Freshly Brewed Tea: A soothing cup of chamomile or Earl Grey tea offers a warm, calming note that balances the sweetness of the cookies.
- Mini Cupcakes: Delicate mini cupcakes topped with pastel frosting add a whimsical touch, ensuring a sweet end to your holiday feast.
- Pineapple Upside-Down Cake: The tropical flavors of this cake contrast deliciously with the cookie cups, creating a memorable dessert presentation.
- Lemon Bars: Tart and sweet, these lemon bars provide a refreshing palate cleanse in between bites of the rich Easter Basket Cookie Cups.
Make Ahead Options
These Easter Basket Cookie Cups are perfect for meal prep, making your holiday baking effortless! You can make the cookie cups up to 24 hours in advance: after baking, allow them to cool completely and then store them in an airtight container at room temperature. The buttercream frosting can also be prepared ahead of time; refrigerate it for up to 3 days in a sealed container. When you're ready to serve, simply re-whip the frosting to restore its fluffy texture and fill the cookie cups, then decorate with the licorice handles and candy toppings just before serving. This way, they'll be just as delicious and festive without any last-minute rush!
Easter Basket Cookie Cups Recipe FAQs
What types of ingredients should I use for the best results?
Absolutely! For the most delightful Easter Basket Cookie Cups, use fresh, high-quality ingredients. Choose Pillsbury Ready-To-Bake Sugar Cookie Dough for that perfect crunch and sweetness. When selecting Twizzlers Pull 'n Peel Licorice, ensure they're pliable and not overly dry. For chocolate bunnies, consider using Ghirardelli for a richer flavor, and opt for Cadbury Mini Chocolate Eggs that are vibrant and festive!
How should I store the Easter Basket Cookie Cups?
Very simply! Store your cookie cups in an airtight container at room temperature for up to 3 days. If the weather is warm or if you want them to last longer, seal them in the fridge where they can stay fresh for up to 5 days. Just ensure they are well-wrapped to avoid any absorption of other strong flavors from your fridge.
Can I freeze the Easter Basket Cookie Cups?
Certainly! You can freeze the unassembled Easter Basket Cookie Cups for up to 2 months. After baking and cooling completely, place them in a freezer-safe container. For thawing, simply move them to the fridge overnight before decorating. This way, you can keep the anticipation alive for your festive get-togethers!
What’s the best way to troubleshoot if my cookie cups don’t come out perfectly?
If your cookie cups seem to fall apart, it may be due to uneven dough distribution in the molds. Make sure to fill the molds evenly and let them cool completely before trying to remove them. If they stick, try gently running a knife around the edges before popping them out. Also, always handle with care during decoration; moving the finished product can cause breakage, especially with fragile frosting!
Are there any dietary considerations for the ingredients?
Absolutely! If you're concerned about allergies, check the labels on your sugar cookie dough, frosting, and candies. Some brands may contain gluten or dairy. If creating a gluten-free version, look for a certified gluten-free sugar cookie dough. As for pets, avoid using chocolate products—chocolate is toxic for dogs and cats, so keep these treats safely away from curious furry friends!
Easter Basket Cookie Cups for a Sweet Holiday Surprise
Ingredients
Equipment
Method
- Preheat your oven to 375°F (190°C) and prepare a silicone mini bundt pan on a baking sheet.
- Slice 8 squares of cookie dough in half, press into each mold to form a base.
- Bake for 15-19 minutes until edges are lightly golden.
- Cool in the pan for about 10 minutes, then transfer to a wire rack to cool completely.
- Prepare the buttercream frosting by beating together softened butter and shortening, adding powdered sugar, milk, and vanilla until smooth.
- Fill each cooled cookie cup with frosting, piping to create grass effects.
- Attach Twizzlers as handles and decorate with chocolate bunnies and mini eggs.


Leave a Reply