
Baking is often where culinary creativity comes to life, and this Halloween, it's about to get delightfully spooky! I’m excited to share my Frankenstein Mini Cheesecakes, the perfect blend of playfulness and flavor that will charm everyone at your gathering. These kid-friendly treats not only come together in just 15 minutes of prep but also provide a unique and delicious twist on the traditional dessert table. With their vibrant green color and adorable chocolate faces, they're sure to be a hit for both young and old. Imagine the smiles on your loved ones' faces as they indulge in these spooky delights—what’s not to love? Ready to dive into this delightful kitchen adventure? Let's get started!
Why Are These Cheesecakes So Irresistible?
Deliciously playful: These Frankenstein Mini Cheesecakes blend classic cheesecake creaminess with a fun Halloween twist that everyone will adore.
Quick and easy: Whipping them up takes just 15 minutes of prep time, making them perfect for busy hosts wanting to impress.
Kid-friendly excitement: The vibrant green color and spooky decorations will captivate kids and adults alike, making them a crowd favorite at any gathering.
Endless variations: Feel free to switch up the decorations or flavors—take a look at these delightful Protein Pancake Sausage ideas for more fun twist!
Perfect for sharing: These mini cheesecakes are the ultimate party food that can be enjoyed in single servings, appealing to every sweet tooth.
Frankenstein Mini Cheesecakes Ingredients
For the Cheesecake Batter
- Cream Cheese – Provides rich, creamy texture; use full-fat cream cheese for best flavor.
- Sugar – Sweetens the cheesecake mixture; consider a sugar substitute for a lower-calorie option.
- Eggs – Binds the ingredients, adding structure; room temperature eggs mix more smoothly.
- Flour – Helps firm up the cheesecake; substitute with almond flour for a gluten-free version.
- Vanilla – Enhances flavor; use vanilla extract or vanilla bean paste for a richer taste.
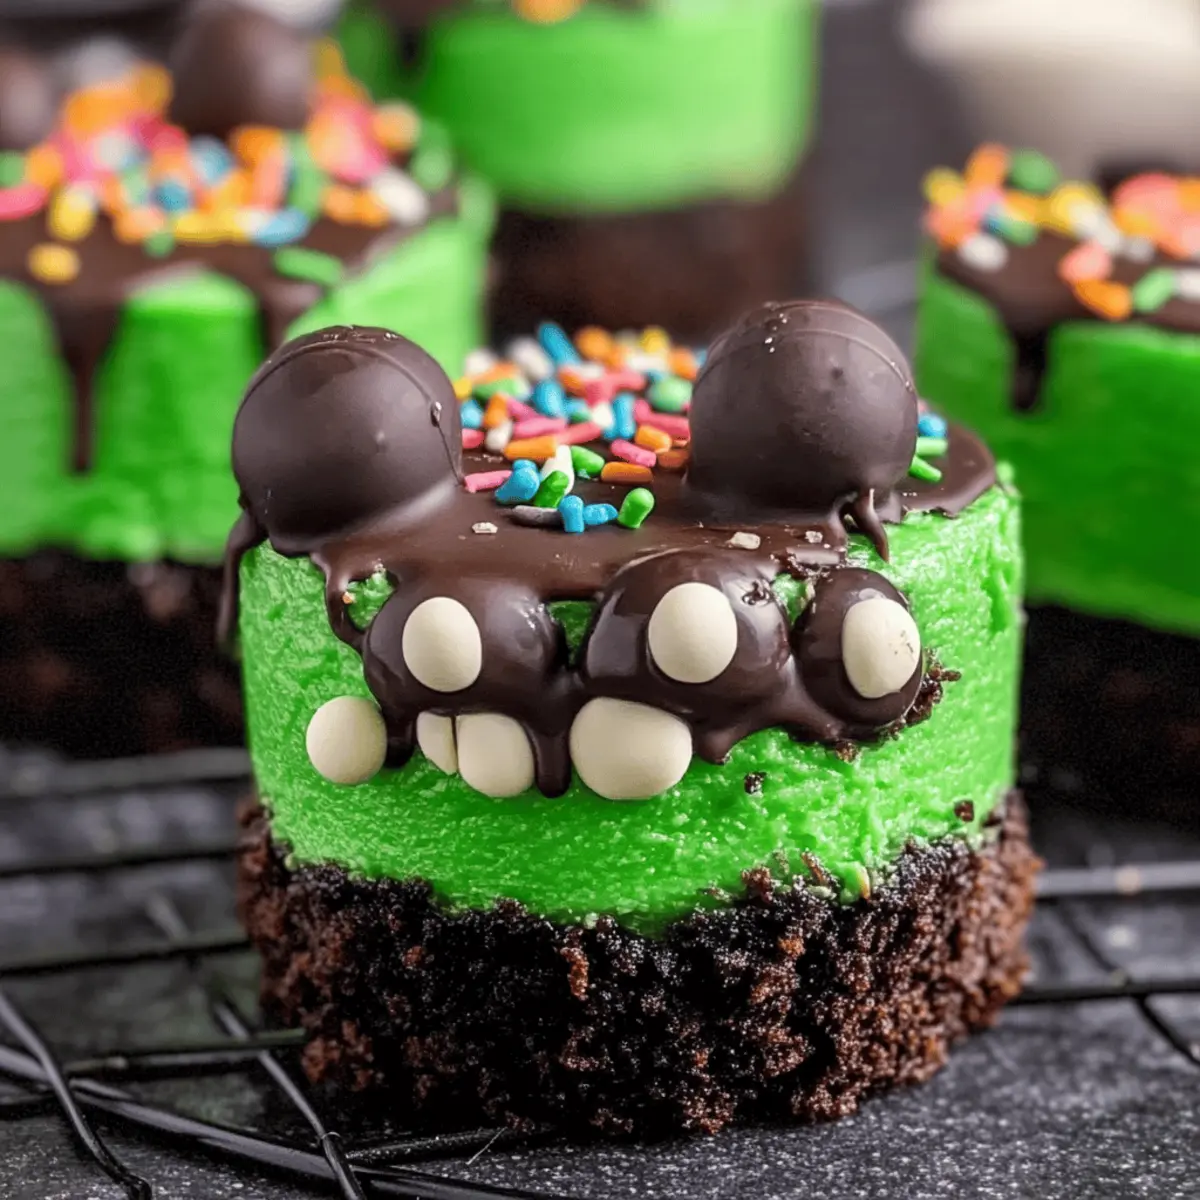
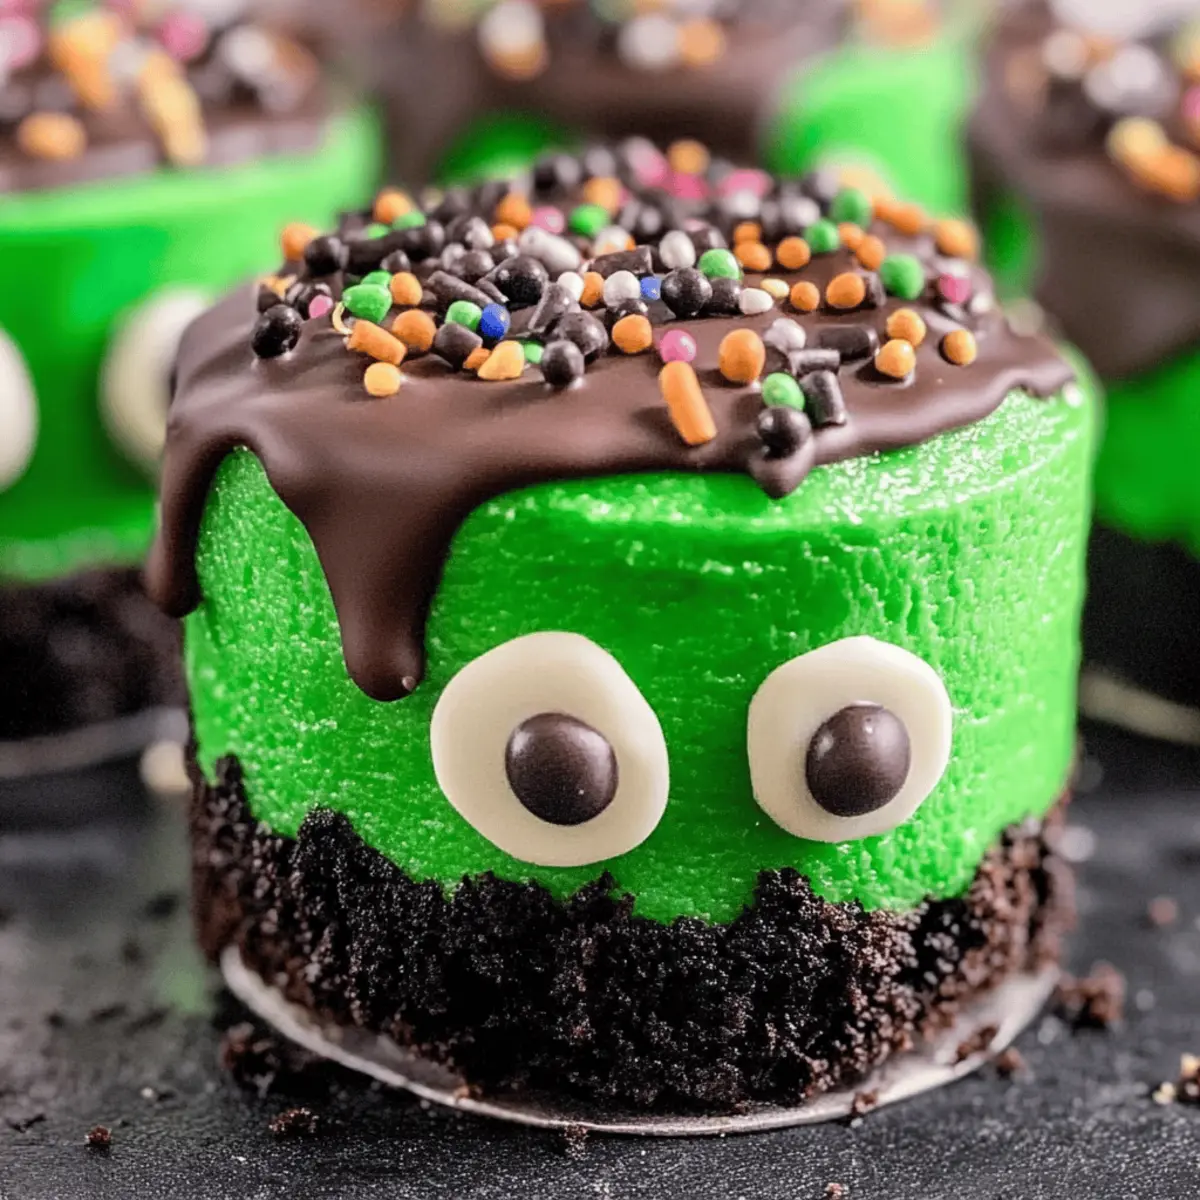
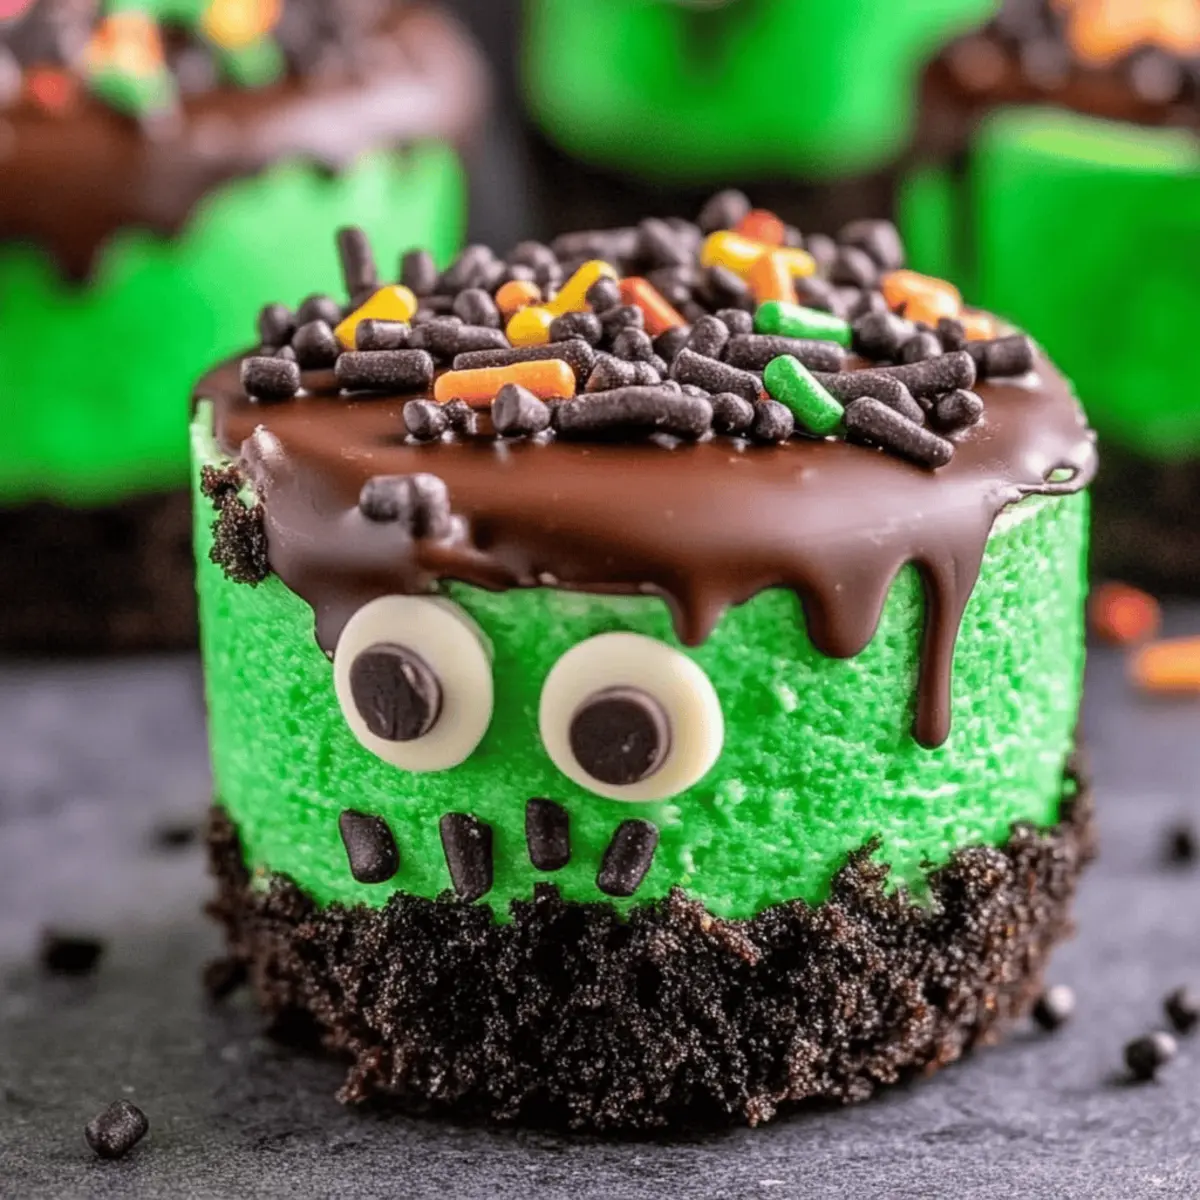
- Green Food Coloring – Adds a spooky Halloween look; adjust the amount to achieve your desired intensity.
For the Crust
- OREO Cookies – Forms the crust, providing flavor and texture; swap with chocolate graham crackers for a different twist.
- Butter – Binds the crushed cookies; avoid using margarine as it alters the flavor.
For Decoration
- Edible Eyes – Gives a fun, spooky touch; they’re essential for completing your Frankenstein look.
- Chocolate Chips – Adds extra sweetness and acts as a place to “glue” the edible eyes.
- Chocolate Sprinkles – Enhance the Halloween theme while providing a delightful texture.
Now that you have all the ingredients for your Frankenstein Mini Cheesecakes, it’s time to unleash your creativity in the kitchen!
Step‑by‑Step Instructions for Frankenstein Mini Cheesecakes
Step 1: Preheat the Oven
Start by preheating your oven to 350°F (175°C). This ensures it's at the perfect temperature for baking your Frankenstein Mini Cheesecakes. While the oven heats up, gather your mini cheesecake pan or muffin tin and place it on a sturdy baking sheet for easy handling.
Step 2: Make the Crust
In a small bowl, melt the butter until smooth, which should take about 30 seconds in the microwave. Crush the OREO cookies into fine crumbs, then combine them with the melted butter. Firmly press this mixture into the bottom of your mini cheesecake pan, using the back of a spoon or your fingers to create a compact layer that will serve as a delicious crust.
Step 3: Prepare the Cheesecake Batter
In a large mixing bowl, beat cream cheese, sugar, eggs, and vanilla with an electric mixer on medium speed until the mixture is smooth and creamy, around 2-3 minutes. Gradually add the flour and mix gently until fully incorporated. Finally, stir in green food coloring until you achieve your desired Frankenstein green hue, making the batter fun and festive.
Step 4: Bake the Mini Cheesecakes
Carefully pour the bright green cheesecake batter over the crusts in the mini cheesecake pan, filling each cup nearly to the top. Place the pan in the oven and bake for approximately 15 minutes, or until the centers are just set but still slightly wobbly. Once baked, remove them from the oven and allow them to cool completely in the pan on a wire rack.
Step 5: Decorate the Cheesecakes
Once the Frankenstein Mini Cheesecakes are completely cooled, melt some chocolate in the microwave. Dip the tops of each cheesecake in the melted chocolate, then immediately coat them with chocolate sprinkles for a spooky touch. Use additional melted chocolate to pipe on fun decorations and carefully attach edible eyes and chocolate chips for a delightful finishing touch that brings your spooky desserts to life.
Expert Tips for Frankenstein Mini Cheesecakes
- Pan Selection: Use a mini cheesecake pan for the best results; muffin tins can work but require careful greasing to avoid sticking.
- Room Temperature Ingredients: Ensure all ingredients, especially cream cheese and eggs, are at room temperature for a smooth, blended batter, critical for your Frankenstein Mini Cheesecakes.
- Don’t Overmix: After adding flour, mix just until combined; overmixing can lead to a dense cheesecake instead of the light, fluffy texture we want.
- Cooling Time: Let the cheesecakes cool completely in the pan before decorating; this prevents the melted chocolate from sliding off and ensures a neat presentation.
- Fun Decorations: Get creative with the toppings! You can also use crushed candies or gummy worms for added spookiness and varied textures.
Make Ahead Options
These Frankenstein Mini Cheesecakes are perfect for busy home cooks looking to save time during the Halloween rush! You can prepare the crust and cheesecake batter up to 24 hours in advance. Simply crush the OREO cookies and mix with melted butter; press it into the mini cheesecake pan, cover, and refrigerate. For the batter, beat together cream cheese, sugar, eggs, vanilla, and flour, then add the green food coloring. Store it in an airtight container in the fridge. When ready to bake, pour the batter over the chilled crusts and bake as directed. This way, you’ll have delicious mini cheesecakes ready to decorate with minimal effort!
Frankenstein Mini Cheesecakes: Customizable Fun!
Feel free to let your imagination run wild with these delightful mini cheesecakes! Each variation adds a special touch, ensuring a treat that’s uniquely yours.
- Gluten-Free: Substitute the flour with almond flour or a gluten-free blend for a scrumptious alternative.
- Dairy-Free: Use a vegan cream cheese and plant-based butter to create a dairy-free version without sacrificing taste.
- Different Colors: Use pastel colors like pink or blue for baby showers or delicate celebrations—who says Halloween has all the fun?
- Spooky Toppers: Instead of chocolate decorations, consider using gummy worms or spider-shaped candies to give your cheesecakes an extra eerie flair.
- Flavorful Twists: Add a teaspoon of caramel or pumpkin spice to the batter for a cozy flavor that’s perfect for fall.
- Nutty Additions: Mix in chopped nuts like pecans or walnuts for a crunchy texture that contrasts beautifully with the creamy cheesecake.
- For the Chocolate Lovers: Drizzle a chocolate ganache over the tops before adding your decorations for an indulgent twist.
- Theme Pairing: Consider serving alongside yummy Protein Pancake Sausage for a fun party spread that everyone will enjoy!
With these variations, you can style your Frankenstein Mini Cheesecakes to fit any occasion! The possibilities are deliciously endless.
What to Serve with Frankenstein Mini Cheesecakes?
These playful treats are sure to create a festive atmosphere at your Halloween gathering, making it easy to expand your dessert spread!
-
Mummy Dogs: These fun, wrapped hot dogs will delight kids and adults alike, pairing perfectly for a spooky dinner before dessert.
-
Pumpkin Soup: A savory pumpkin soup will add a warm, cozy contrast to the sweetness of the cheesecakes, enhancing the seasonal vibe.
-
Ghoulish Punch: A fruity punch, perhaps with a hint of lime and a few floating gummy eyeballs, will refresh your guests and add a unique Halloween twist.
-
Chocolaty Ghosts: Chocolate ghosts made from marshmallows and chocolate will not only complement the cheesecakes but also keep the dessert table delightful and whimsical.
-
Spider Web Pizza: A pizza with a cheesy web design and sliced olives for spiders will dazzle and pair wonderfully with your cheesy desserts, balancing fun and flavor.
-
Cauldron Brownies: Rich, fudgy brownies decorated to mimic a bubbling cauldron will satisfy chocolate cravings and work harmoniously with the mini cheesecakes' textures.
-
Witch's Brew Milkshakes: Creamy milkshakes topped with whipped cream and edible glitter will make a thrilling beverage choice to pair with your spooky treats, sure to enchant both young and old!
Storage Tips for Frankenstein Mini Cheesecakes
Fridge: Store your Frankenstein Mini Cheesecakes in an airtight container for up to 3 days to maintain their fresh flavor and texture.
Freezer: If you'd like to keep them longer, these mini cheesecakes can be frozen for up to 2 months. Wrap each cheesecake individually in plastic wrap, then place them in a freezer-safe container.
Reheating: When you're ready to enjoy them again, simply thaw in the fridge overnight. For a warm treat, heat in the microwave for just 10–15 seconds—watch closely to avoid overheating!
Decoration: If you've already decorated your cheesecakes, it's best to store them in the fridge without any extra toppings to keep the designs intact. Add edible eyes and sprinkles before serving for the freshest look.

Frankenstein Mini Cheesecakes Recipe FAQs
How do I know if my cream cheese is at the right ripeness?
Absolutely! For the best texture in your cheesecake batter, ensure your cream cheese is soft and at room temperature. It should be easily spreadable, without any lumps. If you're in a pinch, you can microwave the cream cheese for about 10-15 seconds. Just make sure not to melt it!
How should I store leftover Frankenstein Mini Cheesecakes?
Very! To keep them fresh, store the mini cheesecakes in an airtight container in the refrigerator for up to 3 days. If you have a lot left and want to keep them longer, they can be frozen for up to 2 months. Simply wrap each cheesecake individually in plastic wrap and then place them in a freezer-safe container.
Can I freeze Frankenstein Mini Cheesecakes?
Yes, you can! To freeze your cheesecakes, allow them to cool completely and then wrap each one tightly with plastic wrap. Place them in a freezer-safe container or a zip-top bag. They'll be perfect for up to 2 months. When you’re ready to enjoy them, thaw them in the refrigerator overnight for the best texture.
What can I do if the cheesecakes crack while baking?
No worries! Cracking can happen, often due to baking at too high a temperature or overmixing the batter. Ensure your oven is properly calibrated and stick to the specified baking time. If you find cracks, a drizzle of melted chocolate over the top after cooling can disguise them beautifully while adding a bit more deliciousness!
Are these cheesecakes safe for kids with allergies?
It depends! These mini cheesecakes contain common allergens like eggs and dairy. For a kid-friendly version suitable for allergies, consider using dairy-free cream cheese and an egg substitute, such as a flaxseed mixture (1 tablespoon ground flaxseed mixed with 3 tablespoon water per egg) or a store-bought egg replacer. Make sure to always check for cross-contamination.
How can I change the decorations for other occasions?
The more the merrier! You can switch up the decorations to fit any theme by using various colored food coloring or toppings. For a Valentine’s Day twist, use pink food coloring and heart-shaped candies. For a Christmas treat, try red and green sprinkles and festive edible decorations. Customization is part of the fun!
Frankenstein Mini Cheesecakes: Spook Up Your Halloween Fun
Ingredients
Equipment
Method
- Preheat your oven to 350°F (175°C). Gather your mini cheesecake pan or muffin tin placed on a sturdy baking sheet.
- Melt the butter in a small bowl, then crush the OREO cookies into fine crumbs. Combine them with the melted butter and press into the mini cheesecake pan.
- Beat the cream cheese, sugar, eggs, and vanilla with an electric mixer until smooth. Gradually add the flour, then stir in green food coloring.
- Pour the cheesecake batter over the crusts in the mini cheesecake pan, filling each cup nearly to the top. Bake for approximately 15 minutes.
- Once cooled, dip the tops of each cheesecake into melted chocolate and coat with chocolate sprinkles. Use melted chocolate to pipe decorations and attach edible eyes and chocolate chips.


Leave a Reply