
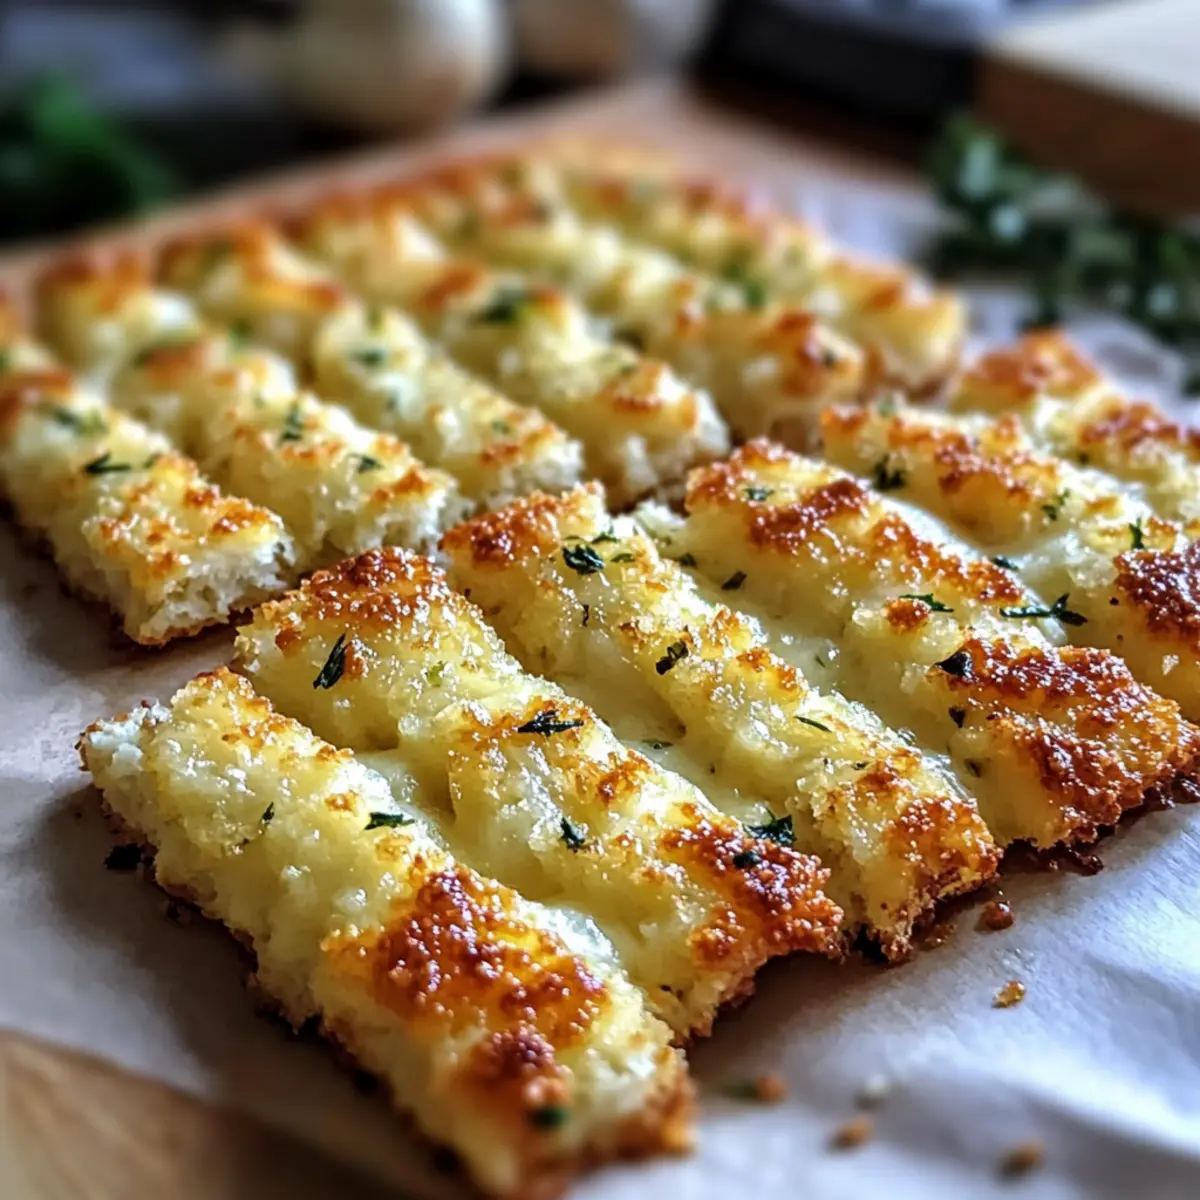
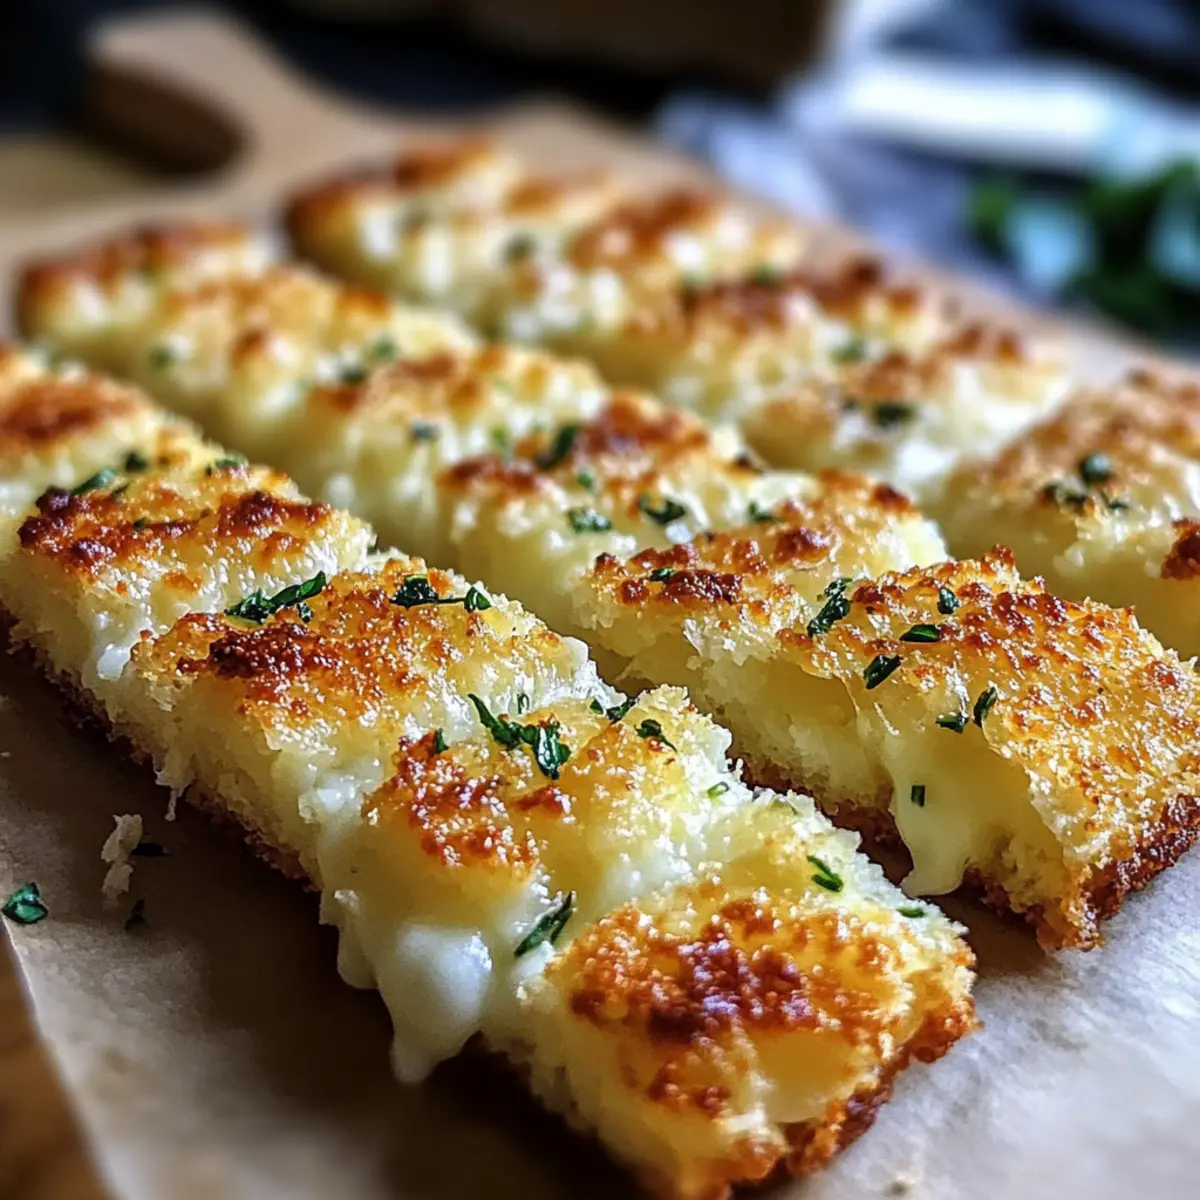
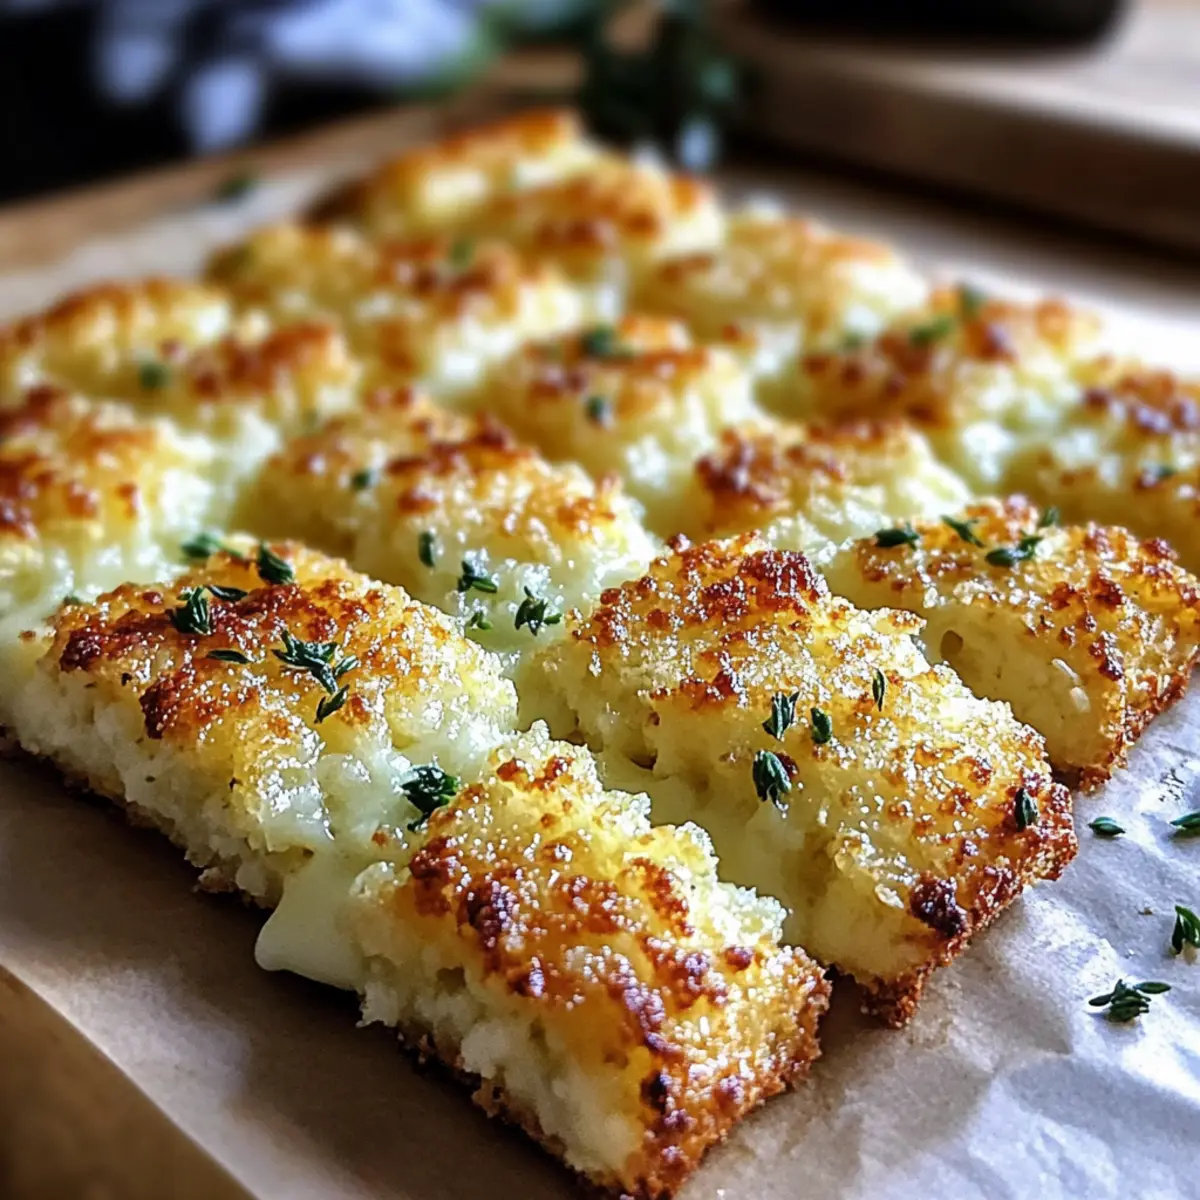
As I pulled my Cheesy Keto Cauliflower Garlic Breadsticks from the oven, a wave of mouthwatering garlic and cheese notes filled the kitchen, instantly transporting me to my favorite Italian bistro. These delightful low-carb treats are not just a guilt-free alternative to traditional breadsticks; they offer a quick prep time of just 7 minutes, making them a lifesaver on busy evenings. Whether paired with your favorite marinara sauce or enjoyed solo as a savory snack, they’re sure to impress even the most discerning of palates. Plus, with the added benefits of being both keto and gluten-free, it’s easier than ever to indulge without compromising on your dietary goals. Ready to take your snacking game up a notch? Let’s dive into this deliciously cheesy adventure!
Why are these breadsticks so irresistible?
Cheesy Goodness: Each bite delivers a melty, cheesy experience, making them an irresistible treat for cheese lovers.
Low-Carb Delight: Perfectly tailored for keto enthusiasts, these breadsticks are low in carbs yet high in flavor, ensuring you can indulge guilt-free.
Quick and Easy: With only 7 minutes of prep, they transform into a convenient snack or starter, ideal for last-minute gatherings or weeknight dinners.
Versatile Pairing: Enjoy them with marinara sauce, alongside soups, or as a savory side to salads; the options are endless!
Flavorful Kick: Fresh garlic and Italian seasoning enhance the overall taste, providing that classic garlic bread experience you crave.
If you're a fan of easy and delicious recipes, you might also love these Garlic Butter Steak bites or Cheesy Garlic Chicken.
Keto Cauliflower Garlic Breadsticks Ingredients
For the Breadsticks
• Cauliflower – Provides the base; ensure it's super dry to avoid sogginess.
• Mozzarella Cheese – Adds creaminess and binds the mixture; can substitute with Monterey Jack for a different flavor.
• Parmesan Cheese – Enhances cheesy flavor and texture; suggested to be finely grated for the best results.
• Egg – Acts as a binding agent to maintain structure while baking.
• Garlic – Use fresh or powdered for a garlicky kick; fresh is preferred for a stronger flavor.
• Italian Seasoning – A perfect blend that elevates the taste; can make your own mix with oregano, basil, and thyme.
• Salt and Pepper – Essential for seasoning; adjust to taste for that perfect balance.
For the Topping
• Butter – Brush with melted garlic butter after baking for extra flavor.
• Parmesan Cheese – Sprinkling more on top before baking intensifies that cheesy goodness.
Indulge in these Keto Cauliflower Garlic Breadsticks and savor the delightful blend of flavors combined in this low-carb treat!
Step‑by‑Step Instructions for Keto Cauliflower Garlic Breadsticks
Step 1: Preheat and Prepare
Begin by preheating your oven to 400°F (200°C). While the oven warms up, line a baking sheet with parchment paper. This will ensure your Keto Cauliflower Garlic Breadsticks don’t stick and make cleanup a breeze. Take a moment to gather all your ingredients so that you’re ready for the next steps.
Step 2: Cook the Cauliflower
Using either a steamer basket or microwave-safe bowl, steam or microwave the cauliflower florets until they are tender, which should take about 5-7 minutes. Once cooked, drain the cauliflower thoroughly to remove excess moisture. This is crucial for achieving the perfect texture in your breadsticks, as too much moisture can lead to sogginess.
Step 3: Mix the Ingredients
In a large mixing bowl, combine the drained cauliflower with mozzarella cheese, finely grated Parmesan cheese, the egg, fresh or powdered garlic, and Italian seasoning. Use a fork or your hands to mix everything together until well incorporated. The goal is to create a uniform mixture that allows the flavors to meld beautifully in your Keto Cauliflower Garlic Breadsticks.
Step 4: Shape the Breadsticks
Transfer the cauliflower mixture onto the prepared baking sheet. With your hands, shape the mixture into stick forms, making sure to leave space between each stick. This will help them bake evenly and develop that delightful golden color. Aim for a thickness similar to traditional breadsticks for the best experience.
Step 5: Bake for Perfection
Once shaped, place the baking sheet in the preheated oven. Bake the Keto Cauliflower Garlic Breadsticks for about 20 minutes, or until they are firm and golden brown. Keep an eye on them as they bake; they should feel slightly crisp on the outside while remaining cheesy on the inside.
Step 6: Add the Finishing Touch
As soon as the breadsticks are done baking, remove them from the oven and brush them generously with melted garlic butter. This adds a rich, savory flavor that elevates each bite. Optionally, sprinkle a bit more grated Parmesan on top for an extra cheesy finish just before serving.
Step 7: Serve and Enjoy
Allow your Keto Cauliflower Garlic Breadsticks to cool for a minute before serving. They are best enjoyed warm, either on their own or with a side of marinara sauce for dipping. These delightful breadsticks are not just a great snack but also make for an impressive appetizer at any gathering!
Expert Tips for Keto Cauliflower Garlic Breadsticks
• Dry Cauliflower: Ensure your cauliflower is super dry after cooking to avoid soggy breadsticks that won’t hold their shape.
• Space It Out: Leave enough space between each breadstick on the baking sheet so they can bake evenly and form that desired crispy exterior.
• Golden Indicator: Watch for a golden-brown color; this is a good indicator that your Keto Cauliflower Garlic Breadsticks are done and ready to enjoy!
• Right Temperature: Keep your oven at 400°F (200°C) for the best results; a higher temperature can lead to uneven baking and burning.
• Store Properly: For the best texture, store any leftovers in an airtight container in the fridge, and consider reheating them in a toaster oven for optimal crispiness.
Keto Cauliflower Garlic Breadsticks Variations
Personalize your Keto Cauliflower Garlic Breadsticks with these delightful twists that will tantalize your taste buds!
-
Dairy-Free: Substitute mozzarella and Parmesan with dairy-free cheese alternatives like cashew or almond-based cheeses for a creamy, guilt-free option. They melt beautifully, ensuring you won’t miss the dairy!
-
Spicy Kick: Incorporate red pepper flakes or diced jalapeños into the mix for an exciting kick that will awaken your palate. Just a teaspoon of red pepper will transform your breadsticks into a spicy delight!
-
Herb-Infused: Add fresh herbs like chopped parsley or basil as a flavor boost. Not only do they enhance the aroma, but they also bring a vibrant touch to your breadsticks that feels like a garden-fresh treat.
-
Nutty Texture: For an unexpected crunch, fold in finely chopped walnuts or pecans. Their nutty flavor pairs wonderfully with the cheesy goodness, giving each bite a satisfying contrast in texture.
-
Cauliflower Rice: Use cauliflower rice for a chunkier texture that adds more bites of flavor in every breadstick. Just ensure it’s well-drained to maintain that perfect crispiness!
-
Sun-Dried Tomatoes: Mix in chopped sun-dried tomatoes for an extra flavor boost with a hint of tang. They add a delightful Mediterranean flair that will have you dreaming of Italian summer nights.
-
Vegan Version: Replace the egg with a flaxseed meal mixture (1 tablespoon of flaxseed meal mixed with 3 tablespoons of water) for a vegan-friendly option. It binds beautifully and keeps the breadsticks fluffy without losing any flavor.
Explore these delicious variations, and if you're in the mood for more cheesy goodness, try pairing them with Garlic Parmesan Roasted Zucchini or dive into a savory plate of Old Bay Garlic.
Make Ahead Options
These Cheesy Keto Cauliflower Garlic Breadsticks are perfect for meal prep enthusiasts! You can prepare the cauliflower mixture up to 24 hours in advance and store it in an airtight container in the refrigerator, ensuring it stays fresh and ready for baking. Simply follow the initial steps of cooking and mixing the cauliflower with mozzarella, Parmesan, egg, and seasonings, then shape the mixture into sticks. When you're ready to enjoy them, simply arrange the prepared sticks on a baking sheet, bake for about 20 minutes until golden, and brush with melted garlic butter. This way, you’ll have delicious, low-carb garlic breadsticks on hand for those busy weeknights!
How to Store and Freeze Keto Cauliflower Garlic Breadsticks
Fridge: Store your leftover Keto Cauliflower Garlic Breadsticks in an airtight container for up to 2 days. This ensures they stay fresh and tasty for your next snack or meal.
Freezer: For longer storage, freeze the breadsticks in a single layer on a baking sheet for about 1-2 hours until firm, then transfer them to an airtight freezer bag for up to 3 months.
Reheating: Reheat from frozen in a toaster oven at 375°F (190°C) for about 10-12 minutes, or until warmed through and crispy again. This keeps the delightful texture intact!
Meal Prep: These breadsticks are perfect for meal prep; make a large batch and freeze for quick, low-carb snacks or side dishes whenever cravings strike!
What to Serve with Cheesy Keto Cauliflower Garlic Breadsticks
Nothing complements the warm, cheesy goodness of these breadsticks quite like the perfect side dishes or drinks to elevate your meal experience.
-
Marinara Sauce: A classic dip that provides a tangy balance to the richness of the breadsticks, enhancing the overall flavor.
Serve these breadsticks with a side of homemade marinara for a comforting Italian touch that can't be beaten. -
Caesar Salad: Crisp romaine lettuce paired with creamy dressing adds freshness and crunch, perfectly contrasting the warm breadsticks.
Enjoying the salad alongside the breadsticks creates a gratifying texture contrast that keeps each bite interesting. -
Zucchini Noodles: Also known as zoodles, these light, veggie noodles offer an elegant, low-carb option that pairs beautifully with the cheesy breadsticks.
Toss them in olive oil, garlic, and a sprinkle of parmesan for a delightful side dish that mirrors the flavors of the breadsticks. -
Roasted Vegetables: A medley of seasonal vegetables brings a nutty, caramelized flavor that complements the cheesy profile of the breadsticks.
This colorful addition not only provides essential nutrients but also adds vibrant visual appeal to your meal. -
Stuffed Peppers: The savory filling, often made with lean protein and spices, creates a hearty, satisfying dish that goes hand-in-hand with the breadsticks.
Pairing them together ensures a filling meal that keeps your hunger at bay while maintaining those low-carb goals. -
Chilled White Wine: A crisp, refreshing wine like Sauvignon Blanc enhances your dining experience, cutting through the richness of the cheesy bites.
Enjoy a glass as you indulge in the warm breadsticks for a luxurious yet easy evening at home.
Keto Cauliflower Garlic Breadsticks Recipe FAQs
How do I choose the best cauliflower for this recipe?
Absolutely! When selecting cauliflower, look for firm, compact heads without any dark spots or soft spots. The florets should be bright white with no signs of yellowing. For the best results, opt for fresh cauliflower that feels heavy for its size, as this indicates a high water content, which you’ll need to drain thoroughly after cooking.
What’s the best way to store leftover breadsticks?
Very! Store your leftover Keto Cauliflower Garlic Breadsticks in an airtight container in the refrigerator for up to 2 days. It’s crucial to keep them sealed to maintain their texture. If you think you won’t finish them within that time frame, consider freezing them for prolonged freshness!
Can I freeze these breadsticks?
Of course! To freeze your Keto Cauliflower Garlic Breadsticks, let them cool completely after baking. Then, place them in a single layer on a baking sheet and freeze for about 1-2 hours until firm. Once set, transfer them to an airtight freezer bag, removing as much air as possible. They can stay frozen for up to 3 months. When you’re ready to enjoy them, reheat from frozen in a toaster oven at 375°F (190°C) for 10-12 minutes, and they’ll taste freshly baked!
What if my mixture is too wet?
Don't worry; it happens! If your cauliflower mixture is too wet, it may lead to soggy breadsticks. To fix this, try squeezing out excess moisture using a clean kitchen towel or cheesecloth. If you're still having trouble, you can incorporate a tablespoon of almond flour or coconut flour into the mixture to help absorb the extra moisture without altering the flavor significantly.
Can I make these breadsticks vegan?
Absolutely! To make a vegan version of the Keto Cauliflower Garlic Breadsticks, simply replace the egg with a flaxseed meal mixture. To do this, combine 1 tablespoon of flaxseed meal with 2.5 tablespoons of water and let it sit for about 5 minutes until it thickens. This creates a great binding agent that works well in this recipe!
Are these breadsticks safe for pets?
Generally, yes! The ingredients in Keto Cauliflower Garlic Breadsticks are safe for pets, particularly the cauliflower and cheese. However, make sure to avoid giving them any breadsticks that have excess garlic or spices, as these can be harmful to pets. Always consult with your veterinarian if you’re unsure about new treats!

Cheesy Keto Cauliflower Garlic Breadsticks You’ll Dream About
Ingredients
Equipment
Method
- Preheat your oven to 400°F (200°C) and line a baking sheet with parchment paper.
- Steam or microwave the cauliflower florets until tender, about 5-7 minutes. Drain thoroughly.
- In a large mixing bowl, combine drained cauliflower with mozzarella cheese, Parmesan cheese, egg, garlic, and Italian seasoning. Mix until well incorporated.
- Shape the mixture into stick forms on the baking sheet, leaving space between each stick.
- Bake for about 20 minutes or until firm and golden brown.
- Brush with melted garlic butter and sprinkle more Parmesan on top before serving.
- Allow to cool for a minute, then serve warm with marinara sauce or enjoy on their own.
Leave a Reply