
As I fiddled with my lunch options one busy morning, the thought of yet another boring meal made my stomach grumble in protest. That's when the idea of finger sandwiches struck me, a simple yet delightful way to elevate my lunch experience. These finger sandwiches are perfect for any occasion—whether it’s a cozy brunch or a delightful tea party—offering a delicious twist on traditional bites for kids and adults alike. Not only are they a breeze to prepare, but they also leave plenty of room for creativity with eight mouth-watering variations. Plus, these miniature masterpieces are great for lunchboxes, making them an easy crowd-pleaser for little ones during weekly chaos. Are you ready to discover how these tasty sandwiches can transform your next meal?
Why Finger Sandwiches Will Excite You
Easy to Make: The recipes are designed for all skill levels, ensuring that anyone can whip these up in no time.
Flavorful Variety: With eight delicious options, you can tantalize taste buds, from savory meats to sweet treats, catering to every palate.
Perfect for Any Occasion: Whether it’s a sophisticated tea party or a casual lunch, these finger sandwiches bring an element of fun to every gathering.
Kid-Friendly Fun: Packed with nutrition and kid-approved flavors, they make lunchtime enjoyable for children and adults alike.
Creative Expression: Get inspired to play with flavors and combinations—check out my tips on variation ideas for adding your personal flair!
Crowd-Pleasing: These charming bites are sure to impress guests—ideal for parties or picnics, they’re a hit wherever they go!
Finger Sandwich Ingredients
For the Classics
• Peanut Butter – Provides a creamy texture and sweetness; can substitute with almond butter for a nut-free option.
• Jam – Adds sweetness; any berry jam works well, but fruit preserves offer added texture.
• White Bread – Acts as the sandwich structure; whole-grain or gluten-free bread can be healthier options.
For the Savory Treats
• Mayo – Delivers creaminess and moisture; replace with Greek yogurt for a tangy, lower-calorie choice.
• Yellow Mustard – Provides a flavor contrast; consider Dijon mustard for a gourmet touch.
• Cheddar Cheese – Offers flavor and richness; swap for pepper jack for a spicy kick or go vegan with plant-based cheese.
• Deli Ham – Serves as a protein source; turkey or chicken slices create a lighter sandwich variant.
• Green Leaf Lettuce – Brings freshness; opt for spinach or arugula for a punch of flavor.
• English Cucumber – Adds crunch and freshness; zucchini can work as a substitute in a pinch.
For the Gourmet Options
• Whipped Cream Cheese – This creamy filling enhances richness; switch to regular cream cheese and add herbs for extra flavor.
• Egg Salad – A hearty filling that’s satisfying; tofu makes for a great vegetarian alternative.
• Smoked Salmon – Elevates the flavor profile; creamy avocado can also be a delicious substitute.
• Capers – Provide a salty, briny flavor; olives are a tasty alternative for a similar bite.
• Pimento Cheese – This creamy cheese spread adds depth; consider hummus for a vegan variation.
For the Sweet Delights
• Strawberries – Bring sweetness to dessert sandwiches; raspberries or sliced bananas can provide a delightful twist.
• Cool Whip – Adds lightness; whipped coconut cream serves as a dairy-free alternative.
• Bacon – Introduces crispy texture and savory flavor; replace with turkey bacon or a vegetarian option.
• Tomatoes – Provide freshness and juiciness; sliced bell peppers can add crunch without moisture.
• Green Pesto – Delivers rich flavor; sun-dried tomato pesto can be a tasty swap.
These finger sandwiches are not only easy to make but also versatile enough to adapt to various tastes, making them a fantastic choice for your next event!
Step‑by‑Step Instructions for Finger Sandwiches
Step 1: Prepare the Fillings
Begin by flattening your slices of white or whole-grain bread using a rolling pin for a smoother texture. For the peanut butter and jam sandwiches, spread a generous layer of peanut butter on one side and jam on the other, roll tightly, and slice into bite-sized pieces. For the classic ham and cheese, mix mayonnaise and yellow mustard, layer the ham, cheddar, and lettuce on bread, and slice into small quarters.
Step 2: Assemble the Cucumber Sandwich
Spread a layer of whipped cream cheese evenly over slices of bread, then layer thinly sliced English cucumber on one piece. Top with another slice of cream cheese-covered bread, press gently to meld, and slice into elegant triangles. This finger sandwich option brings a refreshing crunch that’s perfect for tea parties and pairs wonderfully with the savory varieties we’ve just made.
Step 3: Create the Egg Salad Sandwich
In a bowl, mix together boiled eggs, a pinch of salt, chopped capers, and mayonnaise, ensuring a creamy consistency. Spread this hearty mixture between two slices of bread to create a satisfying filling. Cut the assembled sandwich into small rectangles or triangles. The egg salad adds a delightful richness that balances beautifully with the lighter options like cucumber sandwiches.
Step 4: Prepare the Pimento Cheese Delight
Take your favorite pimento cheese spread and layer it generously between two slices of bread for a creamy, tangy sandwich option. Push down slightly to secure the filling, then slice off the crusts for a classic look. This flavor-packed finger sandwich is sure to impress your guests at any gathering, embodying the spirit of delightful finger sandwiches.
Step 5: Assemble the Sweet Strawberry Sandwiches
In a mixing bowl, combine whipped cream cheese and Cool Whip, blending until light and fluffy. Cut the crusts off white bread and use a heart-shaped cookie cutter to create fun shapes. Spread the cream mixture on one heart, add a slice of strawberry, and top with another heart. These sweet treats are perfect for dessert tables, adding a burst of color and flavor.
Step 6: Construct the BLT Finger Sandwich
Layer crispy bacon, fresh lettuce, and sliced tomatoes on rounds of bread spread with mayonnaise. Press down gently to combine the flavors and slice into bite-sized pieces. This classic combination of savory and fresh is always a hit, transforming everyday ingredients into delightful finger sandwiches designed to please your palate.
Step 7: Make the Turkey Pesto Sandwich
Spread a layer of cream cheese mixed with green pesto on one slice of bread. Add turkey slices and delicate tomato pieces on top, then cover with another slice of basted bread. Press down gently, then slice into manageable pieces. The turkey pesto finger sandwich offers an inventive twist that’s not only mouthwatering but also visually appetizing for any occasion.
Step 8: Final Assembly and Serve
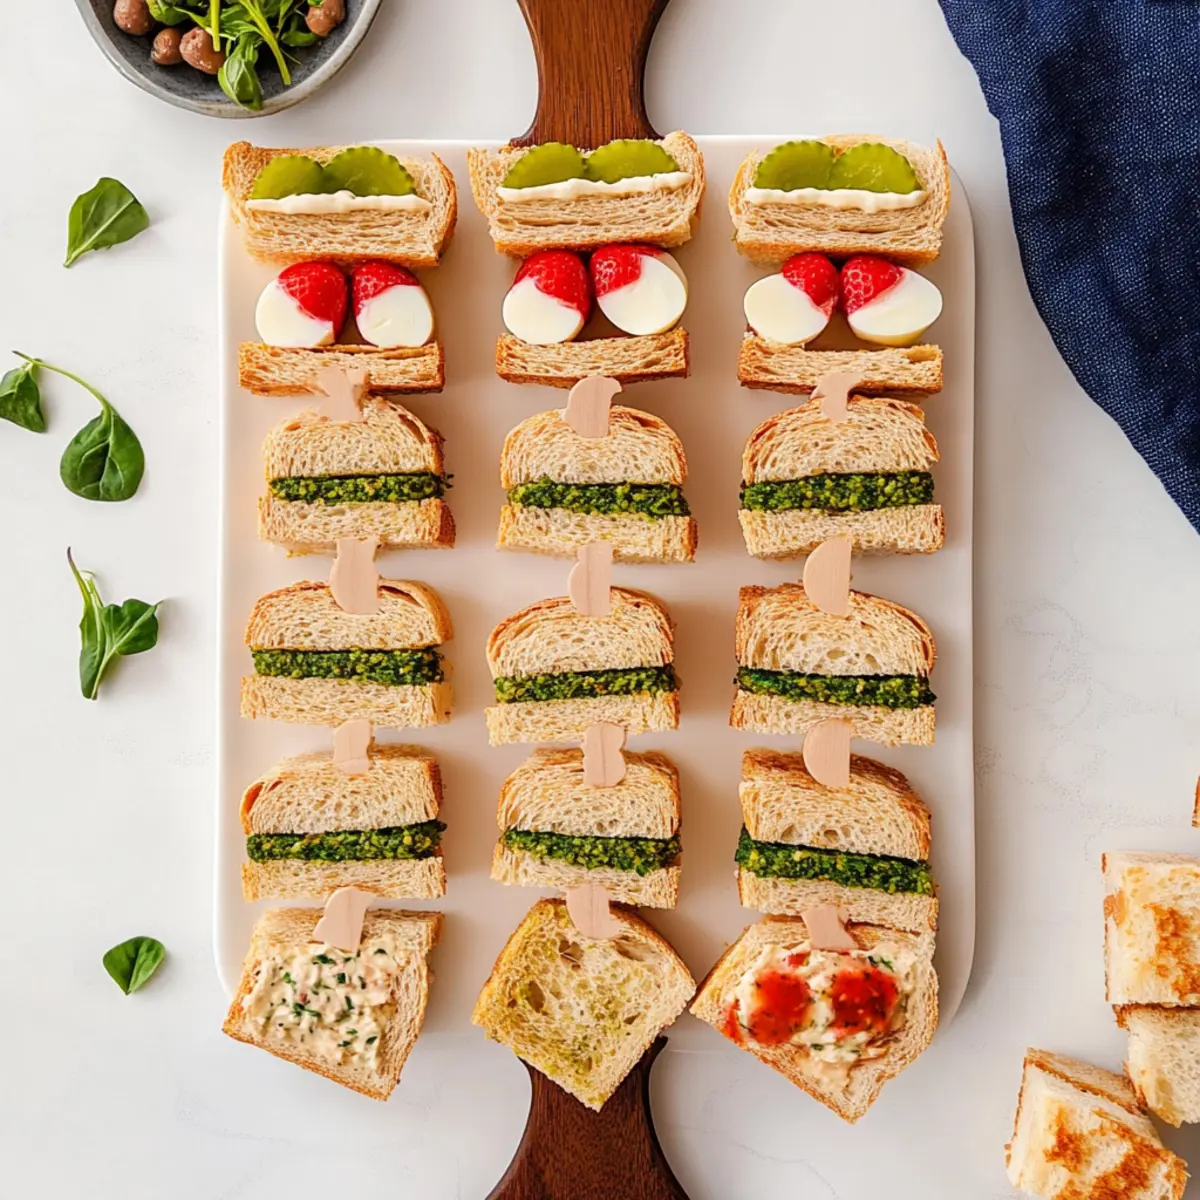
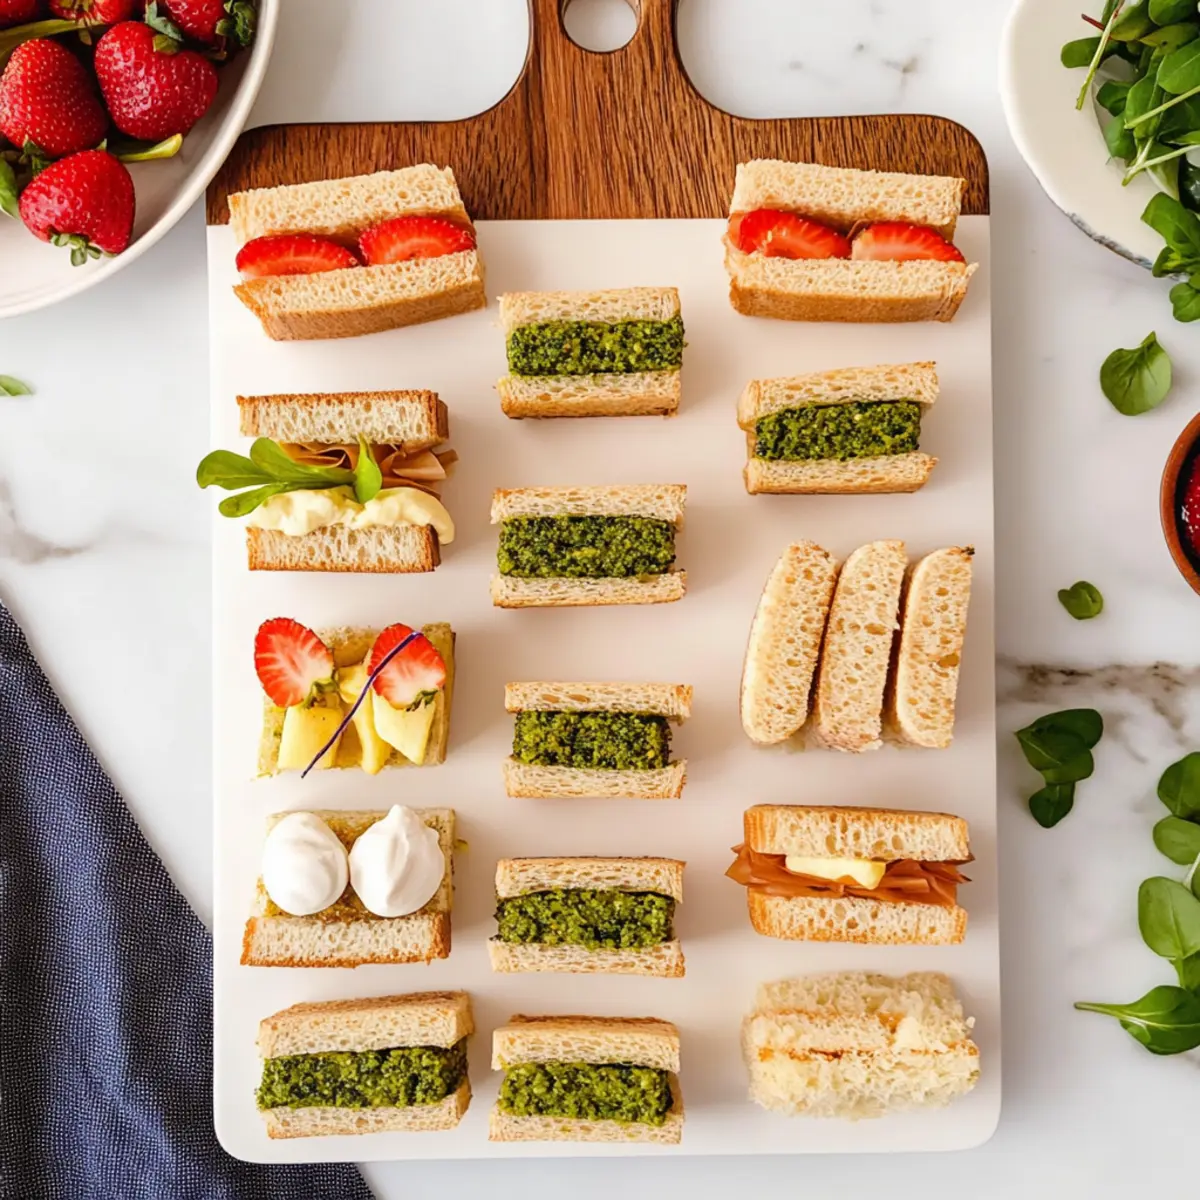
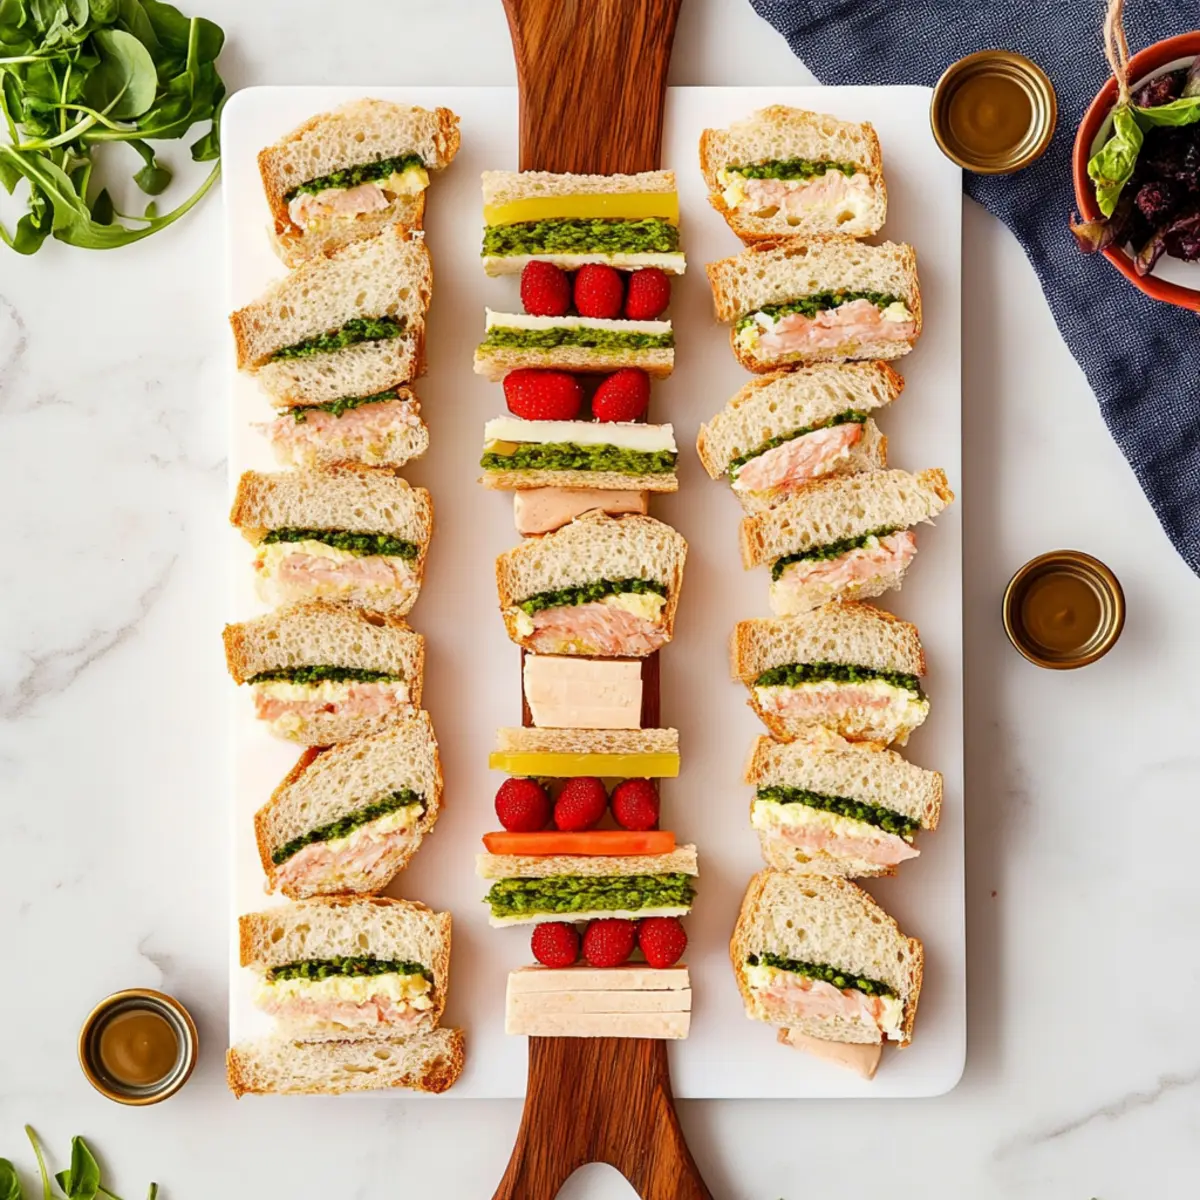
Before serving these fabulous finger sandwiches, insert toothpicks for easy handling and stability. Arrange them on a platter, ensuring varieties are interspersed for a colorful display. If not serving immediately, keep them in an airtight container lined with parchment between layers to maintain freshness. Enjoy these delightful finger sandwiches with family and friends!
What to Serve with Finger Sandwiches
Looking to elevate your finger sandwich experience into a full-fledged meal? Let’s explore delightful pairing options that will tantalize your taste buds!
- Creamy Tomato Soup: A warm, velvety soup that contrasts beautifully with the cool crunch of finger sandwiches, perfect for dipping!
- Mixed Green Salad: Fresh greens tossed with a zesty vinaigrette add a refreshing bite, balancing the richness of the sandwiches.
- Fruit Skewers: Colorful, juicy fruits provide a sweet contrast and a vibrant presentation, making your meal even more inviting.
- Cheese Platter: A selection of cheeses can enhance your sandwiches’ flavors, offering variety with each bite and appealing to cheese lovers.
- Sparkling Lemonade: A fizzy, citrusy drink lifts the meal, complementing the sandwich flavors while keeping it light and refreshing.
- Herbal Iced Tea: Pairing finger sandwiches with a lightly sweetened herbal tea adds an elegant touch, ideal for brunches or tea parties.
- Chocolate-Dipped Strawberries: End on a sweet note with these indulgent bites, providing a delicious treat to follow your savory delights.
- Mini Quiches: These savory bites are perfect for brunch menus and complement finger sandwiches wonderfully, adding an eggy, creamy element to the table.
Storage Tips for Finger Sandwiches
Fridge: Store finger sandwiches in an airtight container in the refrigerator for up to 2 hours to maintain freshness and texture.
Freezer: These sandwiches can be frozen for up to 1 month; layer them between parchment paper to prevent sticking and ensure easy separation.
Reheating: Thaw frozen sandwiches overnight in the fridge before serving; for a warm touch, briefly warm them in the oven at a low temperature for a few minutes.
Wrap Well: Always wrap each sandwich tightly in plastic wrap or foil if prepping ahead to keep them from drying out and preserve the flavorful fillings of your finger sandwiches.
Finger Sandwiches: Fun Variations Await
Feel free to personalize these delightful sandwiches with simple swaps and exciting twists, transforming every bite into a new adventure!
- Dairy-Free: Use avocado instead of cream cheese for a luscious, dairy-free filling.
- Gluten-Free: Substitute traditional bread with gluten-free wraps or bread to suit dietary needs.
- Spicy Kick: Swap out cheddar for pepper jack cheese and add jalapeño slices for a zesty twist.
- Veggie Delight: Replace deli meat with roasted red peppers and a layer of hummus for a savory, plant-based option.
- Sweet Treat: Use Nutella and banana slices on white bread for a decadent dessert sandwich that kids will adore!
- Fresh Herbs: Mix fresh dill into your cream cheese spread for an aromatic lift in cucumber sandwiches.
- Creative Shapes: Use seasonal cookie cutters to create fun shapes for extra visual appeal, enchanting little ones at lunchtime.
- International Flare: Experiment with fillings like tzatziki and grilled chicken for a Mediterranean-inspired delight.
These variations not only enhance flavor but also cater to different dietary preferences, inviting everyone to savor the magic of finger sandwiches. For more ideas, don’t miss my tips on variation ideas to really make them your own!
Expert Tips for Finger Sandwiches
Perfect Crusts: Cut the crusts off the sandwiches for a classic look; this also makes them easier for kids to enjoy.
Prevent Sogginess: Layer your spreads (like mayo or cream cheese) between moist ingredients to keep the bread from getting soggy.
Creative Shapes: Use cookie cutters to create fun, unique shapes that appeal to kids and make with finger sandwiches more festive for any occasion.
Wrap Them Well: If preparing ahead, wrap the sandwiches tightly in plastic wrap to keep them fresh and prevent drying out.
Mix and Match: Feel free to mix different fillings in one sandwich for a flavor explosion—getting creative is part of the fun with finger sandwiches!
Serve Fresh: Enjoy your finger sandwiches the same day they’re made for the best taste and texture, but they're still good for up to two hours in an airtight container.
Make Ahead Options
These finger sandwiches are perfect for meal prep enthusiasts looking to save time! You can prepare the fillings up to 24 hours in advance, ensuring that your sandwiches are both fresh and delicious. Simply mix your egg salad, cream cheese spread, or any desired fillings, then store them in airtight containers in the refrigerator to maintain their quality. To prevent moisture from making the bread soggy, layer spreads like cream cheese between moist ingredients. When you’re ready to serve, assemble the sandwiches and slice them just before enjoying for the best flavor and texture. Enjoy hassle-free, delightful finger sandwiches that impress your guests with minimal last-minute effort!
Finger Sandwiches Recipe FAQs
What type of bread is best for finger sandwiches?
For finger sandwiches, I recommend using white or whole-grain bread for a soft texture that holds up well. If you're catering to dietary preferences, gluten-free bread can be a great alternative! Just make sure it’s fresh, as stale bread can ruin the delightful experience of these finger sandwiches.
How long can I store finger sandwiches in the fridge?
Absolutely! You can store your finger sandwiches in an airtight container in the refrigerator for up to 2 hours while maintaining their freshness. If you're making them ahead of time, just wrap them tightly in plastic wrap to prevent drying out, but try to enjoy them the same day for peak flavor!
Can I freeze finger sandwiches?
Yes, you can freeze finger sandwiches! To do this, layer them between sheets of parchment paper in an airtight container or freezer bag. This way, they'll freeze well for up to 1 month. When you're ready to enjoy them, thaw them overnight in the fridge and serve cold or warm them in the oven at a low temperature if you prefer a cozy touch.
How can I prevent finger sandwiches from getting soggy?
Very important! To avoid sogginess, apply a layer of spreads like mayonnaise or cream cheese between moist ingredients. This technique creates a barrier, keeping the bread dry. Wrapping them tightly in plastic wrap after assembly helps maintain their structural integrity too!
Are there any allergy considerations with finger sandwiches?
Absolutely! When making finger sandwiches, keep in mind potential allergens such as nuts, gluten, dairy, or eggs. For nut allergies, consider swapping peanut butter for sunbutter, and use gluten-free bread for those with gluten sensitivities. Always check with your guests about allergies beforehand to create a safe and enjoyable feast for everyone!

Delicious Finger Sandwiches for Every Occasion Made Easy
Ingredients
Equipment
Method
- Flatten slices of bread using a rolling pin. Spread peanut butter on one side and jam on another, roll, and slice into pieces.
- Spread whipped cream cheese on slices and layer cucumber between them, slice into triangles.
- Mix boiled eggs, salt, capers, and mayo for egg salad; spread between two slices and cut as desired.
- Layer pimento cheese between slices of bread, press down, and cut crusts off.
- Mix whipped cream cheese and Cool Whip; cut crusts from bread, spread, add strawberry slices, and top with another slice.
- Layer bacon, lettuce, and tomato on mayo-spread bread, press down, and slice.
- Spread cream cheese mixed with pesto on bread, add turkey and tomato, press down, and slice.
- Insert toothpicks for serving, arrange on platter, and store in an airtight container if not serving immediately.


Leave a Reply