
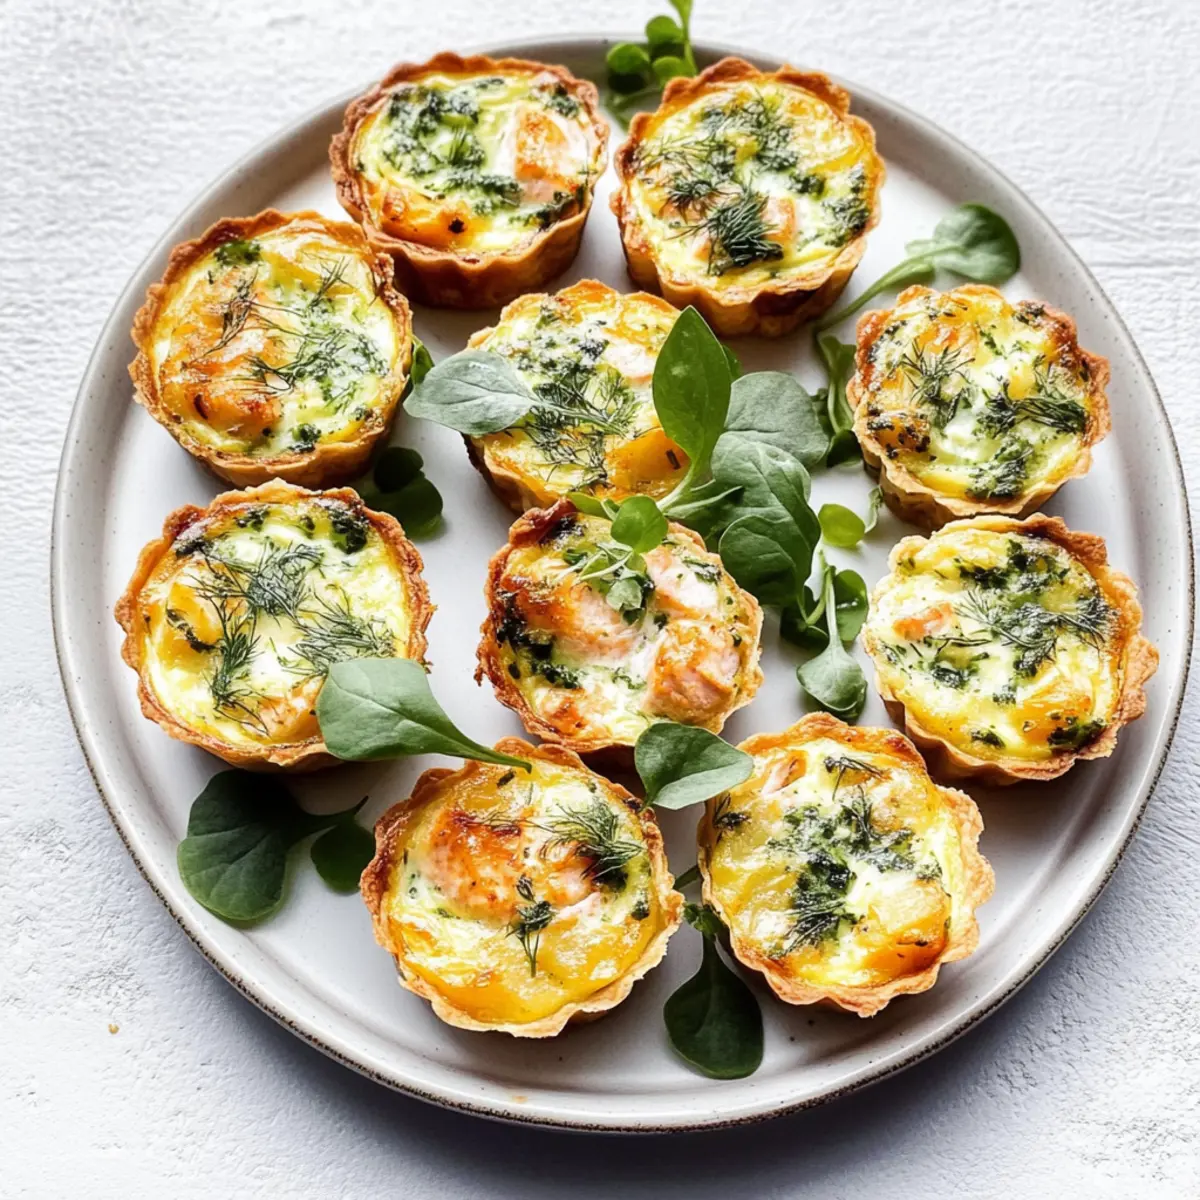
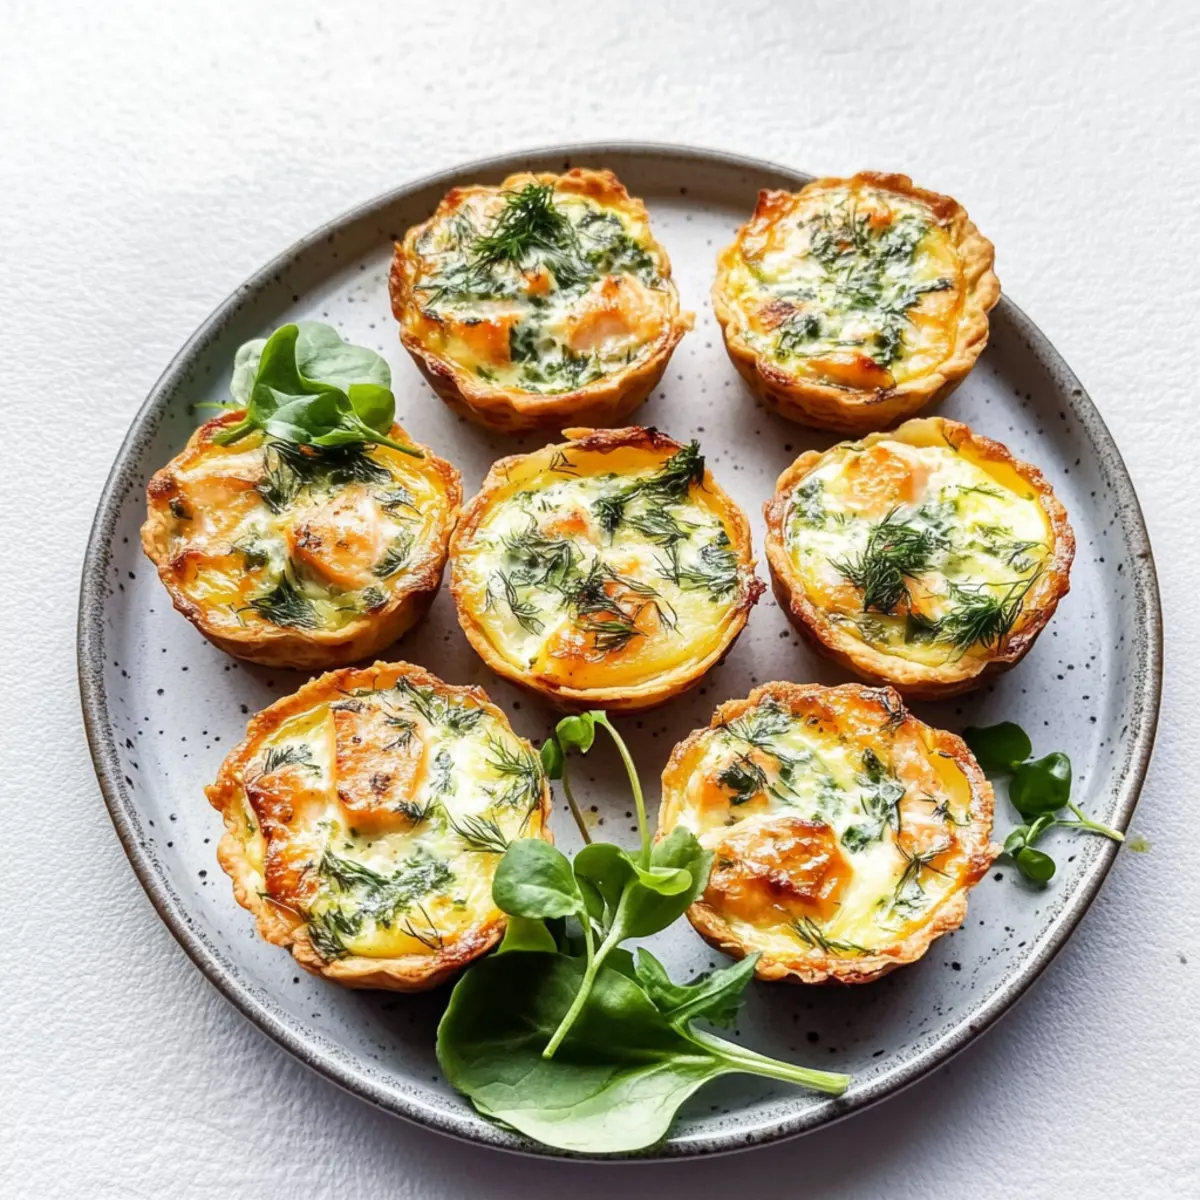
As I pulled the golden-brown puff pastry from the oven, the delightful aroma of salmon entangled with fresh dill filled the kitchen, instantly whisking me into a savory daydream. These Mini Baked Salmon Quiches with Dill and Watercress have quickly become a staple in my brunch repertoire, showcasing a balance of elegance and simplicity. Not only are they a joyous treat to prepare, but they also serve as a satisfying, gluten-free option that makes entertaining a breeze. You’ll love how quickly they come together, and with the added perk of being freezer-friendly, whipping up a batch ahead of time allows you to enjoy homemade goodness whenever your cravings strike. Are you ready to create a quiche that’s both comforting and refined? Let's dive in!

Why Is This Quiche So Special?
Savory Elegance: The delightful combination of salmon, dill, and creamy filling elevates any meal.
Quick Prep: With minimal ingredients and straightforward steps, you’ll have these quiches ready in no time.
Freezer-Friendly: Perfect for busy days—prepare them in advance and freeze for an easy brunch option later.
Crowd-Pleaser: Ideal for gatherings, these bite-sized wonders will impress guests and family alike.
Versatile Twist: Feel free to swap in seasonal vegetables or cheeses for a unique spin—try spinach and feta for a vegetarian option! As you savor every bite, you’ll understand why these Mini Baked Salmon Quiches are destined to become a go-to favorite in your culinary repertoire.
Baked Salmon Quiche with Dill Ingredients
For the Filling
- Salmon Filet – Provides protein and rich flavor; skin-on or skin-off works well.
- Large Eggs – Binds the filling; essential for structure, so no substitutes recommended.
- Heavy Cream – Adds creaminess and richness; can substitute with half-and-half for a lighter option.
- Yukon Gold Potatoes – Adds heartiness to the quiche; parboil before adding for the best texture.
- Fresh Dill – Provides aromatic freshness; swap with fresh thyme or tarragon if desired.
- Scallions – Offers a mild onion flavor; diced onions or shallots can also be used.
For the Crust
- Puff Pastry – The main structure, light and flaky texture; gluten-free pastry can be substituted.
- Neutral Oil – For baking salmon, adds moisture; any light oil like canola or vegetable works.
For Seasoning
- Kosher Salt – Enhances flavor; essential for both the salmon and filling.
- Granulated Garlic – Adds depth to the dish; fresh garlic can be a great alternative.
- Lemon Zest – Brightens flavors and adds acidity; do not substitute zest with juice.
For Garnishing
- Watercress – Adds freshness and a peppery flavor; arugula is a good substitute.
- Sour Cream or Creme Fraiche – Optional topping, enhances richness when served.
Step‑by‑Step Instructions for Mini Baked Salmon Quiche with Dill
Step 1: Bake the Salmon
Preheat your oven to 400°F (200°C). Drizzle the salmon filet with neutral oil, then season generously with kosher salt, granulated garlic, and a sprinkle of lemon zest. Place the salmon on a lined baking tray and bake for 10-12 minutes until it flakes easily with a fork. Once done, remove from the oven and allow it to cool slightly before shredding.
Step 2: Prepare the Puff Pastry
Reduce the oven temperature to 375°F (190°C). On a lightly floured surface, roll out the puff pastry and cut it into squares that fit your greased muffin tin. Gently press each square into the tin, ensuring there's a snug fit. Pre-bake the pastry cups for 5-6 minutes, just until slightly puffed and beginning to brown at the edges for your delicious Mini Baked Salmon Quiche.
Step 3: Make the Egg Mixture
In a medium bowl, whisk together the large eggs and heavy cream until well combined. Add a pinch of kosher salt to enhance the flavors, blending thoroughly. This creamy egg mixture will create the luscious filling for your Mini Baked Salmon Quiche, making it delightfully rich and satisfying when baked.
Step 4: Assemble the Quiches
Once the puff pastry cups have cooled slightly, it's time to fill them! Start by evenly distributing the watercress, shredded salmon, and parboiled Yukon gold potatoes among the pastry cups. Sprinkle fresh dill and scallions over each, ensuring every bite is full of flavor. Finally, pour the egg mixture over the fillings, filling each cup to just below the top to allow for puffing.
Step 5: Bake the Quiches
Place the muffin tin in the preheated oven and bake the Mini Baked Salmon Quiches for 25 minutes. Watch as the pastry turns golden brown and the filling sets; it should be slightly puffed and firm. Once done, remove them from the oven and allow them to cool for a few minutes in the tin before transferring them to a wire rack for cooling.

Variations & Substitutions for Baked Salmon Quiche with Dill
Feel free to customize your quiche creation with these delightful twists that add flair and fit various dietary needs!
- Dairy-Free: Substitute heavy cream with coconut cream and use a dairy-free pastry for a creamy, plant-based delight.
- Vegetarian: Replace salmon with sautéed spinach and feta for a savory burst of flavor that everyone will love!
- Gluten-Free: Use a gluten-free puff pastry option to cater to dietary restrictions while keeping that flaky goodness.
- Cheesy Goodness: Experiment with different cheeses like goat cheese or sharp cheddar for added richness and flavor variations. Each cheese imparts its own character, making your quiche unique.
- Seasonal Veggies: Toss in seasonal favorites like asparagus or zucchini to enhance the nutritional profile and add a beautiful touch to each bite.
- Spicy Kick: Mix in a pinch of red pepper flakes or diced jalapeños for those who enjoy a little heat in their savory dishes. A perfect way to kick things up a notch!
- Herb Infusion: Swap fresh dill for fresh thyme or tarragon to create an herby twist that complements the salmon beautifully.
- Mini to Major: Want a larger centerpiece? Simply adapt your recipe for a deep-dish quiche using the same filling and bake in a bigger pie dish for a glorious brunch spread!
Don’t hesitate to explore and create your own version of this irresistible Mini Baked Salmon Quiche. For a delightful pairing, you might enjoy serving these quiches alongside a refreshing salad or Herb Infused Quiche for even more flavor inspiration. Happy cooking!
How to Store and Freeze Baked Salmon Quiche with Dill
- Room Temperature: Let the quiche cool completely at room temperature. If not consumed immediately, store it in the fridge to maintain freshness.
- Fridge: Store leftovers in an airtight container for up to 3 days. Reheat at 350°F (175°C) until warmed through for the best flavor.
- Freezer: Freeze unbaked quiche for up to 3 months. Wrap tightly in plastic wrap, then aluminum foil. Bake from frozen, adding about 10 minutes to the baking time.
- Reheating: For already-baked quiche, simply reheat in the oven or microwave until warm. The Baked Salmon Quiche with Dill stays delicious even after freezing!
Make Ahead Options
These Mini Baked Salmon Quiches with Dill are perfect for meal prep, helping you save time on busy weeknights! You can prepare the ingredient components, such as shredding the salmon and parboiling the Yukon gold potatoes, up to 24 hours in advance. Store them in airtight containers in the refrigerator to maintain their freshness. Additionally, you can assemble the unbaked quiches and refrigerate them for up to 3 days. When you're ready to serve, just pop them in the oven for 25 minutes, and they’ll come out just as delicious and flavorful. This way, you can enjoy a delightful homemade brunch with minimal effort!
Expert Tips for Baked Salmon Quiche with Dill
-
Puff Pastry Fit: Ensure the puff pastry squares fit snugly in the muffin tin to prevent leaks and maintain shape.
-
Parboil Potatoes: Parboil Yukon gold potatoes until just tender but not fully cooked; this ensures a perfect texture in the filling.
-
Avoid Overfilling: Pour the egg mixture just below the top to allow the quiche to puff up without overflowing during baking.
-
Freezing Technique: Assemble unbaked quiches, wrap tightly, and freeze. Bake from frozen, adding about 10 minutes to baking time for the best results.
-
Ingredient Flexibility: Don’t hesitate to swap seasonal vegetables or herbs; freshness adds a wonderful twist to this Baked Salmon Quiche with Dill.
What to Serve with Mini Baked Salmon Quiche
Elevate your brunch experience by pairing these delightful quiches with complementary dishes that enhance your meal's flavors and textures.
- Fresh Garden Salad: A light, zesty salad with mixed greens and vinaigrette cuts through the richness of the quiche, adding a vibrant pop.
- Roasted Asparagus: Tender asparagus drizzled with olive oil and lemon complements the savory notes of salmon beautifully while adding a satisfying crunch.
- Creamy Mashed Potatoes: They provide a comforting texture and a subtle creaminess that pairs wonderfully with the richness of the quiche.
- Sautéed Spinach: Lightly sautéed with garlic, it offers a fresh contrast to the quiche's flavors and a burst of nutrition on your plate.
- Fruit Salad: A refreshing mix of seasonal fruits provides a sweet, bright counterpart that balances the savory quiche and cleanses the palate.
- Chilled White Wine: Pair with a crisp Sauvignon Blanc or a light Pinot Grigio for a delightful sip that enhances the meal’s elegance.
- Homemade Scones: These buttery, flaky treats are perfect for brunch and add a sweet touch that mingles nicely with the salmon quiche’s savory elements.
- Herbed Yogurt Dip: Serve with pita chips or veggies for a tangy side, a creamy complement that pairs beautifully with the savory filling.
- Passion Fruit Mousse: For dessert, a light, airy mousse adds a tropical sweetness that rounds out the meal perfectly, ending on a refreshing note.
Baked Salmon Quiche with Dill Recipe FAQs
What kind of salmon should I use for this quiche?
Absolutely! You can use either skin-on or skin-off salmon filets. Just ensure they are fresh or, if using frozen, adequately thawed before seasoning and baking for the best flavor and texture in your Mini Baked Salmon Quiche.
How should I store leftover quiche?
Store leftovers in an airtight container in the fridge for up to 3 days. For the best taste, reheat your Mini Baked Salmon Quiche at 350°F (175°C) until warmed through, which typically takes about 10-15 minutes.
Can I freeze these quiches?
Yes! To freeze, assemble the unbaked quiches, then wrap them tightly in plastic wrap followed by aluminum foil. They can be frozen for up to 3 months. When you’re ready to bake them, go straight from the freezer to the oven, adding about 10 minutes to the baking time to ensure they cook through.
What should I do if my quiche filling overflows?
To prevent this mess, fill your pastry cups just below the top to allow for puffing during baking. If it does overflow, don't worry! It can be trimmed off easily once they cool.
Are these quiches safe for people with dietary restrictions?
These Mini Baked Salmon Quiches can be gluten-free if you use gluten-free puff pastry. Additionally, keep in mind that if you're serving to someone with seafood allergies, you can easily swap the salmon for a vegetarian option, like spinach and feta, for a safe yet delicious alternative.
How can I tell when the quiche is done baking?
Look for a golden-brown crust and a filling that has puffed up and is set in the center. It should no longer jiggle when gently shaken. Allow it to cool slightly before serving, perfecting every bite of your scrumptious Baked Salmon Quiche with Dill!
Irresistibly Creamy Baked Salmon Quiche with Dill Delight
Ingredients
Equipment
Method
- Preheat your oven to 400°F (200°C). Drizzle the salmon filet with neutral oil, season with kosher salt, granulated garlic, and lemon zest. Bake for 10-12 minutes until it flakes easily. Let cool and shred.
- Reduce the oven temperature to 375°F (190°C). Roll out the puff pastry and cut into squares for the muffin tin. Pre-bake for 5-6 minutes until slightly puffed.
- In a bowl, whisk together the eggs and heavy cream. Add a pinch of kosher salt.
- Distribute watercress, shredded salmon, and parboiled potatoes into the pastry cups. Sprinkle with dill and scallions. Pour the egg mixture over the fillings.
- Bake for 25 minutes until golden brown and filling is set. Cool slightly before transferring to a wire rack.
Leave a Reply