
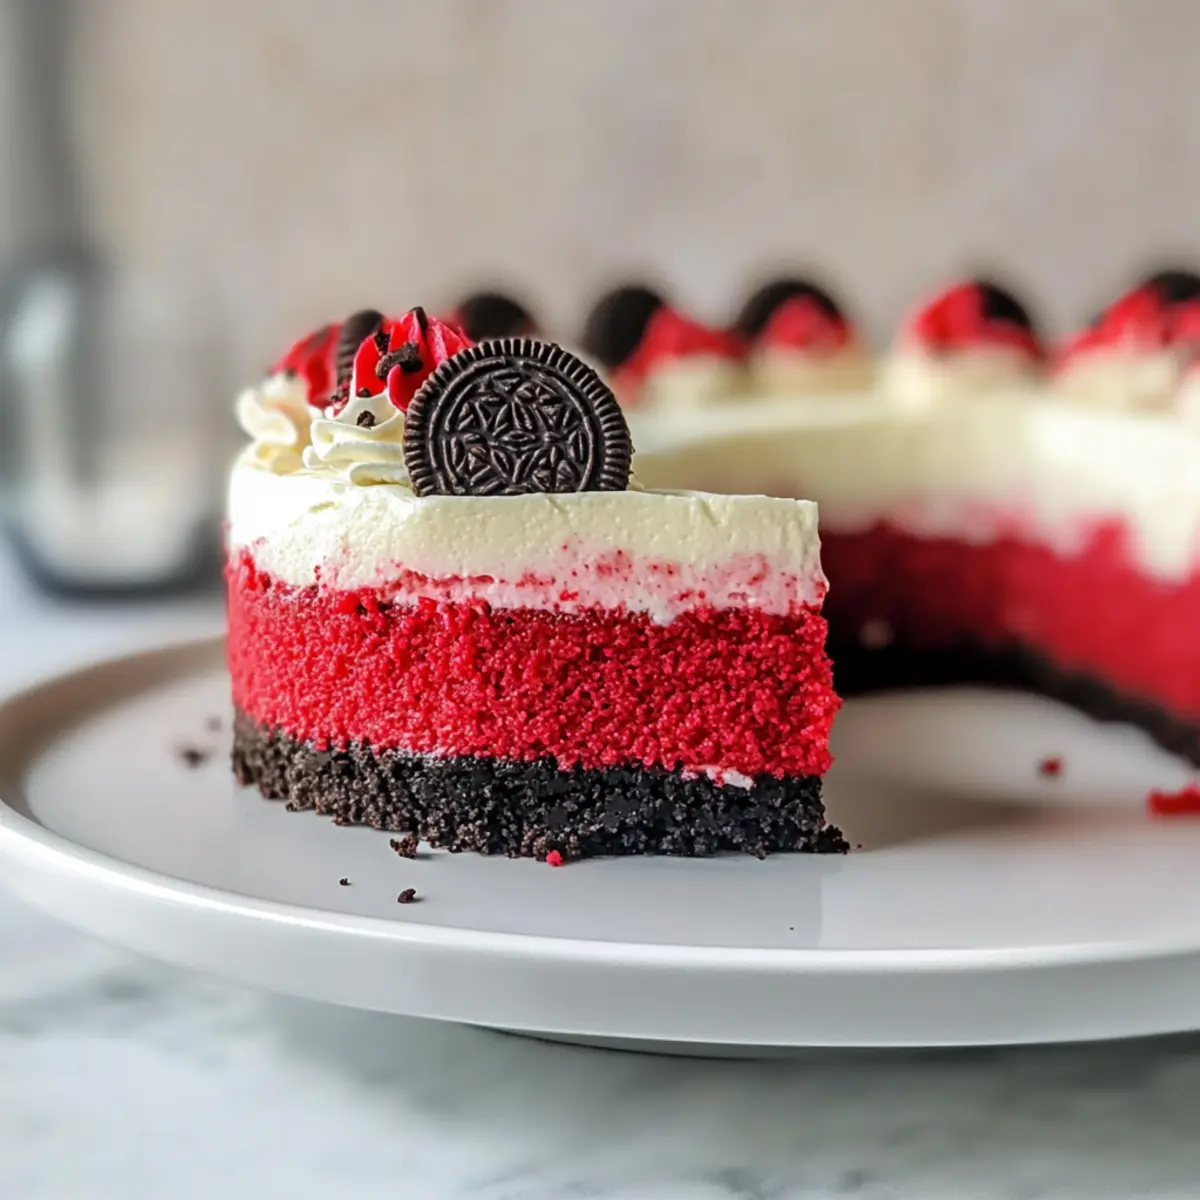
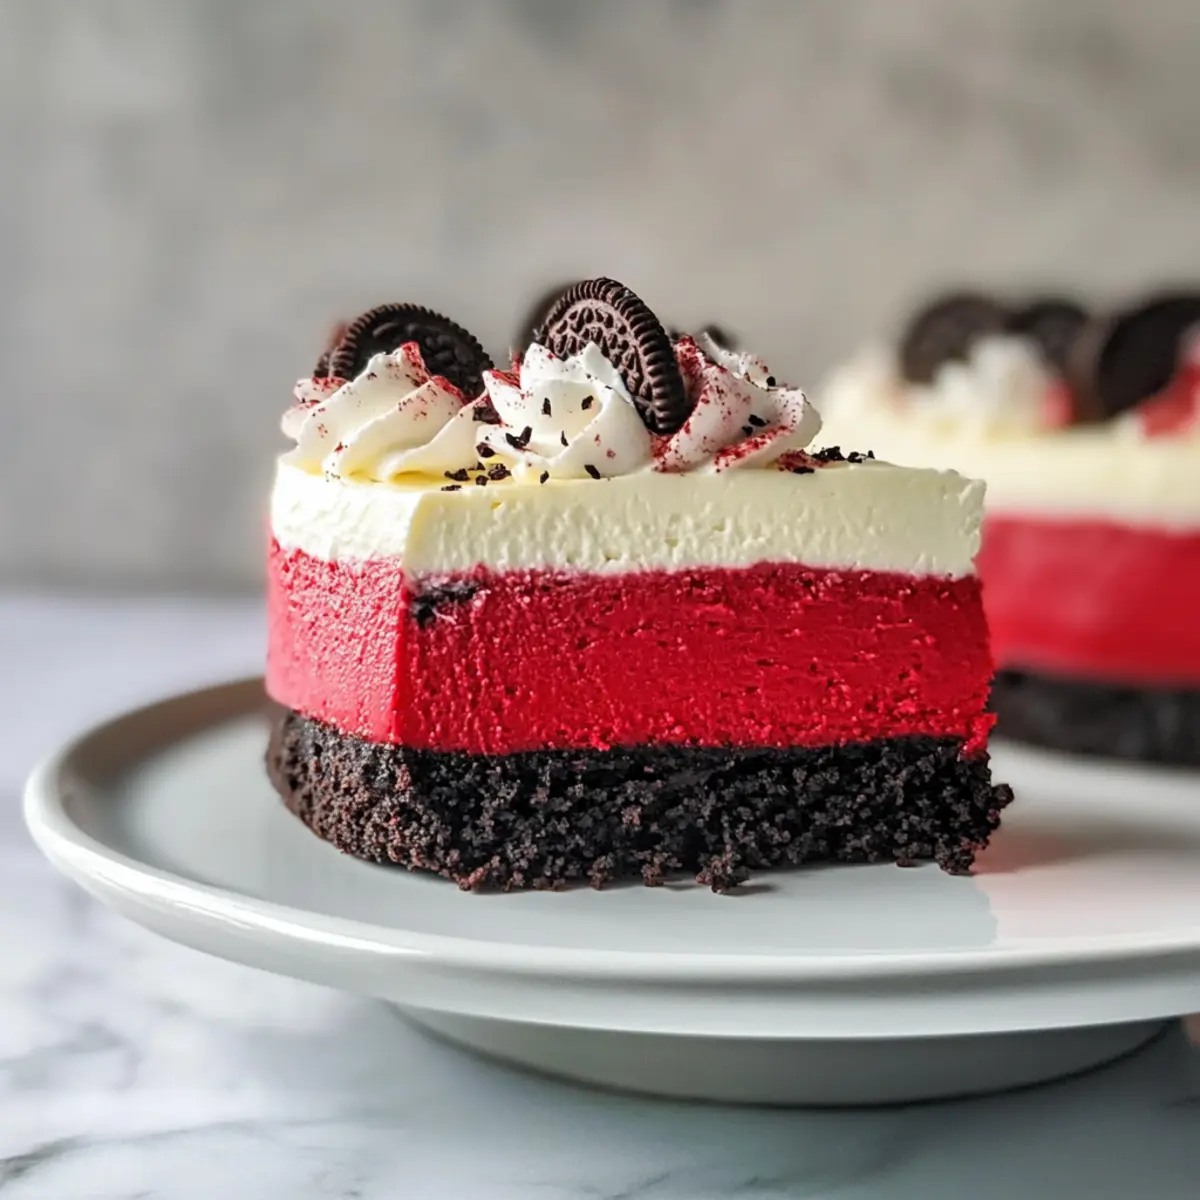
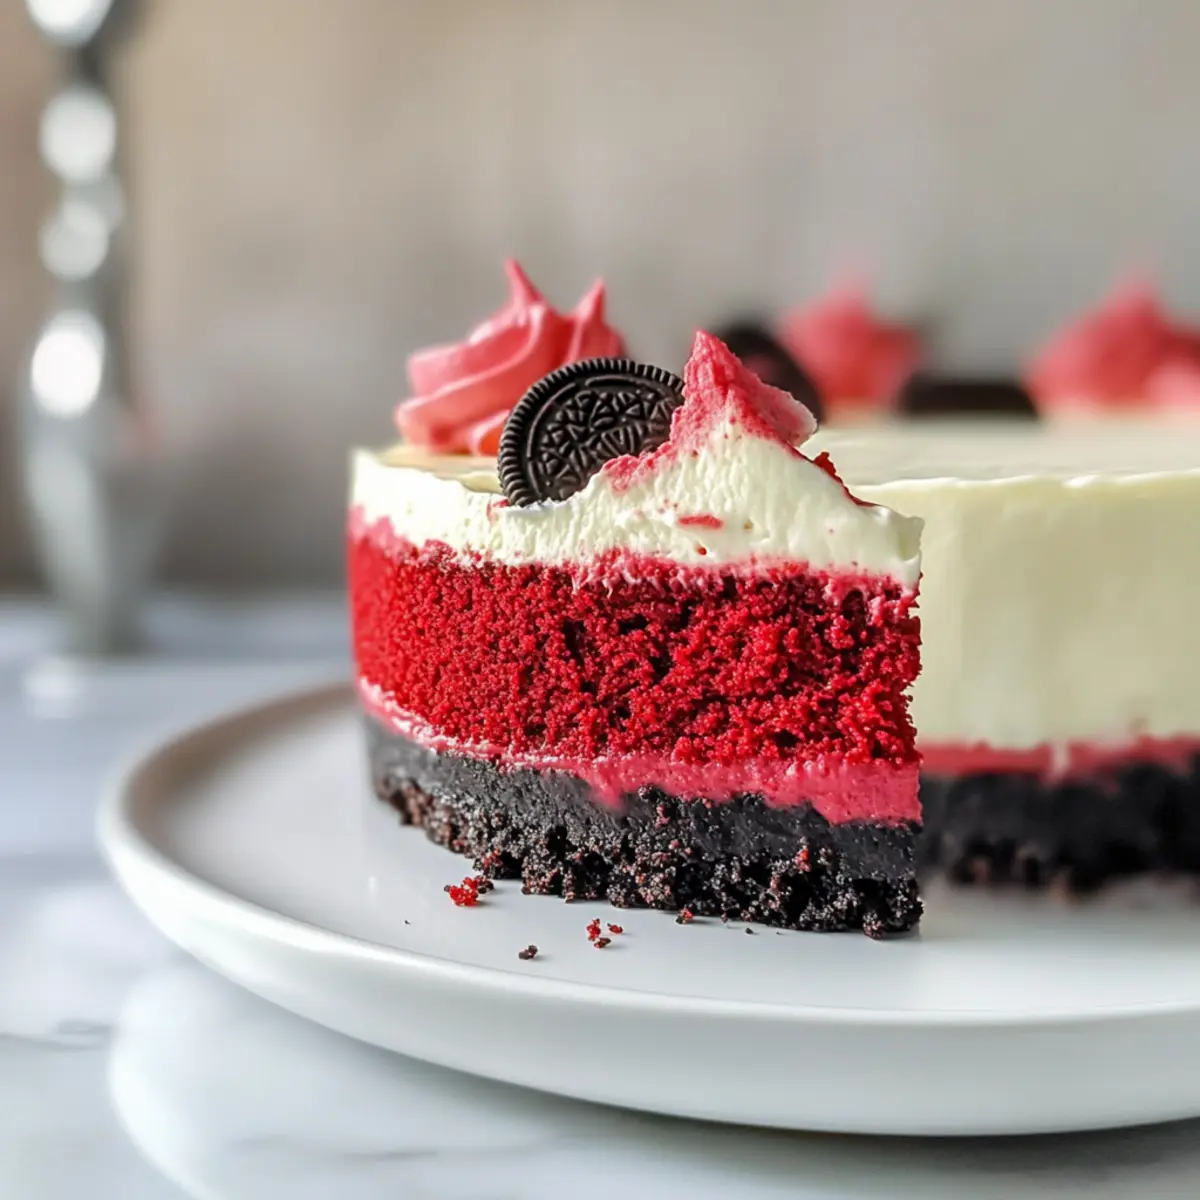
As I sifted through flour and sugar the other day, I stumbled upon a burst of inspiration for dessert that sent my heart racing—Creamy Red Velvet Cheesecake with Oreo Crust! This delightful concoction captures the spirit of classic red velvet cake, melding it seamlessly with the rich and creamy decadence of cheesecake. With a gorgeous red hue and an irresistible Oreo base, this festive dessert is not just stunning; it’s also surprisingly easy to whip up, making it a great choice for home bakers of any skill level. Allow this luscious treat to take center stage at your next gathering, or simply indulge in its velvety goodness on a cozy night. Curious about how to create this show-stopper? Let’s dive into the recipe!
Why is This Cheesecake Unforgettable?
Rich, Bold Flavor: The deep chocolate notes from the cocoa powder blend beautifully with the tangy cream cheese, creating a taste sensation that will have everyone raving about your baking skills.
Gluten-Free Option: With a simple swap of gluten-free chocolate sandwich cookies, this recipe ensures no one has to miss out on its divine flavors.
Stunning Presentation: The vibrant red color topped with creamy frosting is visually striking, perfect for impressing guests during special occasions.
Effortless Baking: Thanks to the straightforward steps and common ingredients, you’ll be a cheesecake pro in no time, just like with our Burnt Basque Cheesecake!
Make-Ahead Wonder: Prepare this dessert a day in advance and let the flavors develop overnight for a truly memorable treat.
Cheesecake Versatility: Feel free to customize with extracts or mix-ins, turning your creation into a unique centerpiece that suits any gathering, just like our delicious Red Velvet Strawberry option!
Red Velvet Cheesecake Ingredients
• Time to gather the essential components for this delightful dessert!
For the Crust
• 30 Oreo Cookies – This forms the delightful base; feel free to swap with gluten-free chocolate sandwich cookies for a gluten-free version.
• ¼ cup Unsalted Butter – Binds the cookie crust together; use margarine for a dairy-free alternative.
For the Cheesecake Filling
• 32 ounces Cream Cheese – The star of the filling, offering luxurious creaminess; light cream cheese is a possible substitute, but the flavor might shift.
• 1 cup Granulated Sugar – Sweetens the filling to perfection; granulated erythritol can work if you're looking for a lower-sugar option.
• 3 tablespoons Natural Unsweetened Cocoa Powder – Adds a chocolatey hint that complements the red velvet flavor; Dutch-processed cocoa can be used as an alternative.
• ⅔ cup Sour Cream – Infuses tang and creaminess; Greek yogurt serves nicely as a substitute if needed.
• 1 ½ teaspoons White Vinegar – Enhances the cheesecake's tenderness; you can use lemon juice if that’s what you have on hand.
• 2 teaspoons Vanilla Extract – Elevates flavor for that bakery-quality touch; consider vanilla bean paste for a richer taste experience.
• ¼ teaspoon Salt – Balances the sweetness beautifully; no substitute needed here.
• 2 tablespoons Liquid Red Food Coloring – Offers the signature red hue of a red velvet dessert; this is optional if you prefer to skip the color.
• 4 large Eggs – Essential for binding the filling and providing structure; flax eggs can be used for a vegan option.
For the Frosting
• 4 ounces Cream Cheese – Necessary for the frosting's creamy base; maintaining the same type as the filling yields the best results.
• ¼ cup Unsalted Butter – Contributes to a smooth and fluffy texture; stick with unsalted to keep sweetness balanced.
Step‑by‑Step Instructions for Creamy Red Velvet Cheesecake with Oreo Crust
Step 1: Make the Crust
Preheat your oven to 350°F (175°C). In a food processor, crush 30 Oreo cookies until they resemble fine crumbs, then mix with ¼ cup melted unsalted butter until combined. Press this mixture firmly into the bottom of a 9-inch springform pan to form a crust. Bake for 10 minutes, then reduce the temperature to 325°F (163°C) for the next step.
Step 2: Make the Cheesecake Filling
In a large mixing bowl, beat 32 ounces of cream cheese with 1 cup granulated sugar using an electric mixer until the mixture is smooth and creamy. Add in 3 tablespoons cocoa powder, ⅔ cup sour cream, 1 ½ teaspoons white vinegar, 2 teaspoons vanilla extract, ¼ teaspoon salt, and optionally, 2 tablespoons liquid red food coloring. Mix until fully incorporated, then add 4 large eggs, one at a time, gently mixing on low speed after each addition.
Step 3: Prepare for Baking
To ensure even baking of your creamy red velvet cheesecake, wrap the outside of the springform pan with aluminum foil to prevent water from leaking in. Alternatively, place the pan within a larger roasting pan filled with hot water halfway up the sides. Pour the cheesecake batter over the cooled crust, smoothing the top with a spatula.
Step 4: Bake
Carefully place your springform pan in the oven inside the larger pan. Bake the cheesecake at 325°F (163°C) for about 70 minutes, or until the edges look set while the center still has a slight jiggle. This means your Red Velvet Cheesecake is close to perfection!
Step 5: Cool
When the baking time is up, turn off the oven and crack the door open, allowing the cheesecake to cool inside for about 30 minutes. After this, let it sit at room temperature for another hour before refrigerating for at least 4 hours, or ideally overnight, to ensure it firms up properly and develops its rich flavor.
Step 6: Make Cream Cheese Frosting
For the frosting, beat together 4 ounces of softened cream cheese with ¼ cup unsalted butter until light and fluffy. Gradually add in powdered sugar until smooth, then mix in a splash of vanilla extract for extra flavor. This creamy frosting will beautifully layer on top of your chilled cheesecake.
Step 7: Decorate
Once the cheesecake has chilled completely, carefully unmold it from the springform pan. Use a spatula or piping bag to decorate the top with the cream cheese frosting. You can spread it evenly or create decorative swirls around the edges for an elegant touch, making your Creamy Red Velvet Cheesecake a truly festive centerpiece!

How to Store and Freeze Red Velvet Cheesecake
Fridge: Store your red velvet cheesecake wrapped in plastic wrap or in an airtight container for up to 5 days, ensuring it stays fresh and delicious.
Freezer: For longer storage, freeze slices of cheesecake in an airtight container for up to 3 months. Allow it to thaw in the refrigerator overnight before enjoying.
Reheating: If desired, reheat individual slices in the microwave for about 15-20 seconds to warm slightly without losing its creamy texture.
Avoiding Freezer Burn: To protect against freezer burn, wrap the cheesecake tightly in plastic wrap and aluminum foil before freezing.
Make Ahead Options
These Creamy Red Velvet Cheesecakes are perfect for meal prep, allowing busy cooks to enjoy a sweet treat without the last-minute rush! You can easily prepare the cheesecake base up to 24 hours in advance; simply follow the recipe and allow the cheesecake to chill overnight in the refrigerator. The crust can be made 3 days ahead and stored in an airtight container to maintain its crunch. When you're ready to impress your guests, just whip up the cream cheese frosting and spread it on top right before serving. This not only saves time but ensures your cheesecake is just as delicious and fresh, making it a delightful option for festive occasions!
Expert Tips for Red Velvet Cheesecake
-
Room Temperature Ingredients: Make sure all your ingredients, especially cream cheese and eggs, are at room temperature for a smooth batter, minimizing the risk of lumps.
-
Gentle Mixing: Avoid overmixing the batter after adding eggs to prevent cracks in your cheesecake. Mix just until incorporated for a creamy, even texture.
-
Water Bath Baking: Always bake in a water bath for the best results—this technique helps regulate the temperature and prevents curdling, keeping your red velvet cheesecake creamy.
-
Check for Doneness: Use an instant-read thermometer to check that the cheesecake reaches 145°F; this ensures it's baked through without overcooking.
-
Cool Gradually: Allow the cheesecake to cool in the oven with the door ajar after baking. This slow cooling process helps prevent cracks from forming on the surface.
-
Flavor Variations: Feel free to experiment with extracts or mix-ins, such as chocolate chips or nuts, to customize your delightful red velvet cheesecake!
What to Serve with Creamy Red Velvet Cheesecake with Oreo Crust
There's nothing quite like indulging in the rich flavors and festive colors of a decadent dessert, and this elegant cheesecake deserves to shine with perfect companions.
-
Fresh Strawberries: The juicy sweetness of ripe strawberries provides a lovely contrast, balancing the richness of the cheesecake.
-
Whipped Cream: Light and airy, a dollop of freshly whipped cream adds a luxurious touch that enhances every bite of cheesecake. It also makes for a beautiful presentation!
-
Chocolate Drizzle: A warm drizzle of chocolate sauce adds an indulgent layer, transforming each slice into an even more decadent delight that chocolate lovers will adore.
-
Mint Leaves: Fresh mint brings a pop of color and a refreshing note that cleanses the palate, making it an elegant garnish on your dessert table.
-
Coffee or Espresso: The bold flavors of coffee resonate beautifully with the chocolate undertones in the cheesecake, creating a harmonious finish to your meal.
-
Ice Cream: Pairing with a scoop of vanilla or strawberry ice cream turns your dessert into a festive treat that feels like a celebration with every scoop.
-
Sparkling Wine or Champagne: A glass of bubbly elevates the occasion, adding a delightful crispness that pairs wonderfully with the rich flavors of the cheesecake.
-
Chocolate-Covered Strawberries: For an extra splash of romance, serve your cheesecake with these delectable treats that echo its luscious flavors beautifully.
Embrace the festive spirit and delight your guests with these sumptuous pairings!
Red Velvet Cheesecake Variations
It's time to get creative with your Red Velvet Cheesecake! Let your imagination run wild as you explore these delightful options.
- Gluten-Free: Substitute the Oreo crust with gluten-free chocolate sandwich cookies, allowing everyone to enjoy this delectable dessert.
- Dairy-Free: Use margarine instead of butter and coconut cream in place of cream cheese for a rich, dairy-free version that doesn’t skimp on flavor.
- Lower Sugar: Swap granulated sugar for granulated erythritol, making this cheesecake suitable for low-sugar diets while still satisfying your sweet tooth.
- Add a Crunch: Toss in some chopped nuts or chocolate chips into the filling for added texture and an extra layer of flavor.
- Flavor Boost: Experiment with flavored extracts, like almond or lemon, to add a unique twist that tantalizes the taste buds.
- Skip the Color: Leave out the red food coloring if you're looking for a more traditional cheesecake appearance while enjoying the delicious red velvet flavor.
- Festive Toppings: Top with fresh strawberries, chocolate curls, or a drizzle of chocolate sauce to elevate your cheesecake to festive heights.
- Layer It: Try stacking this cheesecake with layers of Red Velvet Strawberry cheesecake for a truly luscious dessert experience.
With these variations, your Red Velvet Cheesecake can shine in many delightful ways!
Creamy Red Velvet Cheesecake with Oreo Crust Recipe FAQs
How do I choose the best ingredients for my cheesecake?
Absolutely! When selecting cream cheese, opt for full-fat varieties for a rich flavor and creamy texture. Be sure to check the expiration date; fresh ingredients make all the difference. For the cocoa powder, choose high-quality unsweetened cocoa to enhance the cheesecake’s chocolate notes. If you’re going for gluten-free, look for gluten-free chocolate sandwich cookies—they'll provide the perfect base without compromising flavor.
What’s the best way to store my red velvet cheesecake?
Very! You can keep your cheesecake wrapped in plastic wrap or stored in an airtight container in the refrigerator for up to 5 days. If you plan to enjoy it later, freezing is a fantastic option. Just wrap individual slices tightly in plastic wrap and then place them in an airtight container, where they’ll stay good for up to 3 months. When you’re ready to indulge, thaw them overnight in the fridge for optimal texture!
Can I freeze the red velvet cheesecake, and if so, how?
Certainly! To freeze your Creamy Red Velvet Cheesecake, start by allowing it to cool completely after baking. Wrap it tightly in plastic wrap to prevent freezer burn, and then wrap it again in aluminum foil for extra protection. Place it in an airtight container or freezer bag before storing it in the freezer. You can confidently freeze it for up to 3 months. To thaw, simply transfer it from the freezer to the fridge the night before you plan to serve it—it’ll be deliciously creamy when ready!
How can I troubleshoot cracks in my cheesecake?
The more the merrier! If you face cracks in your cheesecake, it’s typically due to overmixing or rapid temperature changes. To avoid this, mix the batter on low speed and incorporate eggs one at a time, gently mixing until just combined. Baking in a water bath can also help maintain an even temperature. If cracks do form, don’t worry—once frosted, they’ll be beautifully hidden!
Does this cheesecake cater to any dietary restrictions?
Yes! This recipe can be easily adapted to fit various dietary needs. For a gluten-free version, simply swap out the Oreo crust for gluten-free chocolate sandwich cookies. To make it dairy-free, use vegan cream cheese and margarine. For a lower-sugar option, replace granulated sugar with erythritol. Always ensure to check ingredient labels for allergens, especially when entertaining guests with dietary restrictions!
What’s the ideal way to serve my cheesecake for a gathering?
Absolutely! For the best presentation, slice your cheesecake with a warm, clean knife—just dip it in hot water and wipe it dry between cuts. Serve chilled, with a luscious drizzle of chocolate sauce or fresh berries on the side. This will not only enhance the visual appeal but also add a burst of flavor, making your dessert the star of the show!
Creamy Red Velvet Cheesecake: Irresistible Festive Delight
Ingredients
Equipment
Method
- Preheat your oven to 350°F (175°C). Crush 30 Oreo cookies in a food processor until fine. Mix with ¼ cup melted unsalted butter. Press into a 9-inch springform pan. Bake for 10 minutes; reduce temperature to 325°F (163°C).
- In a bowl, beat 32 ounces cream cheese with 1 cup granulated sugar until smooth. Mix in 3 tablespoons cocoa powder, ⅔ cup sour cream, 1 ½ teaspoons vinegar, 2 teaspoons vanilla, ¼ teaspoon salt, and 2 tablespoons food coloring if desired. Incorporate 4 large eggs one at a time.
- Wrap the springform pan with aluminum foil to prevent water from leaking. Alternatively, place it in a larger pan filled with hot water halfway up the sides. Pour the cheesecake batter over the cooled crust.
- Place the springform pan in the oven. Bake at 325°F (163°C) for 70 minutes, until edges are set but center jiggles slightly.
- Turn off the oven and crack the door. Allow cooling for 30 minutes, then let it sit at room temperature for another hour. Refrigerate for at least 4 hours, preferably overnight.
- Beat 4 ounces softened cream cheese with ¼ cup unsalted butter until fluffy. Gradually add powdered sugar until smooth and mix in vanilla extract.
- Unmold the cheesecake and decorate with cream cheese frosting, spreading evenly or creating swirls.

Leave a Reply